
Padme’s Picnic Gown
Source: Star Wars: Attack of the Clones
Made for: Dragoncon 2026
Journal Entries: Read more at my picnic Padme tag
Related Costumes: Padme’s Lake Gown, 2019, Padme’s Packing Gown, Padme’s Battle Suit, Padme’s Loyalist Committee Gown, Padme Tatooine Arrival

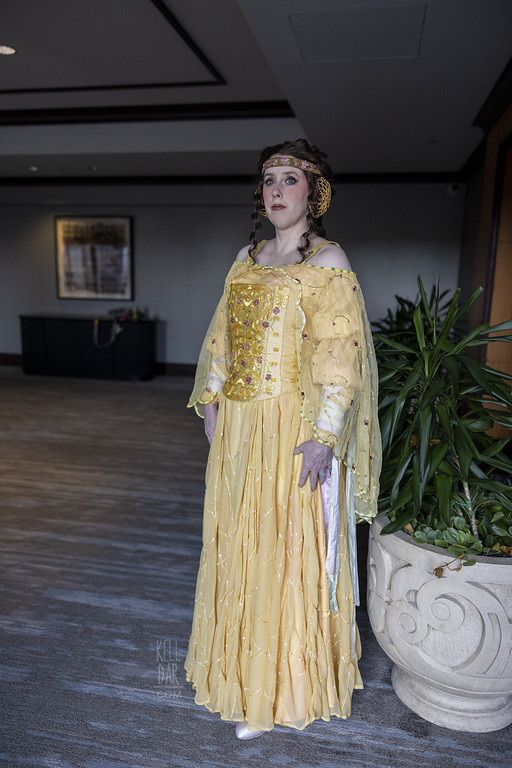
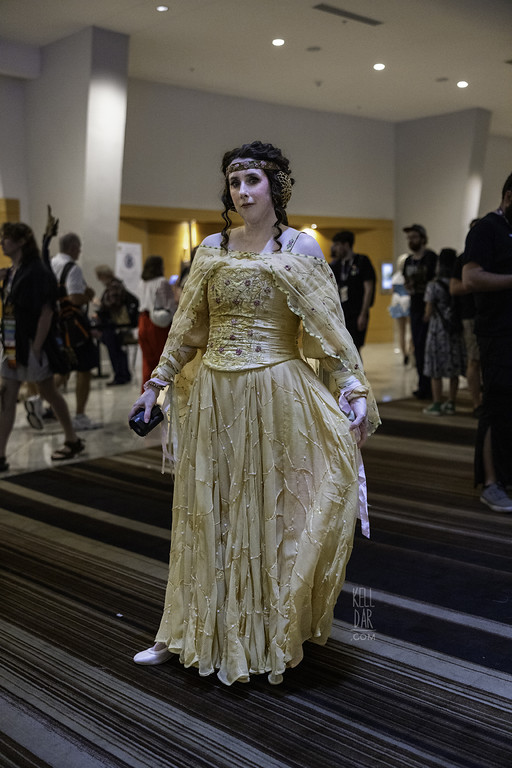
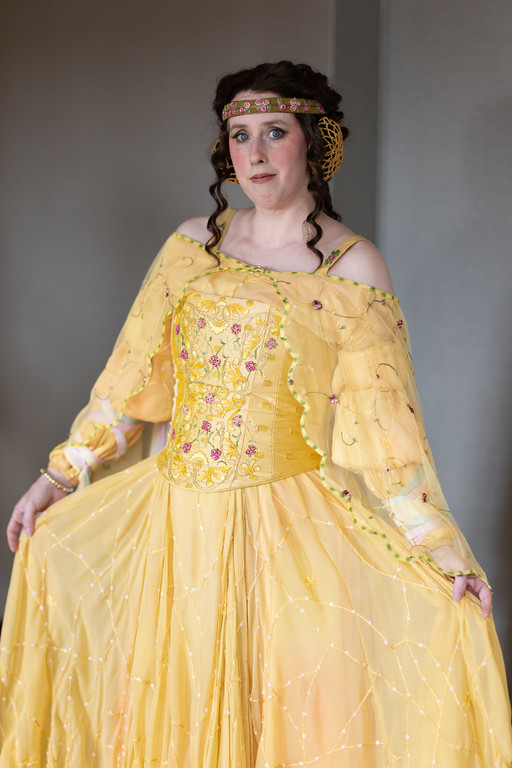
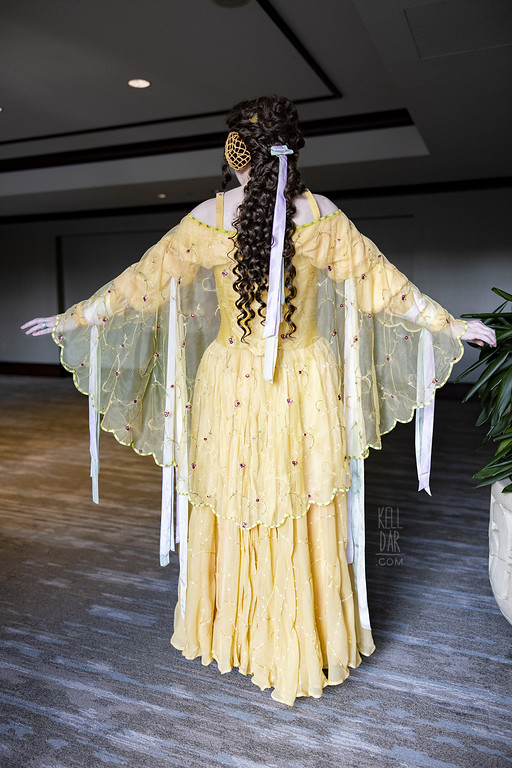
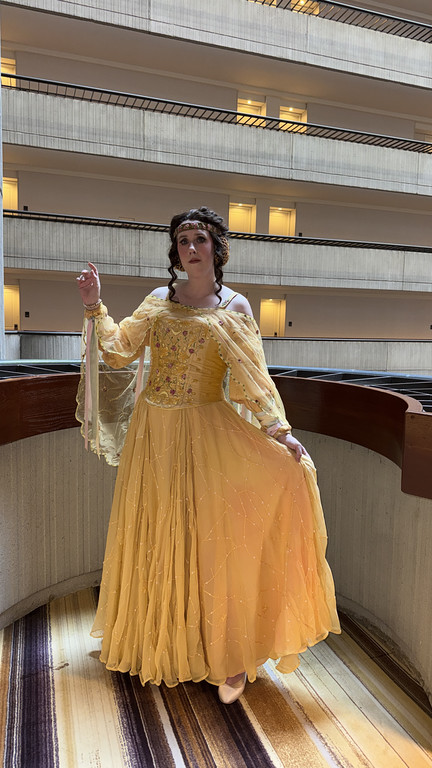
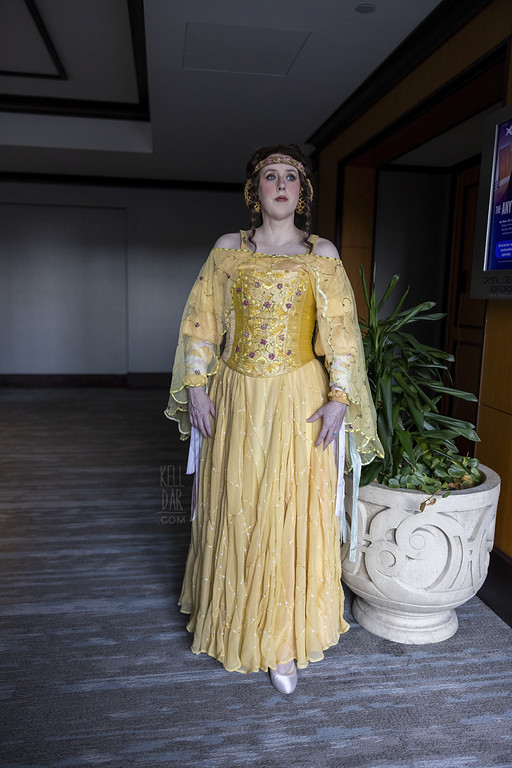

 Patterns Used: Simplicity 5843
For yeaaaars people have asked me when I was going to make this costume, and I was like, “haha maybe one day!” while thinking “I’m never doing that.” Not because I didn’t like the costume – I LOVE it, but I spent 20 years being infatuated and making multiple versions of the lake dress and not paying any attention to all of the research other people were doing on the picnic dress. So I kinda felt like I didn’t know anything about it, compared to so many others, and that made me feel intimidated to ever try to make it for myself.
But now after finally feeling like I made a version of the lake dress I’m happy and settled with, and doing a few other AOTC costumes… and I decided you know what, I’m going to give it a shot.
Fabrics::
My main bodice fabric is a crushed silk in sunstone from Silk Baron. I dyed it slightly more yellow, which is something I saw @mercysong.tardis mention she had done as well. The interior of the bodice is canvas, taffeta and cotton, all of which I had to buy from various places online since Joann doesn’t exist anymore (mad face).
The skirt and blouse fabric is crinkle silk chiffon from Mood in “gold.” The blouse is lined in a silk charmeuse from dharma trading (and my skirt slip is made of the same.) The “curtain” rose netting is from etsy. My ribbons were also from dharma trading.
 Skirt:
I started with the skirt, because I knew that’s where most of the sitting and embroidering work was going to be, and I wanted to get started on it as early as possible. I started out with I think 6 yards of fabric and when it came in I was like, oh that’s not enough LOL. Ordered another 6 and then got to work.
Honestly it was not the cleanest construction of a skirt you’ve ever seen. I started by cutting one circle skirt, deciding that wasn’t enough, so I cut a half circle skirt to add to it, and decided that wasn’t enough, so I added another half circle skirt to that, and then ordered more fabric and ended up with basically, more or less, a triple circle skirt. Because of the awkward way I kept adding to it, I ended up with areas that were way too long and areas that were bordering on too short.
I went ahead and got all of the panels sewn together with french seam. To make sure I was happy with it, I did go ahead and cut out a basic waist band and gathered and basted the skirt to it to make sure I was happy with it before I committed to months of embroidery. I was — and I also decided I wanted to go ahead and hem it. I let it hang for a couple of days beforehand, then put it on my dressform on the table and started pinning up the longer sections to trim. I knew I was taking chance trimming it before doing all this embroidery, but I wanted to protect the raw edge of the hem while it went through the manhandling of hand embroidery. I figured I’d have to revisit it once I was done. I got it all leveled and hemmed it by hand – took 3 days to hem!
 For the embroidery floss I settled on a satin DMC – to keep the satin floss being unruly, I lightly ran an invisible glue stick over it, then a damp towel to get any excess glue off. Then I threaded it into my needle.
As a guide for the “vine” motif, I drew on guides using a brown pencil. It was the best thing I could find that would leave a decent mark that I could see – but also not dark enough that it would be noticeable if any was left. Even though it wasn’t a removable pencil, I did notice it rubbed off as I worked on it, and now finished, pressed, and steamed – I can’t see it anywhere at all.
I worked panel by panel – I started at the back. Laid it out on our coffee table and drew the vines onto the first back panel, then loaded it up into my largest embroidery hoop and got to work. I just did a basic chain stitch. I added the four petal sequins (from Queenssupplycos on etsy!) as I went, and I was a little stingy with them at first – I need to go back and add more.
After I finished the first panel, I went upstairs and pinned it on my dressform to see how it was looking. I saw a LOT of shrinkage which freaked me out. But after steaming it and letting it hang overnight, it relaxed and was back to the length it was originally. Whew. I did stop using ANY tension in my hoop after that — I knew better, I went through the same thing with bespin Leia 10 years ago! I still saw some shrinkage as I went but not as bad as that first panel, and it all relaxed after steaming and hanging.
 So my new few weeks were just nothing but embroidery. I started on it May 21 (much later than I wanted…) and finished the vines July 8. I watched a lot of Rupaul’s Drag Race over those 6 weeks. I also did the embroidery on the 4 bodice pieces at the same time — I’ll talk about the bodice in a bit.
Then it was time for the flowers. I tested out flowers in a few spots. Tested out some stabilizers and didn’t like any of them. I ended up drawing each flower onto a piece of tissue paper, pinning that onto the wrong side of the fabric, and then using that as a guide to do an outline. Then I removed the tissue paper and did the fill in. The tissue paper served as a guide and just the tiniest bit of stabilization while doing the beginning. Using a laying tool was also helpful here.
I didn’t do as many flowers as I should have. I just scattered a few throughout the skirt and bodice pieces, as few as I thought I could get away with – because I needed to move on to the other parts. Added the bead in the center of each and now onto assembly.
I got the back seam sewn up, finished my waistband (canvas, a layer of my silk chiffon on the outside, and some rose fabric from my stash as the lining), and got the skirt gathered the way I wanted and sewn on. Finished the inside edge of the waistband by hand and added hook and eyes at the back.
 Yeah the hem was off after all that. I messed around with a bit — but everytime I moved, the parts that were too long or too short would suddenly shift and be fine. So I decided to leave it. I may look at it on down the road. I may not. We’ll see. Even with the hem, I was REALLY happy with how the skirt turned out – it’s SooooOOOO dreamy.
I decided to do the dyed layer underneath as a separate slip instead of attached to the skirt itself, so I’ll talk about that part in a bit.
Blouse:
I had that old Simplicity Padme picnic look-a-like pattern from the early 2000s (Simplicity 5843) – I got it and looked at its blouse pieces to see if it was usable. The sleeves didn’t seem right, but I did use the body part of the blouse as a starting point for mine. For the sleeves, Kay Dee had a sketch of the sleeve on Padawan’s Guide from back in the day that I used as a starting point. I tested these blouse pieces out in some old scrap chiffon, widened and lengthened the sleeve a bit, and then cut out my real fabric.
 The outer is the crinkle silk chiffon from Mood and the lining layer is some silk charmeuse from Dharma Trading. I dyed the charmeuse lining layers beforehand – just spraying them with pink and yellow dye from a spray bottle. It was a little messy, but it’s never going to be seen, so who cares.
Once I had the vine and flower embroidery done, I got it assembled — I started with the sleeves so I could inset some elastic in for the gathers. Got everything sewn together, and added the straps – made of a piece of taffeta leftover from Belle and a layer of the chiffon. The end of the sleeves I gathered to fit, and then trimmed in some scrap silk charmeuse leftover from Lady Jessica. Added a button and loop closure. I also added a wide piece of elastic at the bottom of the blouse to keep it in place while putting the bodice on.
Bodice:
For the bodice I did actually start with the bodice pattern pieces from the Simplicity pattern — but I changed it quite a bit, almost to the point of “why did I even start with the other thing” LOL. I changed the length, the shape of bottom, the shape of the top, and added another seam in the front.
 The interior I made of a layer of canvas, and a layer of taffeta – originally the taffeta was going to be the lining, but I ended up adding a 4th layer of yellow cotton instead because I thought it matched my outer silk fabric better, in case it was visible. Once I had those interior layers assembled, I added spiral steel boning, and I also went ahead and added eyelets, since the outer layer was going to have a separate closure over the top of the eyelets.
As I mentioned at the start, I did dye the silk fabric to be a little more saturated. Once that was dry, I got it cut and assembled, and I pinned it onto the bodice interior just to see how things were looking with the skirt.
Now the scary part I put off for weeeeks — doing the little cut-outs on the outer layer. I reallly didn’t want to do it and thought about skipping it – but I do think it adds something to the overall texture of the bodice and I wanted that. So I made myself do it (though, I did only do it to the side seams. I didn’t do it on the back). I went through several ideas of how to reliably do this without destroying my bodice layer. This was my process I finally landed on – I had Chase cut lots of little squares of sticky back stabilizer me to start with. I applied those to the wrong side of the fabric shell while it was laying flat, using a ruler to help me get them placed evenly. Then I pinned it to my dressform and eyeballed it, adjusting any squares that just looked off.
 Once that was done, I traced around each of those stabilizer squares with a pencil, so I had a guide drawn on the back side of the fabric. I removed each square of stabilizer, and use my sharpest, smallest scissors, cut an X to each point of the square. Using Aleene’s Tacky Glue (applied VERY thinly with a paintbrush around the edges of the drawn square), I folded the triangular pieces back – the glue held those foldbacks in place until I could sew it. I added small cut squares of gold taffeta (leftover from Belle last year) over the backside of the cut out, and then from the front, stitched it all into place in the corners. I also added a tiny dab of the Aleene’s Tacky Glue to each corner just to make sure nothing would fray.
At this point it was done… and I started second-guessing myself. I decided my silk layer was too thin, and I ended up TAKING IT APART (with all of those little cut squares already done!), and flat-lining each piece in the same taffeta I used behind the cut outs. Then I reassembled it. Thankfully it went back together ok but that was scary after doing all those cut-outs LOL. I’m glad I did it though.
 For the embroidery motif on the front, I pulled all of the good reference photos I had into photoshop and drew up a guide. I printed it out on normal paper a few times to check the sizing, and once I was happy with it, I printed it onto some sticky back stabilizer and stuck it to the wrong side of my silk layer.
Now we begin my couch-camping and Rupaul’s Drag Race marathon part 2. I started with the metallic gold sections and did a chain stitch. Next I did the leaves, then the yellow to orange fill-in sections. This was all very satisfying and much more enjoyable to do than the endless, mindless chain stitch on the skirt. Last thing I did were the roses, which were a pain but they turned out OK-ish. It took me just under 2 weeks of nonstop work which was more than I expected. (I also do have to admit that my whole embroidery front panel is slightly off center. Despite measuring and marking the exact center before placing my stabilizer guide, it somehow ended up with the center of the embroidery off center. Oh well.)
Once the embroidery was done, I got the shell sewn to the interior layer at the top and bottom, flipped it rightside and pressed it. Then I finished the back edges and got it all marked for a closure. I flip-flopped on what I wanted to do, but finally just decided to do a row of snaps. That would hold well and be easy enough for Chase to deal with – more than hook and eyes. I had him lace me up and then mark the snap placements for me with chalk. Got those sewn on and thankfully it all worked fine and didn’t need any adjustments!
 The Cape:
Oh lord so I left the cape for kinda the last minute. I got my fabric and it just sat in a bin for like 3 months before I finally got it out with like 2 weeks before Dragon Con. I drew up a basic pattern based on the one I did for my disneybound last year – just adding the scallops this time. Printed it out tiled and taped it together to hold it up to my dressform to check the sizing. Did a fabric mock-up with that out of some scrap cotton – all looked perfect. Thank goodness. Didn’t have time for disasters at this point.
So next I needed to dye it. Thankfully I had JUST dyed this same stuff for the disneybound last year, so I knew I needed some yellow AND some orange to get the warm tone I wanted. Got my dye pot boiling, put some dye in, tested it on a corner and it was WAYYY too orange. Ugh. Dumped it out, but I had no more orange DyeMore. I had to doordash some LOL (And like 2 hours after I paid extra to have a bottle of dye doordashed to me from Michael’s, Chase decided he needed to go to Michael’s.) Mixed up a new batch, tested it, looked ok this time so I got it dyed. I let it dry overnight, decided it wasn’t dark enough, and did a second round.
 Once that was dry and steamed, I got my cape cut out using my paper pattern. Then I tested out the way I wanted to do the edge finishing with some scraps — I wanted to use the largest satin stitch I could from my sewing machine, but I needed to figure out how to stabilize it. I tested it out with all of the various stabilizers I had on hand – and nothing but my HEAVIEST sticky-back (non wash out) stabilizer would keep it from curling up on itself. So I decided I would just have to live with the sticky back in there permanently.
I cut my stabilizer into the scallop shapes and applied it to the ends of the cape, then sat at the machine for an hour guiding along pencil markings I’d made for where the edge should be (I cut my cape bigger than needed so I could just cut away the excess once the stitching was done.)
It did not go smoothly — in a few places my machine refused to advance and I had to coax it through and I ended up with some bald spots. It was REALLY hard to patch those. I also ran out of thread and had to rethread everything halfway through. But we did it. It was fine. I pinned it on. All was good.
 Went to the craft store to get some paint to paint the green stripes on, and looking at references in the store… that’s when I realized… the capelet meets in the center front. It MEETS in the CENTER FRONT. Guess whose capelet DID NOT meet in the CENTER FRONT? Mine!! Because I used my stupid disneybound pattern that stopped at the straps!
So here I am thinking I’m going to have to spend the entire next day redoing this damn thing. I had enough fabric — but it was the time that was the issue. It took forever to apply all that stabilizer, sit there and guide it all through the machine, and then pick off the excess stabilizer.
After sleeping on it, I went and reviewed it the next morning, and THANKFULLY I had left all that excess on the edges, and I hadn’t cut any of that away yet. I had enough excess to make two more scallops which was just enough to now meet in the center. Yay! But… that meant I had to unpick the first two scallops’ edging and try to patch from the stopping to add these new scallops. It was not pretty… but I got it done. It’s functional. I got the edges painted (and hate where I started at the center back — it’s too saturated) and stitched on, and called it done.
 I plan to remake it in the future, since I do have plenty of fabric left. I think after experiencing it once and knowing the pinch points, I can do it much better a second time around. But didn’t have time for that before Dragon Con, so version 1 it is.
Accessories:
As I mentioned above, I decided to make the second dyed layer of the skirt a separate slip. It’s made of the silk charmeuse from dharma, and I dyed it with pink and yellow dye from a spray bottle. It is NOT my best job dye, I was trying to be fast to avoid mosquitos in the back yard LOL.
After I got it dyed, I rethought it. Originally I was going to be just doing a gathered elastic waistband. I ended recutting those original panels to be more triangular and less rectangular so the skirt would be more A-Line (less bulk at the top), and I bought some more fabric to add more panels. Got those dyed, got it all assembled and hemmed. It DOES have an elastic waistband, but it’s not so bulky as the original rectangular pieces.
 For the shoes, I just rewore my Padme lake dress shoes. Would like to find something else in the future, but for now, these were fine.
My wig is from amazon – it’s the one I got for my Padme veranda nightgown in 2020. I added the buns – made out of some loose hair I had sewn into a brown hairnet) and stuffed them into my snoods (made by LadyMcSnood on etsy!). Then I sewed those onto the sides of the wig. Pulled it back into a ponytail and added the headband and ribbons.
Speaking of, the headband ribbon is from a run by @accordingtomichele in the Padme facebook group. I sewed them together at the center, and then added my roses. I did my roses separate — I did them all on some netting leftover from wedding Leia, with some water soluble stabilizer behind it. Drew my guides on the stabilizer and embroidered them on — soaked the stabilizer off and then trimmed away the excess netting. Sewed them onto the ribbon. This was they are removable if I decided to redo the roses in the future. (I did the roses on the straps the same way, but on the yellow netting from some scraps of the cape).
 The satin ribbons in the hair and on the sleeves are from Dharma Trading. I used 3 spools — dyed one yellow, half of one a pale green, the other half a darker green, and the last spool half was pale pink, and the other half a darker pink. Once they were dried and pressed I started cutting them into the lengths I needed. I was disappointed to find the green spool had two joins in it — one where it was just tied together that I couldn’t untie and had to just cut out, and another where it was stitched together in a really ugly way. I couldn’t work around that one, so I just placed it in the back for now until it can be replaced.
For the upper arms, I just made a bundle and sewed them together — and they snap into place under the sleeve blousing. The lower wrap-around section also snaps on — then has to be wrapped around my forearm by somebody else, I can’t do it. I was really hoping to find a way to make these static so I didn’t need help putting them on, but I didn’t have time. Once wrapped around they thread through a loop of embroidery floss and tie together. The last section I sewed together and around a hair barrette for the back of the hair bun.
 Not completely happy with the ribbons, because they were the LAST thing I was doing like 2 days before we left for Dragon Con. I think my dye is a little light on all of them, they tend to photograph almost white – and I think they are slightly too wide. But that’s something to figure out later.
Lastly, my dragonfly pin is also from Queenssupplycos – they sent it with my sequins! So glad I didn’t have to figure that part out LOL
History:
It was really kinda surreal to put this on in my sewing room because like I said at the start, I never thought I would do this costume, and I kinda slept-walked through the construction because of some real life crap going on. Seeing myself in it was like suddenly waking up and being like holy shit where did this costume come from?? LOL
I didn’t get to wear at Dragon Con as long as I would’ve liked — and I’m not really enthused with most of my photos, I should’ve find a different area and spent more time on getting some good photos — but I did also think i was going to rewear this later in the weekend, and I didn’t. Really kind of a bummer to spend 6 months on a project and not like any of the photos! But that means I just gotta wear it again soon.








Please note that none of these costumes are for sale! This is my personal portfolio.