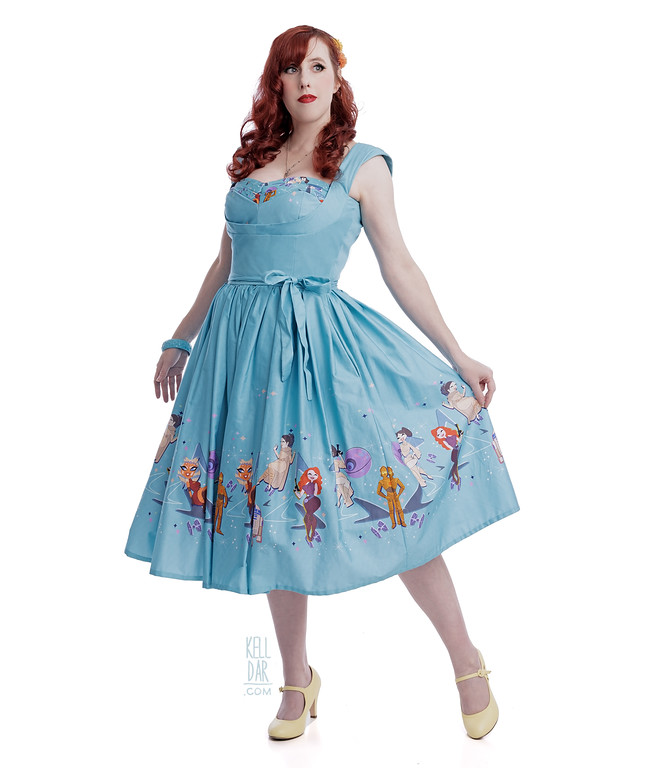
Retro Star Wars Dress
Made for: Disney Trip 2024
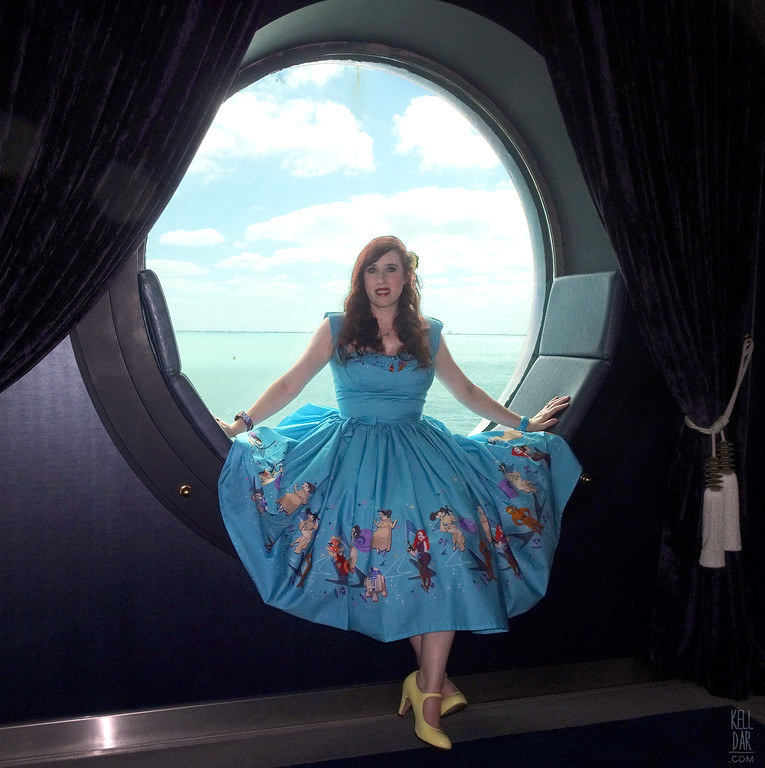
Journal Entries: Read more at my Cruise Dress tag
Related Costumes: Skeleton Dress, Haunted Mansion Dress, Dapper Day Leia, Dapper Bespin Leia
![]()

![]()
Patterns Used: Charm Patterns Liz Dress
The Fabric:

I bought 2 yards of this Atomic Retro Star Wars Girls fabric last year during knitorious fabrics’ May the 4th run. I’m completely obsessed with it. At the time I had no idea what I wanted to do with it, so I just got 2 yards since it was pricey. I thought maybe a skirt? I decided to ruminate on it for a while, since I knew I wasn’t going to be touching it for at least a few months, I’d be dealing with dragoncon rush and I could look at it later in the year.
Eventually I decided actually I want to make a dress, not a skirt. Everytime I make a skirt I don’t know what to pair with it, so I want to go ahead and do a full dress. I decided since I only had 2 yards I could buy complimentary fabric to have enough to make a full dress.
The Pattern:
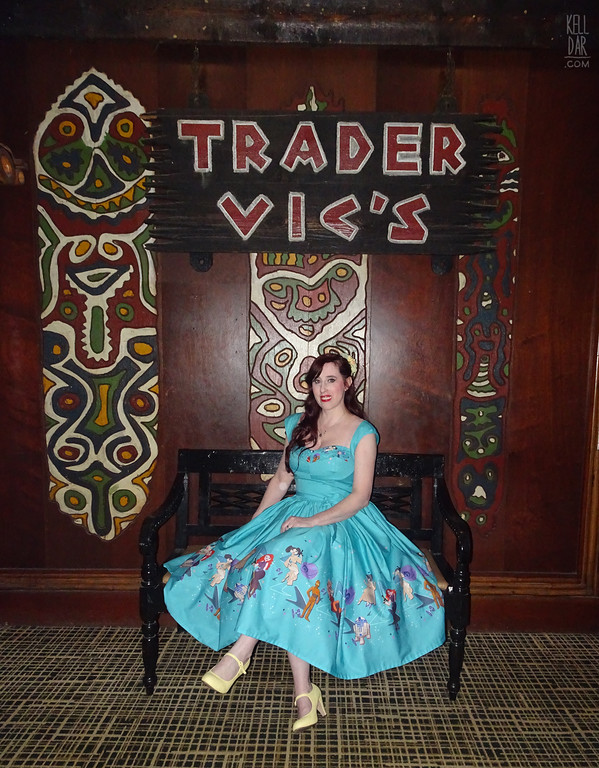
But what dress? I just kinda kept my eyes peeled for a while because I wanted something SIMILAR to my Disney Tiki bird dress, and at last stumbled across Charm Patterns’ Liz dress and it was decided.
Bought the pattern and set aside for the rest of the year while I finished other stuff. Finally around New Year I got it out to start doing a mockup.
Before I dig into the actual sewing section here, I need to put out a disclaimer that I misunderstood/mis-read the way this pattern went together. And allllll of my fitting problems with the mockup and actual dress came from that. I read too fast to always digest information correctly, this is why I struggled in school LOL
The Mock-up: The instruction book this pattern came with was incredible; an area to write your measurements, a fit guide, illustrated steps, optional upgrades, etc. I loved it!
So like the instructions suggested I started with a mock-up. Just some scrap pink fabric. I got all of the bodice pieces cut and just kinda skimmed over the instructions and put them together the way I thought was correct.
And I ended up with a bodice mock-up that fit fine through the waist but had room in the bra cup section for… like… the boobs of a giant.
The fit guide said I may need to size down in the cup size, so that was the first thing I did. Then I went back and skimmed over the instructions for the underbust band/strap and realized I did that wrong, so I reassembled that part, and made the new smaller bra cups, and with a little adjusting that seemed to work out well enough that I thought I was good to move onto the real fabric.
(Spoiler alert: I did NOT have it figured out.)
The Fabric, Part 2:

So I’d gone to the fabric store to get all the extras I’d need, lining fabric, zipper, etc. And I’d also picked out a blue cotton that was fairly close to some of the blues within the design elements of the fabric – basically like a darker teal.
I thought I was all set. I went ahead and cut my Star Wars fabric in half to create the 2 lengths for the skirt, got that pleated and hung on my dressform, and then draped the coordinating teal fabric on the top of my dressform to get an idea of how it would look… and I hated it. It just looked wrong.
So in panic mode because we’re now a month out from the trip and I don’t have enough fabric to make it look decent. Do I just put the project on pause? Do I try to dye some white fabric to match the Star Wars fabric?
I decided to go with option 2. I put in a pick-up order a Joann for some dye and white cotton. A few hours later my pick-up order was canceled. No idea why, if they were out of something or it was the impending winter storm… I swear my Joann pickup orders are only successful about half the time.
But anyway – it was fate that canceled that Joann order. Because that’s what caused me to go check the knitorious fabric website again. I had just assumed that OF COURSE they wouldn’t have anymore of this fabric, it’d been a preorder after all. But in my desperation after the order was canceled, I just went to see if they had any of the alternate versions of this fabric, even if it was in a fabric I didn’t want, if they had ANYTHING that would work…
And they did! They had cotton of the single pattern IN STOCK, EXACTLY what I needed. I ordered 2 yards and crossed my fingers. I decided the fate of this dress lay with knitorious fabric and USPS at that point, if it came quickly I’d be able to finish the dress, if not, then I was meant to do this project later.
And thankfully it shipped same day. It did get stuck for an extra couple of days due to our snowstorm, but it did show up about a week after I bought it, and I was finally able to swing into action.
The Real Deal:

Got the bodice section assembled. Got the lining for the bodice section assembled.
The pattern instructions had an optional guide for adding boning, which I did decide to do. I’d just gotten a new stash of boning so why not, it always helps my posture. I used some bias tape to sew on the boning channels to the lining layer and got the boning cut and inserted.
Next I got the underbust band/straps assembled and sewn on to the outer layer of the bodice section – easy enough, I thought (I was wrong).
Then it was time for the bra section. For the pleated section at the top, I used some of the knit version I had of this fabric – it had a smaller version of the design on it, so I thought it would look better than the wider-spaced large version of the design I’d used for the skirt. I interfaced it to keep it from stretching, got it pleated and sewn onto the upper band of the bra. Got the rest of the bra section assembled, and the lining layer also. Got them sewn together and pinned into the top of the dress.
One thing I did struggle with with the bra cups was the fact I’d used that knit for the pleated sections. It was just a much thicker fabric than the cotton, so the seam that goes horizontal across the bust just never wanted to lay right. It always looked lumpy. I took the cups up a bit, notched that seam as much as possible, pressed the hell out of it, finally got it to where it was passable (more on this later).
At this point I went ahead and pinned in the zipper so I could try it on. The bra section was still just sitting so weird and so far out away from my body, so I looked at the fit guide again. Didn’t really want to add a dart to them, so I opted to just pull it in at the sides. Did that it worked fine. The cups still looked a little wonky, but at least it wasn’t gaping at the front anymore. I trimmed off the excess from the bra cup sides and went ahead and basted the bra into place.
Next up was installing the lining. I went to pin it and… it just did not match up, at all. I could NOT figure out why. It was late at night while I was trying to do this, so I decided I was just tired, I’d come back and look at it again in the morning.
The next morning, first thing I did was look at it all on my dressform and it just. didn’t. look. right.
I picked up the pattern envelope to go back over the instructions and see if I missed something, and when I did, I looked at all the photos of the dress on the back, and thats when the light bulb finally turned on. Flipped back through the instructions to see if I my thought was correct, and … it was.
So this entire time, through the mock-up and the real deal, I’d been sewing the bra unit onto the underbust/strap piece. THAT’S NOT WHERE IT GOES. The underbust/strap piece is supposed to sit ON TOP of the bra unit (which is what I noticed looking at the photos of the dress on the envelope). That’s why the edge is finished!! This entire time I’d been sewing it onto this finished edge, when it was supposed to be a seam down and over – attached to the UNDERBUST seam of the bodice!
No wonder the bra unit kept coming out too big!! It was sitting a good 2 inches out from where it was supposed to! I wish the light bulb had clicked on sooner, but alas. At least I did figure it out at some point.
So looking at the bra unit I’d already made – and already cut down to fit into the wrong seam. I decided to just scrap it and make a new bra unit. I spent that entire day re-cutting and re-assembling new bra pieces.

This time around, with the bra now sitting in the right place, I didn’t have NEAR as much trouble with the bra cups looking wonky. I did still have some issues with the thick knit fabric at the horizontal center bust seam. Decided to try another thing the instructions suggested – inserting foam bra cups. I’d JUST bought a new bra that had foam inserts I’d removed – so I grabbed those and tacked them in between the outer layer and the lining. That added structure helped, along with pressing that seam DOWN instead of open over my tailor’s ham.
New bra unit finished, I basted that into the RIGHT seam this time. Now back to the lining, and now that I was pinning that into the right place as well, it matched up fine!
I basted the lining in just to double check, then sewed it on. As the pattern instructions warned, this really was the most difficult part of the pattern, especially working around the straps. Basting helped – I did my hand basting in a different coloured thread so I could just follow that exact line with my sewing machine. I did still have areas that needed tweaked – again, especially around the straps, but after a lot of back and forth it came together. Got the inside seams trimmed, notched, understitched where I could and pressed.
Pinned the zipper in again to try on and it looked great. At that point I felt like I’d won a battle! LOL
Now I could finally move onto the skirt.
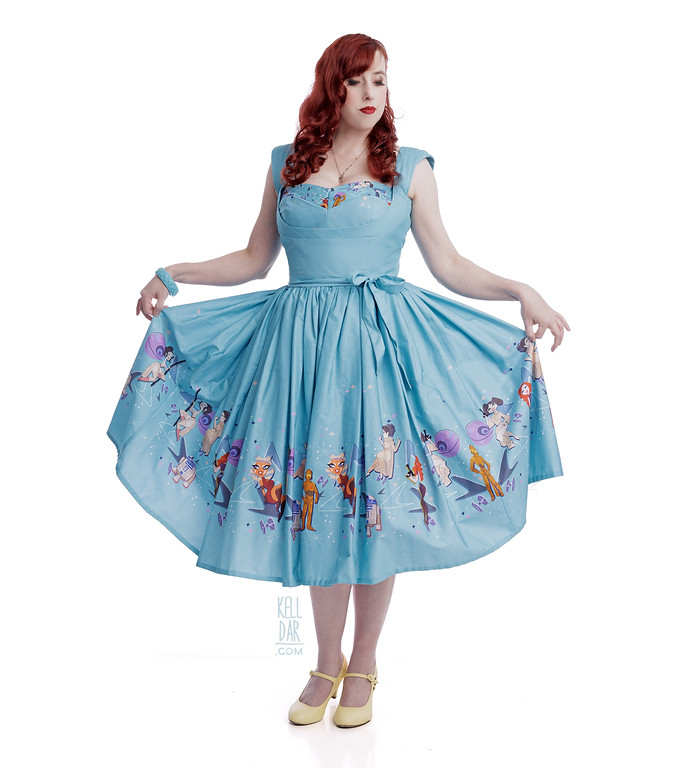
I did not use the pattern pieces for the skirt, since they had a curved edge which wouldn’t work with the fabric’s design. Instead I had just cut the fabric into 2 big rectangles so the bottom edge would be straight.
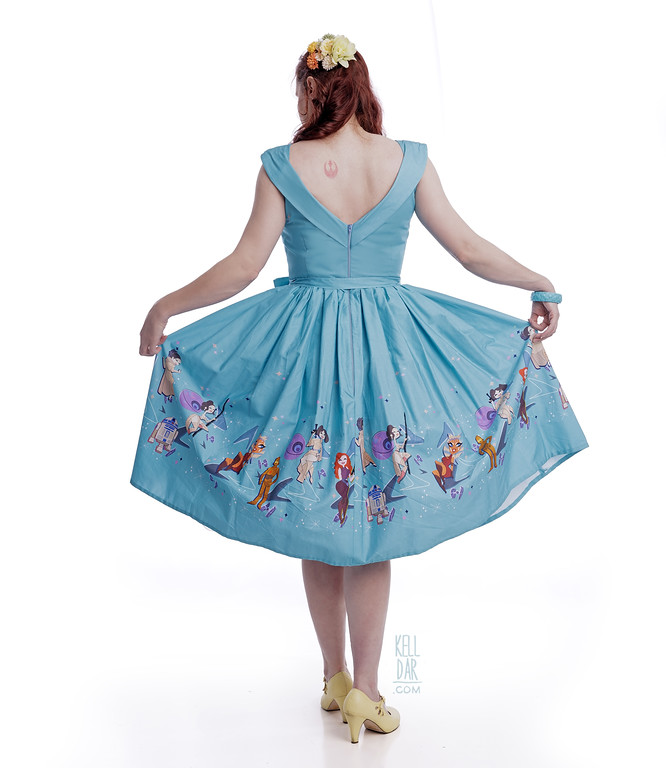
I took my 2 big rectangles and marked the pocket guides and zipper markings off the pattern pieces onto the fabric. I cut the back rectangle in half, so I could have a seam in the center back for the zipper. Ironed on interfacing at the zipper opening as the pattern instructed.
Got the pockets sewn on, and the panels sewn together. Then I gathered the top edge, got it pinned onto the outer layer of the bodice, and then machine sewed it in place.
(Skirts are so much fun, they go together so quickly but it’s such a big “area” of a costume/dress it makes you feel like you’ve accomplished a lot in a short time!)
Next up I installed the zipper. I did skip the lapped zipper here; at this point I was nearing the end of a marathon weekend of working on this and just didn’t have the bandwidth to learn something new. I just sewed the zipper in as normal, trimmed the seam allowance underneath so it would stay under the zipper, and then whip-stitched the interior edge of the zipper to the lining.

Next was the skirt hem –
this fabric having a white edge along the bottom was very helpful! I folded it up once so the white edge was tucked just into the inside, and machine sewed that in place. Then folded it up once more to hide the raw edge, and finished that by hand. I sat and watched the Grammys while finishing all the hand work!
I also finished the inside waist edge of the lining, folding it over and whip-stitching it to the top edge of the skirt to hide the raw upper edges of the skirt. I also reinforced the straps at the join points of the bodice.
And with a week and some change to spare, she was finished. WHEW.
So after I corrected MY dumb mistake assembling this pattern, the dress went together like a breeze and I really fell in love with this pattern. I want to make another dress with it! Next time some cute fabric comes my way! And another Charm Patterns one day too!
Accessories:
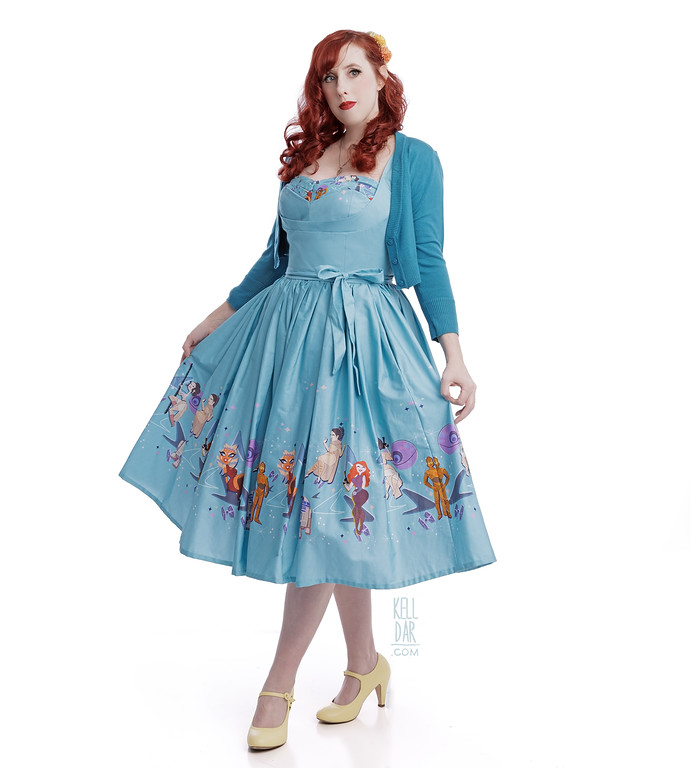
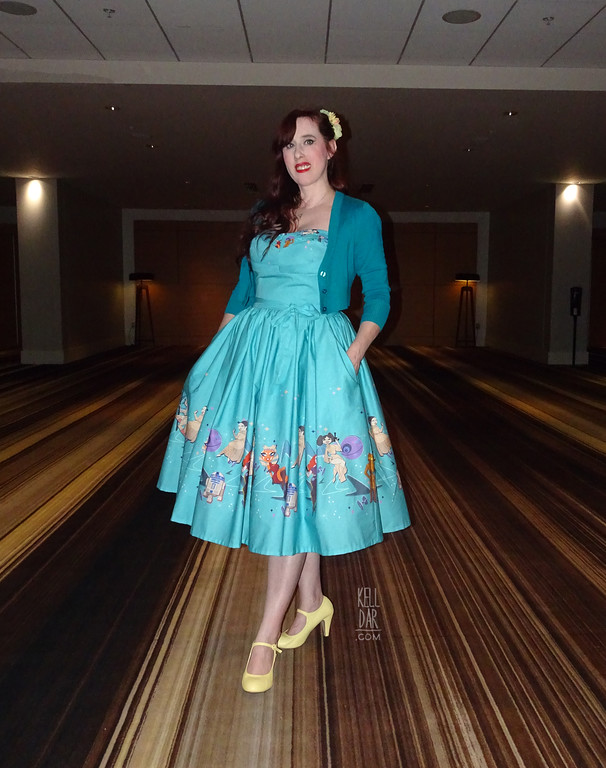
I bought some little clip on flowers to wear in my hair, paired with a petticoat I bought on amazon, and the shrug and shoes I wear with my Disney Tiki Bird dress. I also bought some really cute sunglasses in New Orleans to wear with it, wore them on the cruise, and have apparently lost them in between. Can’t find ’em anywhere. Boo.
![]()


![]()


Please note that none of these costumes are for sale! This is my personal portfolio.