The Skeleton Dress
AKA – Part 1 in Recreating the Tiki Bird dress.
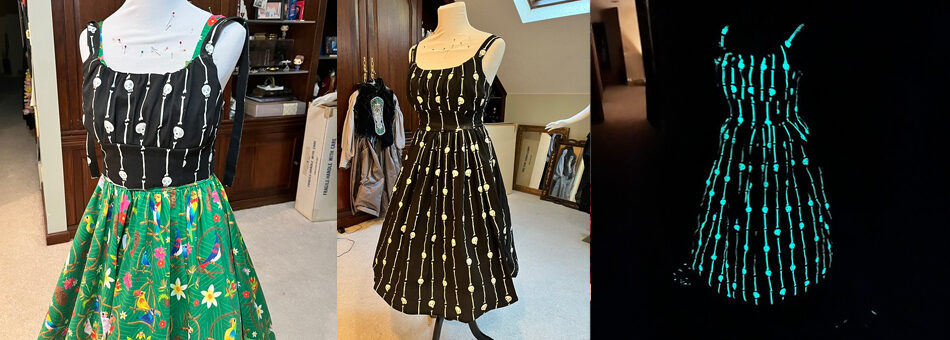
so back in 2017/2018-ish, I bought the tiki bird dress from Disney’s dress shop:

And I have been obsessed with it ever since. I LOVE how it fits me, it’s so comfortable and cute, it has pockets, the fabric is so nice. I tried on several more of the disney dresses in following years during trips and just didn’t love them as much. The tiki bird dress was “peak dress” for me.
I’ve thought about trying to recreate in the past, but I’ve never had a fabric that fit the bill, until this year. I ended up with not one but TWO fabrics I thought would look great in this style.

The first of these fabrics was a black and white skeleton print I got at Joann in August. I thought it was weird an entire bolt of Halloween fabric was already on clearance in August, but I quickly snapped up a few yards and put away for future use. The second was a much more expensive Star Wars fabric which we will talk more about in the future (that will be Part 2 in Recreating the Tiki Bird Dress). Since the Star Wars fabric was so expensive, I decided to play around with the cheaper skeleton fabric, make a Halloween dress, and see how it turned out – and then edit things from there for the more expensive Star Wars fabric.
for this version, I decided to modify a pattern I already onhand – Simplicity 8127:

Was it a good dupe for this? Not really. It looks so close but I basically ended up using none of the pattern pieces “as-is.”
But to start off, I put the tiki bird dress on my dressform so I could compare the pattern pieces to the shapes on the existing dress, then used some scrap fabric to test them out.

for the ruched bodice piece, I slightly changed the shape here to include the raised points for the straps, since the Simplicity pattern was just a straight across neckline. Also widened it a bit so I could get more ruching in.

I used the upper part of the skirt pattern to create the lower bodice/waist area portions. I knew from the start I’d have to edit this section because I absolutely wanted a waist seam.
For the back panels of the dress, I took the pattern piece and laid it over the back of the tiki dress – it was close, but too short, so I traced the original pattern piece and lengthened it to match the panel on the tiki dress.
And then the Simplicity pattern didn’t have a lining layer, I think it was just a facing? (Don’t quote me on that, I didn’t look too hard), but I definitely wanted the bodice to be completely lined. So I essentially traced the inside panels of the tiki dress behind the ruched layer to make pattern pieces for that, and then just doubled the lower bodice/waist area panels and back panels.

Finally time to dig into the real fabric!
Funny thing – in between buying this fabric and using it, in my head I had thought it was cotton. But when I got it out to start using it, I realized it’s actually a stretch knit. Not the greatest choice for this style of dress, but i was already committed so I went ahead. I figured it’d be nice and comfy at least.
Got the ruched area cut and gathered — to gather it, I pinned it onto the dressform over the tiki dress and gathered it enough so it would match the length of those panels correctly. Got the waist area sections sewn together, and sewn onto the ruched panel.

For the skirt panels, i just totally skipped the Simplicity pattern’s pieces. I measured the length and width of the tiki bird dress’ skirt panels, and just cut 3 squares (1 on the fold for center front). I also decided to add pockets, and again laid the tiki bird dress out, traced the shape of the pocket from the inside, and used that to cut out 4 pocket panels. Got those sewn to each side seam, then sewed all together.

Back to working on the bodice – needed to get this more done before I could finish the skirt. Got the back panels sewn on, and got the lining layers put together. i DID use the simplicity pattern piece for the straps, got those made and pinned on so I could start trying this on me.

Got the lining layer sewn onto the top edge and flipped over and straps sewn onto the front, but not the back yet. This was now close enough I could attach the skirt – got it gathered at the top edge and sewn to the bodice. It’s not sewn up up the back seam yet – i like to do that when I install the zipper.

Surprise! It glows in the dark. I completely forgot about this until the first night I walked into my sewing room without turning the lights on and was completely confused what all of the little dots of light all over my floor were – it was scraps and bodice pieces laying everywhere LOL
Next step was getting the zipper in – and guess who somehow misplaced their zipper foot. I attempted this with my standard foot and it wasn’t great but it was functional. Then got the back seam sewn up, and also top stitched around the zipper.
At this point all that was left was to finish the lining on the inside, hem the skirt and sew the straps down in the back.

And it was at this point I ran into problems. Remember how I said I was confused why halloween fabric was on clearance in August? I think I figured out why. This fabric is awful. Like I said, it’s a stretch knit – but everytime it stretches, the black ink on the top layer “cracks” and you’re left with white whiskering in that area – it does not look great, and the more that area is stretched or manipulated, the worse it gets.
So I tried it on that point and realized it was too big. I had to take up all of the waist seams, which meant unpicking the skirt, taking up the seams, and then resewing the skirt on. And all of that manipulation caused a lot of that “whiskering” to develop. Then to top it off when I thought i was done, I flipped it over to inspect and realized I’d pinched the fabric in 2 places when sewing the skirt back on. Had to unpick it and resew again, making it all worse.
I saw a few spots where I would’ve gone back and done a little more dialing in on the fit, but at this point, I decided it was time to just let it be. I got the lining hand-stitched into place on the inside – it’s also not perfect, I had to take it up as well. Then I did the hem by hand, and it ended up being a little uneven in places – if this were a normal fabric, i would’ve unpicked and redone those areas but at this point, I’m done manhandling it.

It’s just going to be what it’s going to be. It was just a project for fun, so I’m not going to overstress about it, and I learned a lot of things to think about when I move onto the more expensive fabric in Part 2.
I plan to wear this to a halloween event mid-October, so I’ll come back and add some photos of me in it as soon as I can.

Edit: And now we have pics!