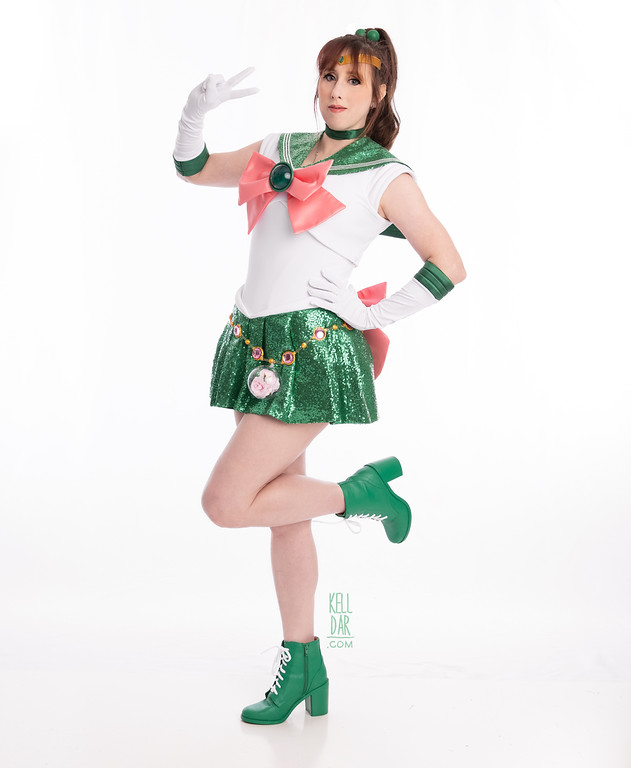
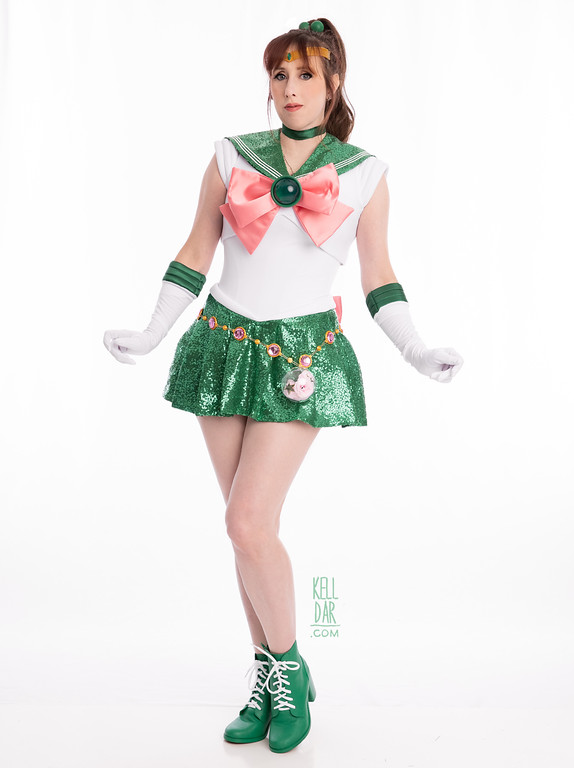
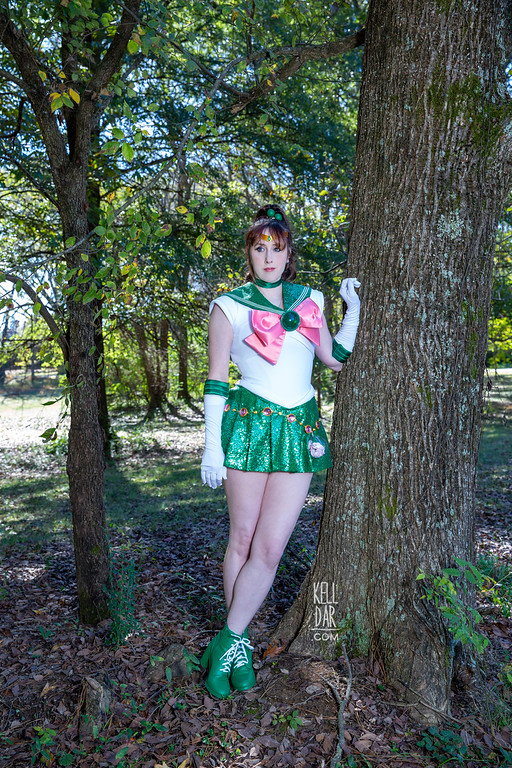
Sailor Jupiter – Shining Moon Tokyo fuku
Source: Sailor Moon Shining Moon Tokyo
Made for: Halloween 2020
Journal Entries: Read more at my Sailor Jupiter tag
Related Costumes: SeraMyu Sailor Jupiter, Eternal Sailor Jupiter, Super Sailor Jupiter
![]()
![]()

Patterns Used:
Green Pepper 517 – Basic Leotard
Simplicity 8160 – collar
McCall’s M7455 – chestpiece and glove puffs
Simplicity 1092 – heavily modified for sleeve puffs on leotard
My first Sailor Jupiter costume was made for Halloween 2000 – I thought it would be fun to make a new version for the 20th anniversary, Halloween 2020. I decided I wanted to base this one on the Shining Moon Tokyo fukus, because I love that sequin fabric!!
Fabric:
Sequin fabric from etsy, white milliskin fabric from fabric wholesale direct (leotard – buy extra for lining, it’s thin), white neoprene (puffy parts), green taffeta (lining) and pink satin (bows) from fabric.com.
Leotard:
I’d been wanting an excuse to buy Green Pepper’s leotard pattern – I really like Green Pepper’s patterns and this seemed like a good solid multi-use pattern to have in the arsenal. Overall, I really liked this pattern – it went together really easily and looked nice. I did self-line it, partially because that’s my preferred method of making a leotard, but also because my milliskin fabric was very thin so it needed to be doubled.
The only major deviation I made from the pattern was to add the puffs at the sleeves. I started with the sleeve puffs from Simplicity 1092 as a basis, but they were HUGE… I worked the shape and size down to closer to what I needed, going through 3 mock-up phases until the last version looked nothing like how it started LOL. I sewed channels into these shoulder puffs, then worked neoprene tubes into them to create the puffed sections. I just cut long segments of the neoprene, about 1.5 in wide, sewed it together, flipped it right side out (it was fairly easy to turn with the eraser end of a pencil, thanks to the stretchiness of the neoprene), then worked it into the channels with a safety pin as a guide. Cut the excess off and closed up the channel opens by hand, then basted the shoulder puffs into the arm holes of the leotard – then finished it by machine sewing them on and removing the basting stitches. I wasn’t super in love with the way the machine stitching looked there, but it’s mostly hidden by the chestpiece, so I decided not to worry myself over it.

Skirt:
For the skirt, I went back and forth between doing a more fluffy circle skirt look (like my original Jupiter costume, I always loved how it looked), or the more traditional pleated skirt look. In the end I went with the pleated skirt because that’s how the Shining Moon Tokyo fukus look.
I basically cut long strips of my taffeta (for lining) and sequin fabric – I only had 2 yards of each so I had to segment them out – ended up with 2 join seams on both sides. I cut them at 12.5in tall, I figured that was enough to cover everything LOL. I sewed the lining and taffeta lengths together, flipped them right side out, then pinned it onto my dressform to start pinning pleats in.
Once I got the pleats how I liked and sewn down, I based the back seam closed and cut the V-shape into the front and back at the top edge – less deep in the back. Then I popped the back seam open again and got a small green zipper set in, just to make it easier to get in and out of the skirt.
At that point I realized the skirt was too big. I had to carefully unpick the stitching holding the pleats in place at the back and make them a bit deeper… and while doing that, I ended up causing my back seam to go off-center. UGH. I left it slightly off-center since it was covered by the bow.

For the hip roll, I cut a long length of neoprene, covered it in my milliskin (since my neoprene had a blue tint to it the milliskin didn’t – I wanted my whites to match!), machine sewed it onto the top of the skirt on one edge, then flipped it over and hand-sewed it closed on the inside, to enclose the raw upper edge of the skirt.
Bows:
Originally I was going to use the Simplicity pattern listed above to make the bows – because I really don’t like making bows. I feel like when I make them with no guide, they look stupid. LOL.
But after messing with that pattern, I realized it wasn’t going to look right. Sooo I just made them the way I make the bows for my Minnie ears and crossed my fingers they wouldn’t look stupid.
I cut a rectangle of the neoprene, that when gathered in the center, had the right size and shape of the overall bow. Then I cut my pink satin double the length of that piece of neoprene, sewed it together right side-to-right side, leaving a spot to flip it right side out. Once I had it flipped and pressed, I worked my neoprene piece back inside, then sewed the hole closed. Then I just took a needle and thread and ran it through the center vertically, to gather the center into the bow shape.
For the lower pieces of the bow, I cut pieces of neoprene into the shape I want, and repeated the process I used for covering the bow shape. Once I had those finished, I sewed them to the back of the main bow, then made a small tube of the pink satin to wrap around the center of the bow and back edges of the lower portions to gather all the pieces together.

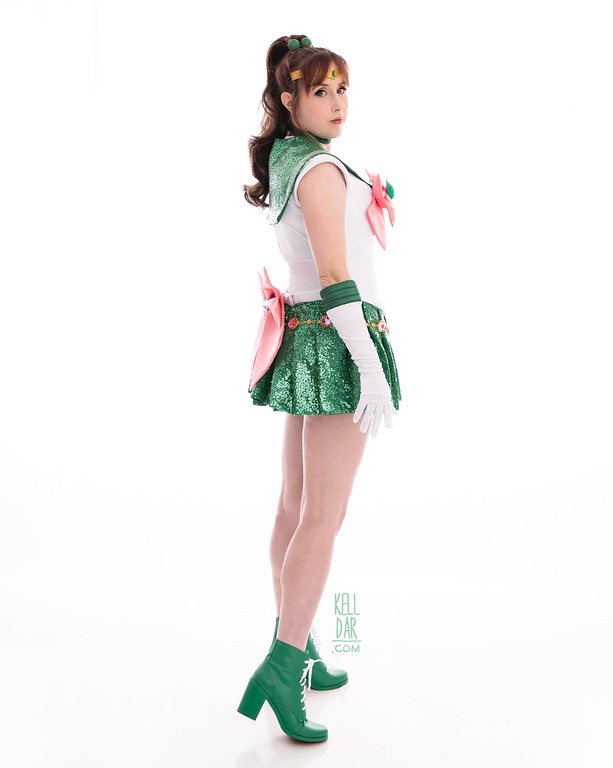
Once both bows were finished, I sewed snaps on – the butt bow snaps onto the back of the skirt, and the front bow snaps onto the collar. The front bow also has velcro sewn on for attaching the gem.
Collar:
I used Simplicity 8160 for the collar, just lengthened a tiny bit in the front. Cut a mock-up out of some scrap fabric first just to make sure it worked ok. Then cut one layer of my lining and one of my sequin fabric, leaving a hole to turn it at the back of my neck.
The difficult part of the collar was the stripes. I really didn’t want to try to heat-bond white ribbons on or something, and I definitely didn’t want stitches showing. I decided to test out some heat transfer vinyl – I had some silver on hand so I did a small test piece on a scrap of the sequin material… and to my great surprise it actually adhered very well. I really thought I’d have trouble with getting it to stick to the sequins, but I didn’t (I think it helped that my sequin fabric was very low profile).
So I bought a roll of white transfer vinyl and while waiting on that to arrive, I took a photo of my collar, taken from above, as straight-on as possible. I brought that pic into photoshop, made sure it was sized the same as real life, and drew the white stripes onto it. Then I took the layer with the stripes, sent them to my husband, and he set them up to print on my silhouette once the vinyl had arrived.

It ended up being 4 pieces I needed to join together, and once I got them weeded I laid them out on my collar and it looked like it would work ok. So I started ironing it on… and the vinyl didn’t want to release from the backing. I had to scrape at it with my fingernail to get it started, which caused wrinkling. How in the world was this going to work for the joins I was going to need to do? I also noticed it had a weird bend at the center back. Before I did anymore I told my husband the trouble I was having, and he said that vinyl had sucked trying to cut it to, kept messing up.
So we decided to order a different roll of white transfer vinyl, and I started over. I made a new collar (since I couldn’t peel off what I’d already transferred on), same pattern and everything – took another picture, drew another set of stripes, and this time printed them on printer paper first to double check they fit right (no weird bend at the center back this time), then printed them on the white vinyl – the new vinyl cut much better and ironed on perfectly… whew!
Once the stripes were done, I sewed the collar together at the front points, and sewed snaps on both sides – on the bottom to snap to the chestpiece and on the top for the bow.
Chestpiece:
I decided I wanted to make the “chestpiece” a separate item instead of it being attached to the leotard, or just set in as another seam at the bust. (I always liked how the chestpiece looked like a separate piece of “armor” in the live action Pretty Guardian Sailor Moon so kinda channeled that).

I used the upper part of the McCall’s M7455 leotard pattern as the basis – the leotard in that pattern has an underbust seam that made that pattern piece really close to what I wanted. I edited the shape a little – curved it up at the bottom front a little more and bringing the arm openings in a bit.
I cut the basic shape out of neoprene, then cut 2 layers of my milliskin and sewed them together. Inserted the neoprene and closed the back and shoulder seams. Since it’s all stretchy I can just pull it off and on over my head. It snaps to the sides of the leotard to keep it in place, and has a snap at the neck for the collar.
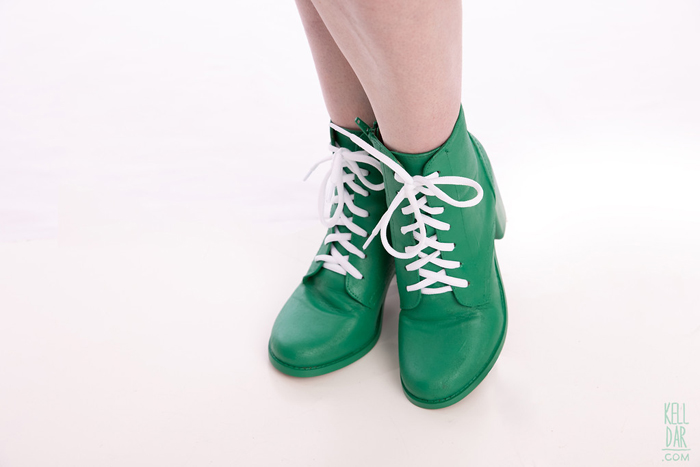
Boots:
I dug around online for a pair of boots that looked the way I wanted but also wouldn’t break the bank. Eventually found this pair of chunky heeled suede boots on target. Ordered them and they arrived in a very beat up box but thankfully the shoes were ok.
I actually really like painting suede shoes – I’ve done it several times before, and I always like the result. I had some green fabric paint left over from painting the stripes on Belle’s library dress last year, so I decided to swatch test that on the tongue of one of the boots. It looked great so YAY for not having to go buy paint. It took about 2 coats to get a good solid colour and I was really happy with the finished result. Bought the shoelaces online.

Accessories:
Let’s start at the top. The tiara is a file we found on thingiverse and Chase modified for me – it was a little too tall and long for me, so it reshaped it a bit and 3d printed it. Worked out great. Thankfully I still had some green gems in my stash… probably from when I first bought the pack of gems for my first Sailor Jupiter tiara in 2000 LOL. Glued that on and tiara was finished. I just toupee-tape it to my forehead.
Rose earrings and hair bobbles were from my 2000 Sailor Jupiter. I thought it would be a nice nod to the original costume (and 2 less things I’d have to make LOL)
For the brooch, I got on etsy and found a seller that makes resin gems. Bought a 60mm green gem, and while it was in transit, Chase 3d-modeled a setting for it and painted it green. Once the gem was in, just glued it to the setting and put velcro on the back to attach it to the bow.
Gloves – I bought the white gloves on amazon. No patience for making plain white gloves here. LOL. I used the sleeve puff piece from McCall’s M7455 for the glove puff – it worked out good for that, just needed to shorten it a bit. Like with the other puffy areas I just used neoprene tubes for stuffing. Once I had the puffs basically made, I sewed them to the gloves.
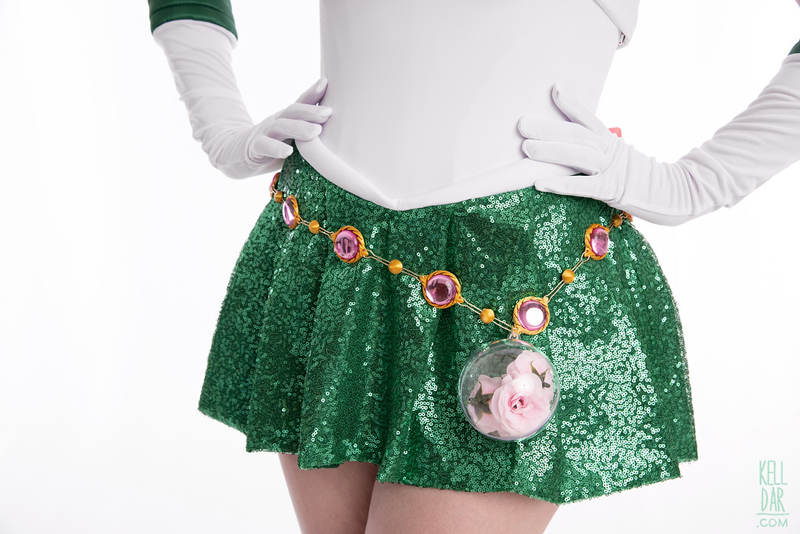
Belt – Chase 3d modeled all of these little belt pieces for me! He printed them in a gold filament, and linked them all together. The gems in each setting I also bought on etsy. It closes in the back with a hook and bar. The little rose container doo-dad is a clear plastic ornament with silk roses stuffed inside. It hooks onto the belt.
History:
I am really very happy with the way this turned out. And the best part is that I made it where it’s very interchangeable… if I want to make Neptune in the future (which I have wanted to for 2 decades now… LOL) I can use the leotard and chestpiece. Just need new skirt, collar, bows and accessories. So that’s cool.
![]()


![]()
(I have too many videos of the construction to post here. Visit my Sailor Jupiter smugmug folders to view them all – I did a 16 part construction series and those are all available in the smugmug folder.)


Please note that none of these costumes are for sale! This is my personal portfolio.