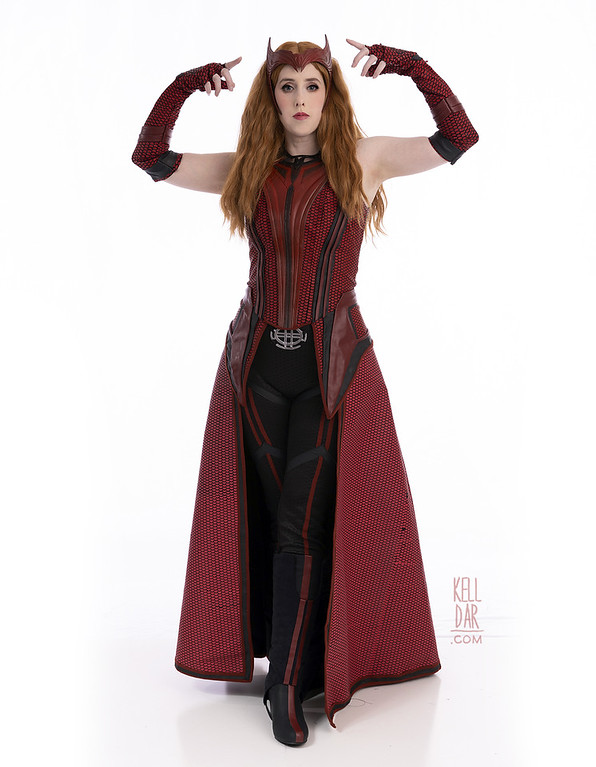
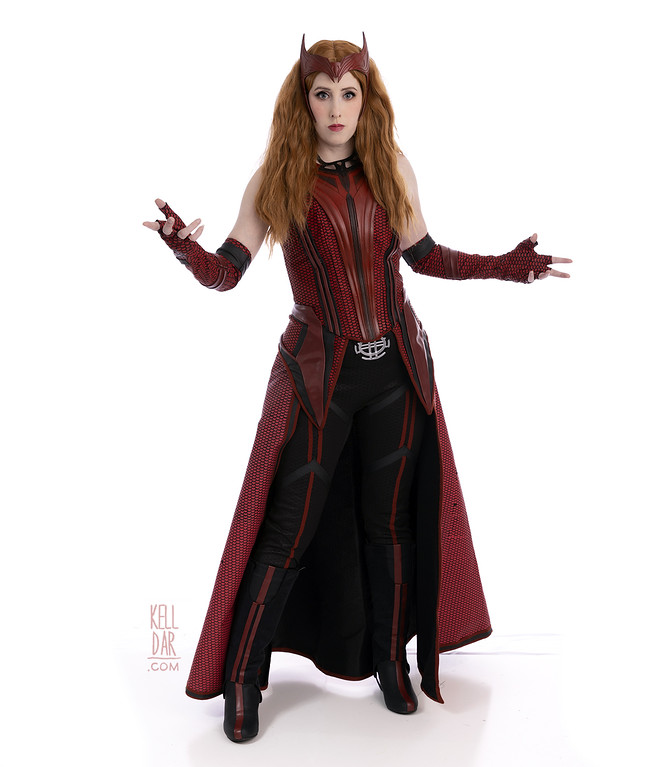
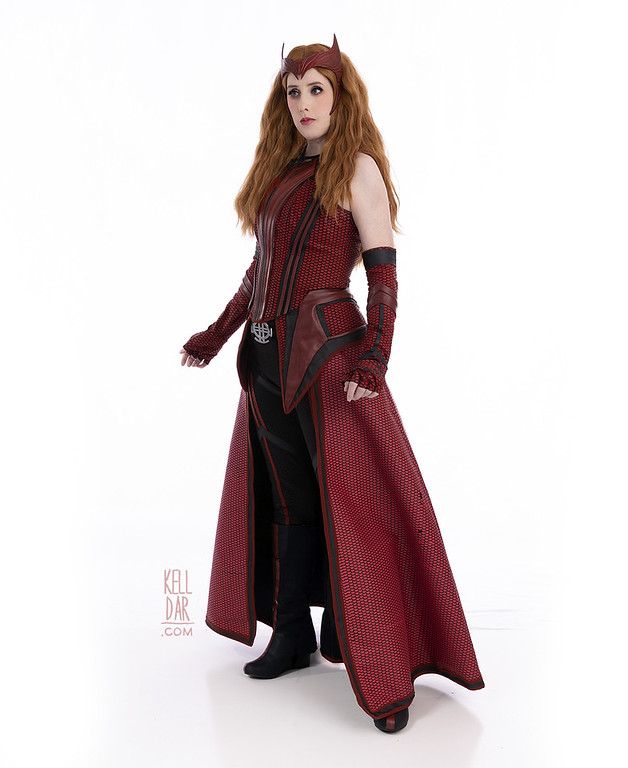
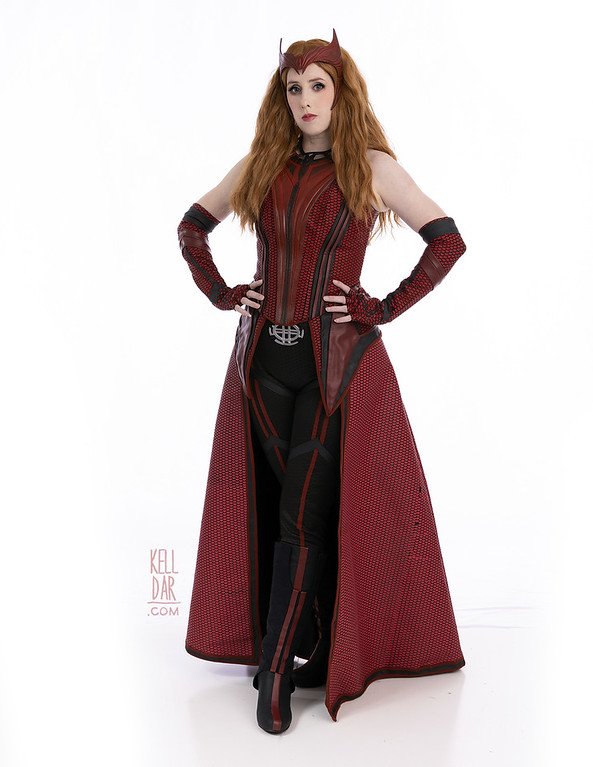
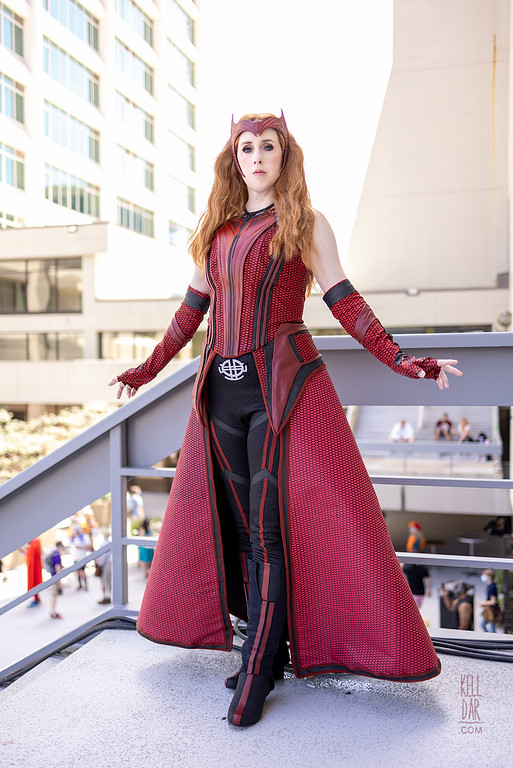
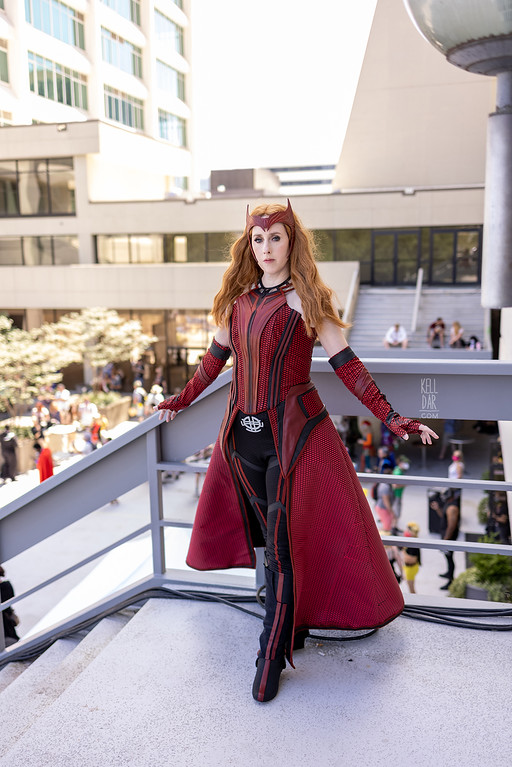
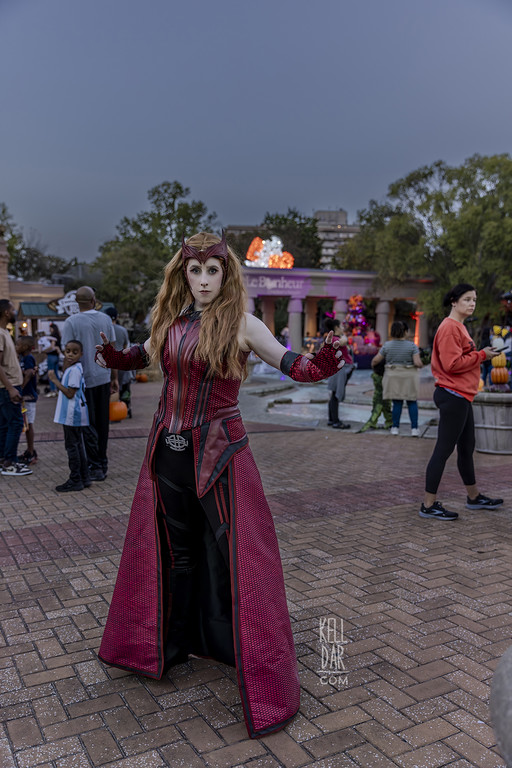
Scarlet Witch
Source: Wandavision
Made for: Dragoncon 2021
Journal Entries: Read more at my Scarlet Witch tag
Related Costumes: Multiverse of Madness Scarlet Witch, Scarlet Witch Comic Version, Scarlet Witch Disneybound
![]()
![]()

Patterns Used:
Kwiksew 2722 (Pants)
I call this costume “old dogs learning new tricks” LOL. in the midst of building this costume, after yet another set-back, my husband and I were talking about how much costuming/cosplay has changed since our era of doing really armor/crafting-heavy costumes in the mid-2000s. New technology, new materials, new techniques being shared. I had to give myself some grace as I stumbled along the way!
I’m going to go in a little bit of a different order here than I usually do and start with the parts I did first.
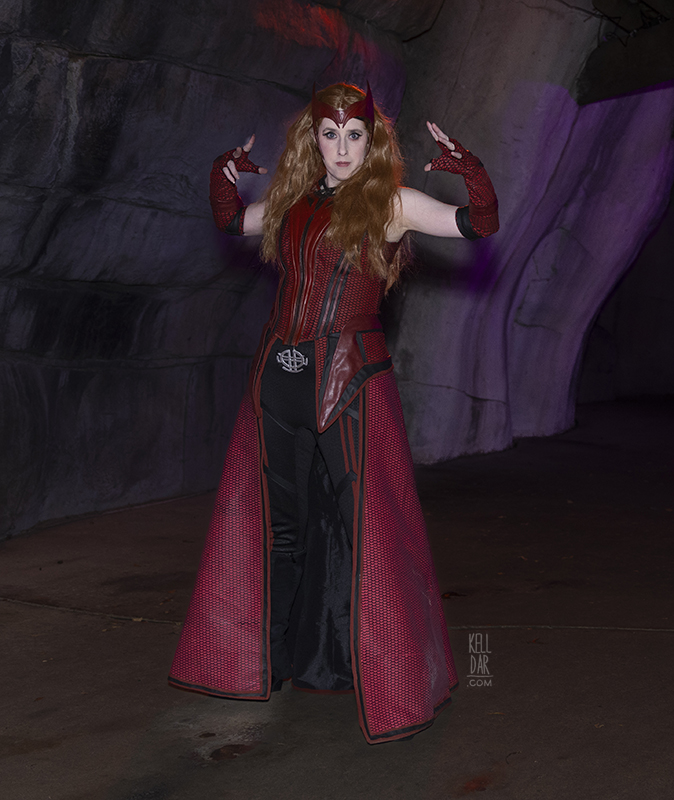
Boots:
I bought a pair of knee-high wedge heel boots online. When they arrived they ended up being much more matte than I expected, but I kinda liked it. To keep with the matte look, I made the outer wrap section out of some scrap black suede I had on hand. The wrap section zips up the back and attaches to the boots with velcro along the top. I added the red stripes (made of red vinyl) with permanent double stick tape.
Pants:

I had a bunch of pants patterns in my stash but all of them had a center front seam. I don’t like how center front seams look on fitted pants. So instead I used the bodysuit pattern above and just cut it off at the waist! (Actually a bit higher than the waist, I wanted to make sure the pants were well above the bottom edge of the bodice). I cut the pieces and then before assembling, I did all of the stripes on the front panel. The triangles I cut out of some scrap black pleather I had on hand, and for the red stripes, I lucked into finding a clearance spandex at my local Joann that matched my pleather pretty well. That was a lot easier to work with than doing that pleather on everything. I hand-sewed them all in place, then machine-sewed the triangles – but I left the red stripes just hand-sewn because I didn’t want the visible stitches. Once the front was done I sewed the back in place, put in an elastic waist and stirrups on the bottom to hold them in place.
Half-skirt:
Originally I had some scuba fabric I was going to use for the skirt, but decided I wanted to line it in something a little stiffer so I ordered a taffeta online. The taffeta came in and I went ahead assembled the lining layer… and when I put it on to test the fit I LOVED the flow and shape of it. So I decided to nix the scuba fabric and only use the taffeta. It’s definitely a bit stiffer/has more body than the skirt on the show but I love the way it flows and catches the wind.

I didn’t use a pattern for this part, it’s just 2 basic front panels and 1 basic back panel. Since I wasn’t going to line it at this point, I french-seamed it to make sure it looked finished on the inside too. After applying all of the HTV (which I’ll talk about next), I finished the edges in long strips of my red spandex (machine sewn on the front and then finished by hand on the inside), and added the extra stripes along the edges and back (glued on with e6000). Then made a bias tape waistband and it closes with a hook and eye under the bodice.
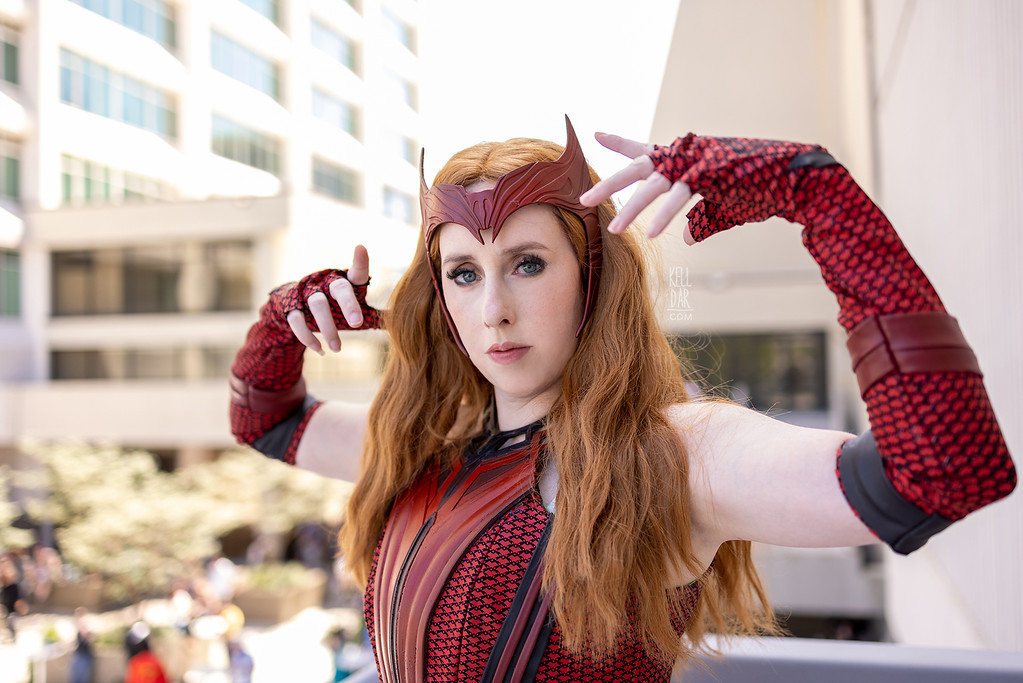
HTV:
So to do the all-over red design on the skirt/gloves/hip panels/bodice, I decided to go the heat transfer vinyl route since I had such good results with it from a few projects last year.
My husband created the repeat pattern for me (which I started calling the “little mothmen” LOL) and I started with applying the vinyl to the bodice pieces first. For the bodice, gloves and hip panels, I used a more expensive, better quality HTV – I really liked this HTV, the colour was beautiful and held up to the stretch of the fabric very well.
For the skirt, I switched to a cheaper, lower quality HTV I bought on amazon. This stuff worked fine, but the colour wasn’t as good as the higher quality stuff. But I couldn’t afford to spend a good $200 in enough of the higher quality HTV to cover this whole skirt LOL. I spent about $40 on the cheaper stuff.

The trickiest part of this was getting the next sheet of HTV lined up with the previous one. It was constantly getting “off” and at first I thought it was just me making mistakes but I came to realize if the paper wasn’t loading in the silhouette 100% straight, the whole cut would be at an angle. So that was definitely throwing me off. There’s a few places I had to patch and it’s not great, but from a distance it’s ok.
One oopsie I made – the last thing I applied the HTV to were the gloves. And on the main arm section of the right glove, I did the design upside down. LMAO.
Gloves:
I did NOT feel like torturing myself making full gloves with gussets and all that. So I just traced my hand onto a piece of paper and used that as my pattern for the hand part. LOL. I used my bodice fabric (a very heavy matte black stretch material – same stuff I used for my Black Widow dress). For the upper part, I copied a pair of gloves I had. Originally I was going to have these zip from the top to the wrist to make them easier to get on, but after basting the zipper into one and then pretty easily taking it off and on without unzipping it… I skipped the zipper and just sewed the seam closed.
I made the black stripes and bands and hand-sewed them onto the gloves, same for the red vinyl stripes. The small black “diamonds” on the hand I did in HTV. Originally I was going to do the triangle above those in HTV as well, but it didn’t work out well and at the last minute I had to add triangles of black vinyl that didn’t quite fit or look right. So at some point I’m going to remove those and redo them.
Bodice:

Originally I made a mock-up using my favourite bodice pattern as a base. But I wasn’t terribly happy with it, it felt too complicated.
I decided instead to do something I’ve never done before – a duct tape dummy! Sacrificed an old tshirt, my husband covered me in duct tape and then cut it away up the back. I put that on my dressform, drew on the seams and cut lines, and then cut it apart to use as a pattern. I ended up with a very well fitted bodice pattern that was a lot less complicated!
I did an interior lining layer of taffeta and cotton (the cotton is Yoda fabric from 2005. I should have used my Avengers fabric but wanted to save it for projects where it would be seen!). I added some spiral steel boning at each seam except the center front.
Once the lining layer was done it was on to the outer layer. As I mentioned above, I used the same heavy stretch matte black fabric I used for my Black Widow dress last year. Applied my HTV to each piece before assembly, then sewed them all together. Then I sewed the outer shell to my lining layer. I didn’t close it up immediately — as soon as we had the collar piece done, I put it on with that and had to tweak the neckline shape a bit. Once that was finished, I closed it up and sewed the zipper into the back. I connected the front neckline to the back with a thin nude-toned ribbon, to keep them in the right place.

The stripes on the center front I made with my black and red vinyl. Unfortunately this is where I had issues with the costume at dragoncon – which I’ll get to at the end. I applied the stripe panels and the collar to the bodice with Ecoweld glue which worked great.
My husband made the entire front piece/collar. It is 3d printed, then cast in urethane and he painted it. It turned out really nice. Again glued in place with Ecoweld. (Which, as of 2025, is not holding up great. The entire front panel has come unglued and fallen off the bodice twice now. I need to find another glue option.)
The hip panels were the last thing I did — they’re a base of the same black bodice fabric (with HTV applied where it would be seen) and interfacing, with pieces made of my black and red vinyl permanently taped and/or hand-sewn in place, and trimmed in the red spandex. Then the pieces were hand-sewn onto the bodice. I bent a lot of needle hand-sewing all these pieces but I didn’t fully trust the tape so I tried to take little stitches everywhere to make sure nothing came undone.
It was while working on the hip panels I discovered that the e6000 glue I’d been using on various pieces I couldn’t sew was not working on the black vinyl. It would dry and just peel right up. Well that’s what I had used to attach the thin red stripes to the black side front panels mentioned above. I tugged at them a bit and they seemed fine so I left them, which was a mistake I’ll talk about below. (I switched to the Ecoweld glue after this which worked better.)
I did not get around to doing the stripes/pieces for the back of the bodice. That’ll be in version 2 later on down the road. (I also want to make the cape)

Etc:
My tiara is 3d printed and Chase painted it. The wig is from amazon and I curled it and trimmed it.
Final thoughts: Despite the set-backs and issues I had building this, I was overall REALLY happy with it. I really wasn’t sure how I felt about it until the night before we left for dcon and I finally got to put it all on and just fell in love LOL. I haven’t felt that stoked about a costume in years.
As mentioned above I’ve got a few things to upgrade/fix/finish. At the con, I made the mistake of initially trying to wear a strapless bra with this (so no bra straps would show around the collar area), which didn’t squish me down as much as the bra I was wearing when I did the duct tape dummy. So when I then put the bodice on, the change in my shape was enough to cause the stripe sections to buckle more than they should have. And those stripes I had glued on, came unglued. Ugh. I had to take it all off and sit and apply tiny pieces of toupee tape all along the back – but thankfully it all held the whole weekend! And I had to switch to a bra that showed a bit more than I wanted but needed to make the bodice fit right.
So now I gotta go back and properly glue those stripes in place before wearing it again. I KNEW I should have redone them at home!
![]()


![]()


Please note that none of these costumes are for sale! This is my personal portfolio.