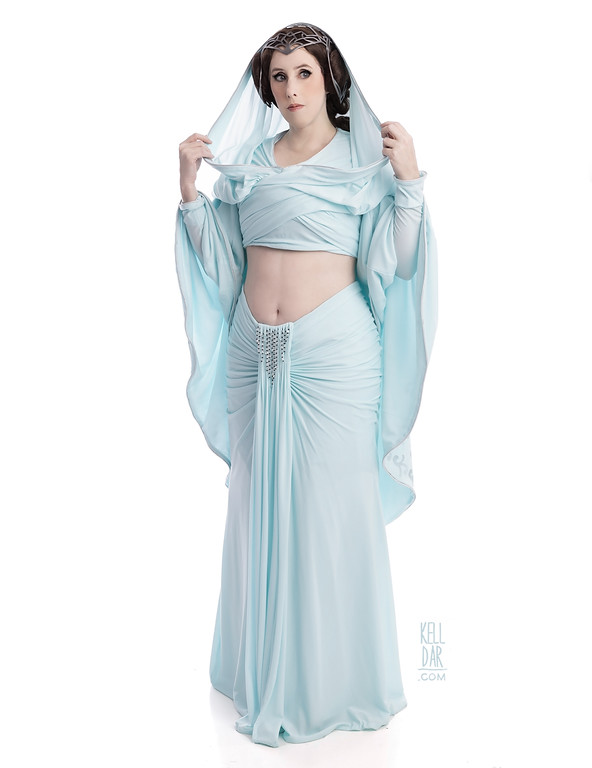
Padme – The Tatooine Arrival Gown
Made for: Dragoncon 2024
Journal Entries: Read more at my Tatooine Padme tag
Related Costumes: Padme’s Lake Gown, 2019, Padme’s Packing Gown, Padme’s Battle Suit, Padme’s Loyalist Committee Gown
![]()

![]()
Patterns Used: None

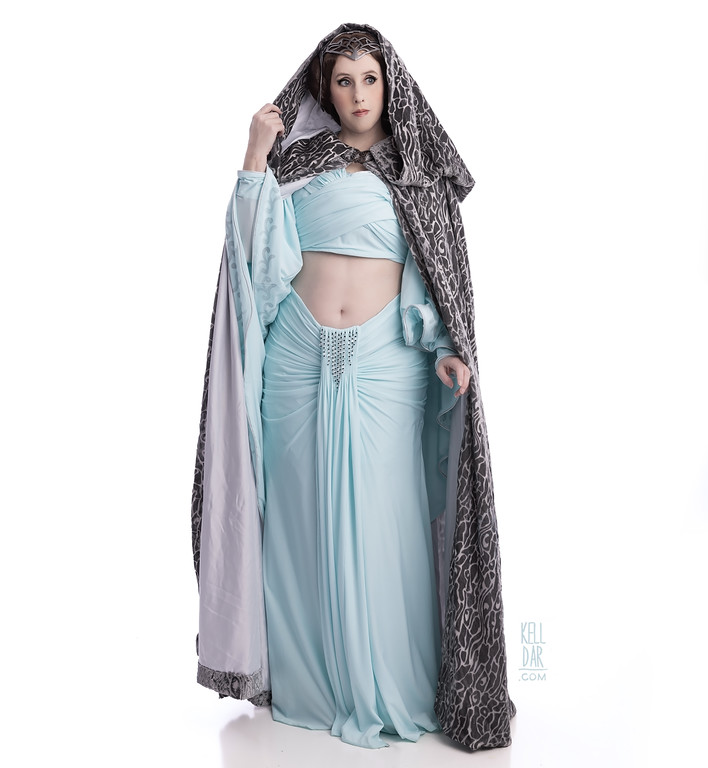
I got the disney cape, so why not.
The Fabric:
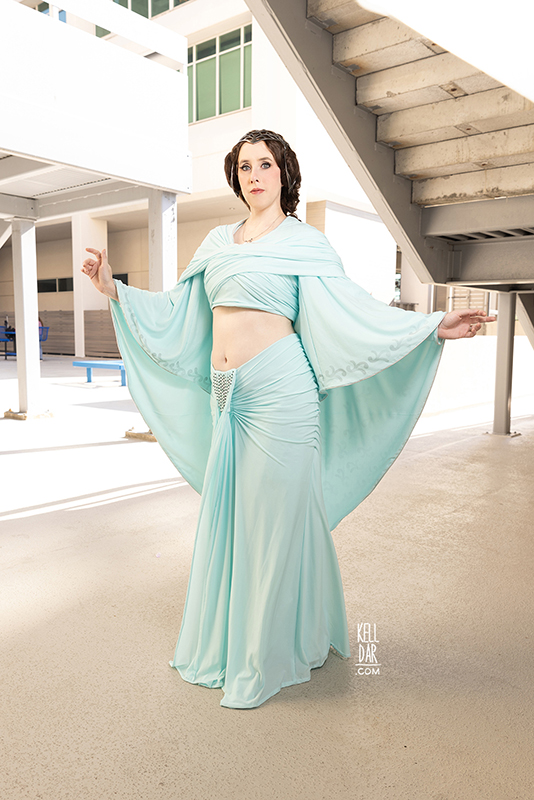
I was really, really, really picky about the fabric for this costume. I wanted a very, very, very thin stretch knit to avoid those gathered crossover sections looking bulky. I got this fabric at Fine Fabrics in Atlanta – it was so thin it was pretty see-through, and it was maybe a taddd more green than I really wanted, I decided to go with it since the runway/some of the bts photos do look a tad more green than the onscreen shots.
For the lining layers I used a basic cotton for the structure of the top, and the same cotton plus a layer of taffeta in the skirt for lining/support
Patterning & Mock-ups:
This may be the hardest thing I’ve ever patterned, and I didn’t expect that going into it. I think just because that giant hood/crossover section was SO BIG, it was hard to get right in a timely manner. I’d buy cheap mockup fabric and be able to get 1 or 2 cuts of this pattern piece out of it, and make my adjustments and… oops now I need more fabric and have to wait on more to arrive. And because I pretty quickly realized I was going to be VERY tight on my real fabric, I wanted to make absolutely SURE I had it all correct before cutting into the real fabric.
I started out by getting a basic shape for the top made – and originally, I was going to have this be a front fold-over closure (I scrapped that around the 2nd mockup.), so originally I made a cropped v-neck with a longer left front panel planning on it to close at the side seam. I used some scrap fabric to also come up with the basic cape shape.

From there I ordered some cheap, $2/yard knit that was a little thicker than my real fabric, but close enough to test everything out. I tested out my cape shape first, and then started trying to figure out that giant hood/crossover section. I also got a basic skirt shape figured out during this first “real” mockup.
I played around with the skirt shapes some more, figured out a piece for the front panel. Then I decided to order more cheap fabric and do another, full, head-to-toe mockup. Used some scrap cotton for the base of the bodice and it was at this point I realized I didn’t want to do the crossover, so the front became “static” and I put a zipper in the back under the cape.
I wasn’t happy with the first attempt at the hood/crossover section in this mock-up, so I recut it with some changes. And still wasn’t happy with that, but was out of fabric, so ordered more and I think I went through 2 more edits.
At long last I felt good enough to go ahead and move everything to paper pattern pieces, and make the attempt at getting everything cut out of my real fabric. It was a close call. I was not able to self-line the sleeves or hood, so each of them just got a facing. I was left with nothing but scraps of my 10 yards!! So if you’re making this costume, I highly suggest getting more yardage, I would’ve gotten 14 knowing what I know now.
One thing to mention is my final pattern piece for the “cape” portion ended up being based on a hybrid between my last mock-up and my Breha Organa costume’s cape piece. I got Breha out and traced the seam/neckline shape to copy for Padme, since they are so similar. Worked well!

Top::
So I started with the top. I found a cotton in pretty much the exact same colour as my main fabric at Joann, and used that for the base of the top. The base i just 2 layers of the cotton, v-neck and cropped under the bust. I then covered that in a layer of my main fabric, which I cut slightly longer than the interior pieces so it would create a few folds at the bottom edge. Once I had The base put together, I installed a zipper in the back so I could get in and out of it.
Next up I decided to do the cape, which was 2 layers. I sewed them together right-side-to-right-side… and then looked up and saw my spool of silver piping staring at me like “Forget something?” LOL I had to take it apart and redo it with the silver piping. (Silver piping was just from amazon. It was cheap and shredded easily and I don’t recommend it.)
Now with the cape reassembled WITH my piping, I sewed it into top at the shoulder seams and around the front edge of the armholes. I did also tack it into place at the back on either side of the zipper.
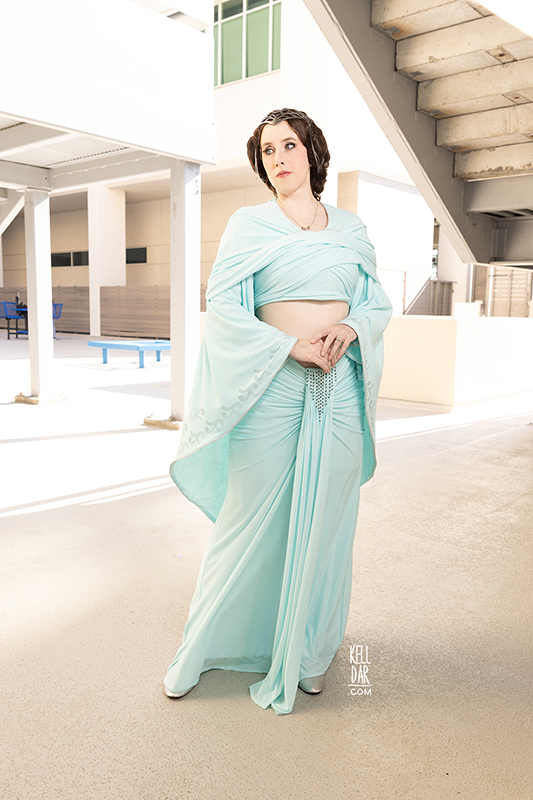
Next was the part I was dreading, the big hood/crossover section. As I noted above, I didn’t have enough fabric to fully line this piece like I wanted – but it ended up working out ok, because I think if I’d fully lined it, the front crossover sections would’ve been too thick and bulky. So I’m glad I just went with a facing. I got the piping sewn around the edge, then sewed the facing on and finished it by hand on the inside edge. The most difficult part of this was getting it all lined up and neat at the neckline point, especially because the cheap silver piping didn’t want to cooperate.
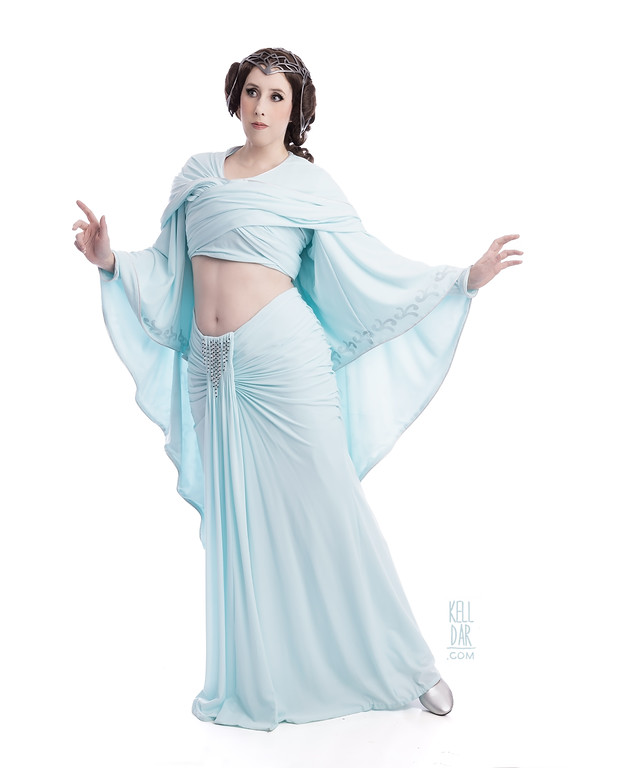
But I eventually got it all in place, and then went to work on the crossover sections. I got that sewn in place by hand, and then tacked some of the gathers so they’d stay where I wanted them. I tried to keep these tacks minimal because I didn’t want them to be super visible or hinder the hood when I wanted to put the hood up. So I do have to do a little rearranging when I put it on, but it’s not terrible.

Finally I added the sleeves – like I said above I didn’t have enough to fully line them, so they’re just faced up to about halfway up my lower arm. These were kind of a pain to do because the cheap silver piping made it very fiddly at the seam.
I’ll talk more about the beading and stamping at the end.
Skirt::
For the skirt, I experimented with a few things. First, I had picked up a taffeta at Joann that matched my main fabric really well, and I wanted to use that for the skirt lining. I wanted something with a little more body & stiffness than just a cotton, so it would maintain the shape of the top of the skirt. Well I cut out the lining layer and put my main fabric over and it was WAAAY too stiff and silly looking. So I recut the lining in just my cotton, but I did include a layer of the taffeta in the skirt — I cut it off to be about mini-skirt length, and it sits behind the cotton lining on the inside. It does its job of adding a little more stiffness at the top to keep it all sitting the way I want.
(I also experimented with a layer of scuba instead of the taffeta, just because I had some laying around – but that was too thick and showed too much through the other fabrics.)
The outer “main” layer of the skirt is basically a big rectangle, just flared out as it goes down (see pattern pieces below), and just cut longer so it could be gathered. I got it sewn to the lining layers at the top edge, flipped, and then gathered the skirt with a gathering stitch in the center front. (Reinforced it on the machine once I was happy with how everything was sitting). Then I arranged the gathers to look nice on either side seam, and tacked them into place, hiding the stitches in the side seam. I did also gather at the back around the zipper. Finally I finished both hems by hand.

The front drape-y piece of the skirt is a separate rectangle of the fabric. I finished the edges by hand and did several lines of gathering at the top. Once I was happy with the way the gathered section looked, I hand-sewed it into place on the inside front of the skirt.
Beading & Stamping:
I went back and forth on the beads for the front panel and hood quite a bit. I found some clear beads I liked, ordered them, and then once I saw them in person, I thought they were too small. So I ordered some a size up. They came in and when I went to start stringing everything together, I realized… these are too big! So I went back to the original beads which worked perfect LOL.
I strung them on silver thread and sewed each individual length directly into the skirt. The hood was much more difficult to do, to get my hand all the way down into that small space every single time. (I should also mention, I reinforced the tip of the hood with a layer of cotton, only just like the bottom 2 inches of the hood, because I knew I didn’t want the weight of the beading pulling on just my very thin knit fabric).
Stamping was the last thing I did. I ended up having a stamp made by SayaBellStamps on etsy!. It was totally worth the $30 to have a really nice wooden stamp with a handle and all and not some slapped-together thing I tried making.
I did run into an issue using a stamp though – once I started laying out a guide, I realized some of the shapes are reversed. Not just turned the other way, but flipped and reversed, which I couldn’t have done without having a second stamp. Didn’t have time to order another by the time I noticed this, so I don’t have the “reversed” symbols – I only noticed a few of them anyway, so I’m not going to sweat it.

I used a silver ink I bought at Michael’s. Tested it out on some scraps first – I had to make sure to get equal pressure on all 4 corners of the stamp to get a good impression. (I did also experiment with fabric paint, but that went on too thick and dark.)
I set up a guide for the stamping by printing out a bunch of the little symbols on regular paper, roughly cutting them out, and laying them on the cape as a guide, getting them as close to the layout of the original as I could. Then I just went through and started stamping. Didn’t take long to do. They’re not perfect, there’s some where I got the line in-between floorboards pressed into the shape LOL – but I’m overall very happy with them.
Accessories::
I decided to just use my ceremonial Leia heels with this. Easy enough.
The tiara is 3d printed from a file created by Ceredircosplay. Chase 3d printed it, assembled, finished and painted it for me. I did nothing here. LOL
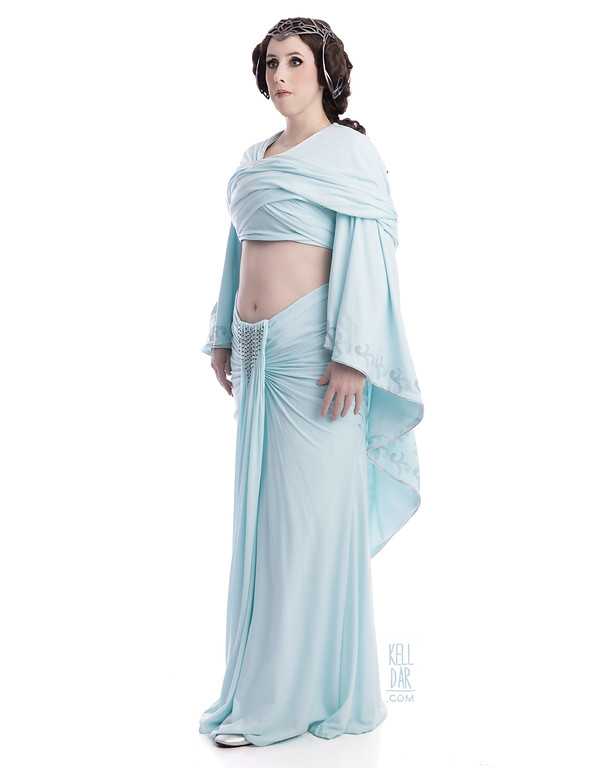
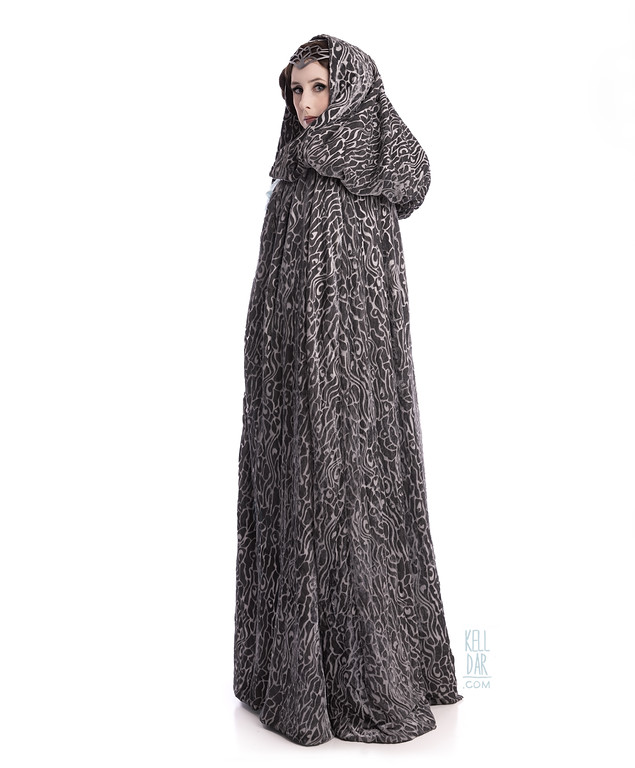
The wig is from Wig is Fashion and it turned into a giant frizzy mess the second I started trying to style it. I did the 2 little side buns, they are pinned and sewn in place around a small brown fleece & batting pillow. The back ponytail I did end up braiding partially to try to keep the crazy fluff of this thing down, but you can tell from the side photo just how crazy the hair got once I started working with it.
Finally, the cape is the Disney store cape. I don’t have any pics of me wearing this with the costume – I opted to not take it to dragoncon since I knew I was going to be hot anyway. All I did was shorten it a hair and rehem it. (And fix one spot where the interior seam was mis-sewn.)
Patterns::
I promised a few folks photos of my pattern pieces to give them an idea of where to start, so here they are!
Please take these with a grain of salt. As with every pattern I create for myself, I do more edits and work on the shape once I’ve actually cut the fabric. I can’t remember every edit I made, but the big one is that my “crossover” gathered front panel portion of that pattern pieces ended up too long, and I cut about 3 inches off either side. These are just meant to be guides for you to understand the shape I personally cut for my costume, and that you can hopefully use as a starting point for yours. In the future I would like to scan these in a little better and provide them life size, once I can figure out how to do that I will update this!
Click for larger:
Bodice panels:

Hood/crossover panel:

Skirt panels:

Cape panels:

![]()


![]()


Please note that none of these costumes are for sale! This is my personal portfolio.