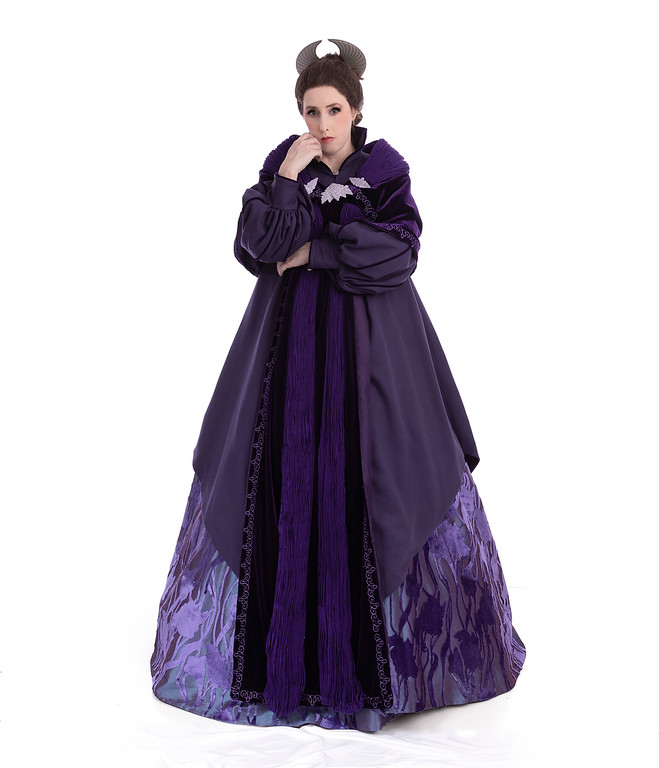
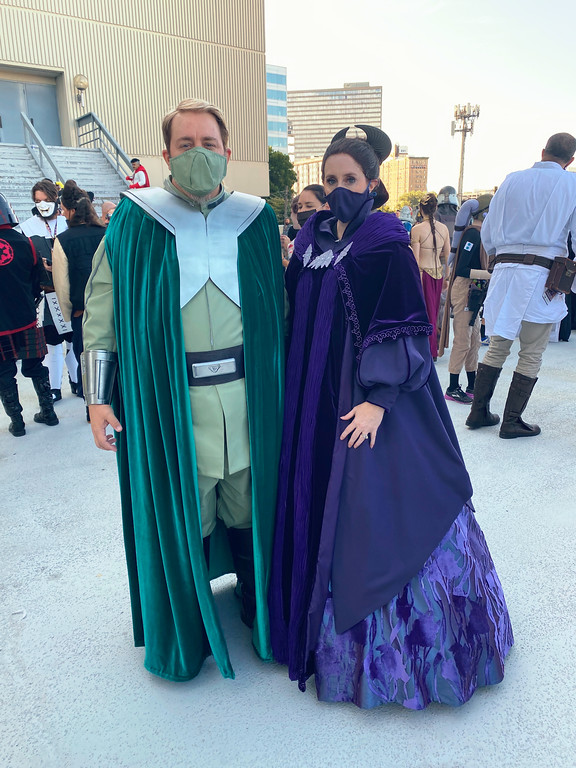
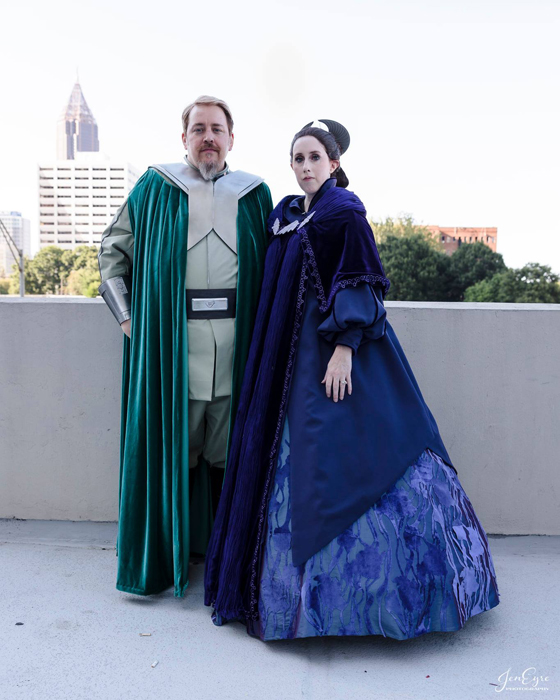
Padme – “Liberty Dies” Gown
Made for: Dragoncon 2021
Journal Entries: Read more at my Liberty Dies Padme tag
Related Costumes: Padme’s Veranda Nightgown, Padme’s Mustafar Outfit, Padme’s Funeral Gown
![]()
![]()
Patterns Used:
Simplicity 2621 (Padme hoopskirt), Simplicity 2589 (Padme underskirt), Simplicity 4443 (Padme surcoat)
So originally, I was planning on remaking Loyalist Committee for dragoncon that year. I had some of the fabric and was trying to amp myself up for it, because even just thinking about it was exhausting me! But then Chase found a 3d print of the Liberty Dies headpiece and convinced me to do that instead. I said ok as long as you do Bail. And here we are.

So Chase and I started planning for these costumes in late 2019. By Feb 2020 we’d bought the majority of our fabric and I’d already started doing the basic patterning on Padme, and Chase had started doing 3d modeling for the Bail parts. And then… y’know. I didn’t really dig back into until early 2021 and then it was very spread out.
Fabric:
Let’s talk fabrics first. I picked up 2 fabrics in Feb 2020 – a purple/blue shift taffeta that was perfect for the underskirt, and a purple fabric for the surcoat. The surcoat looks to actually be suede, but I didn’t want to go that route, and this purple fabric I found had a slightly nubbly texture to it similar suede, so that was perfect without being near as heavy.
I really struggled finding a purple velvet. In 2020 I must have ordered 20 swatches and none worked. The difficult thing with this costume is that in some images it looks to be a warmer “violet” purple and in others a cooler “blue” purple. Based on the fabrics I had already picked up, I decided a cooler toned purple would be best and that would be the look i stuck to. But every velvet swatch I got was either WAY too light purple or way too warm toned. I finally found one swatch that looked good and ordered yardage – and when the yardage arrived it was a totally different (lighter) purple. Thankfully the place I bought it from confirmed my swatch came from old stock they no longer had and let me keep the lighter purple for half off – it’s what I eventually used for the floral overskirt.

At long last @LeiaAurora found a great dark, cool toned purple in LA, bought it and shipped it to me same day. My hero! So I finally had all my fabrics, let’s start making this thing…
Hoopskirt:
I used the above Tudor pattern to make the hoopskirt – I didn’t feel like any of my existing hoopskirts had the right “bell” shape. I used some leftover cotton from Eliza and ordered hooping online. Went together pretty easily and I was happy with the shape. And since I used that pattern, I was able to use the petticoat I made for my first Anne Boleyn costume in 2009 – it’s made for that hoopskirt, so it fit perfectly.
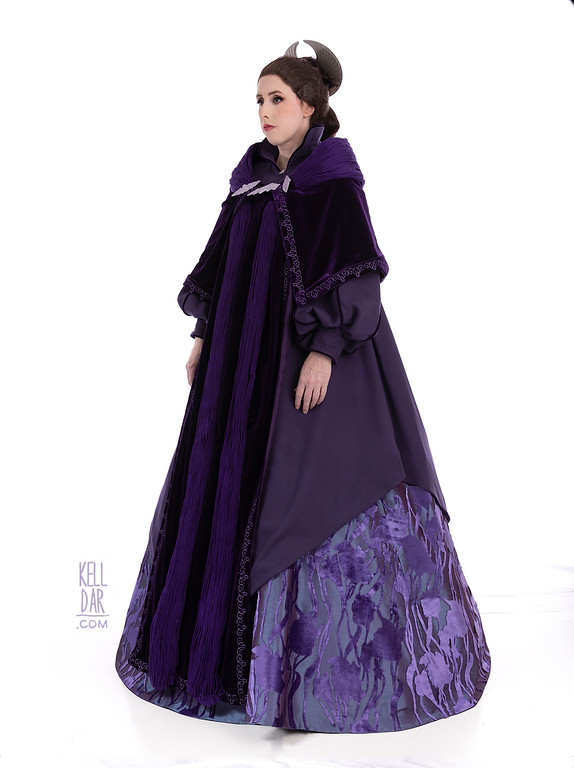
Surcoat:
Next up, the surcoat. I used this “Padme” pattern from the early 2000s, which was a good base (I also used it for Raddus Leia!). Started with a mock-up with some purple lining fabric, got the shapes dialed in and then used the mock-up fabric as a pattern and lining. The collar was a little bit of a pain, I had to take it off and tweak the shape several times, and I’m still not 100% happy with it but oh well.
The sleeves were the complicated part of the surcoat. I made a mock-up sleeve in the basic shape, then cut it into panels to use as a pattern. Each panel is backed in cotton, and for the piping, I bought a bunch of packs of piping online and then covered them in my purple velvet. Sewed them into place on each panel, then sewed all the panels together. Gathered the bottom edge and attached the cuffs – which was not the easiest thing ever, it was a LOT to sew through LOL.

Finally, I added some hook and eye tape down the front from the neckline to around the waist for the closure.
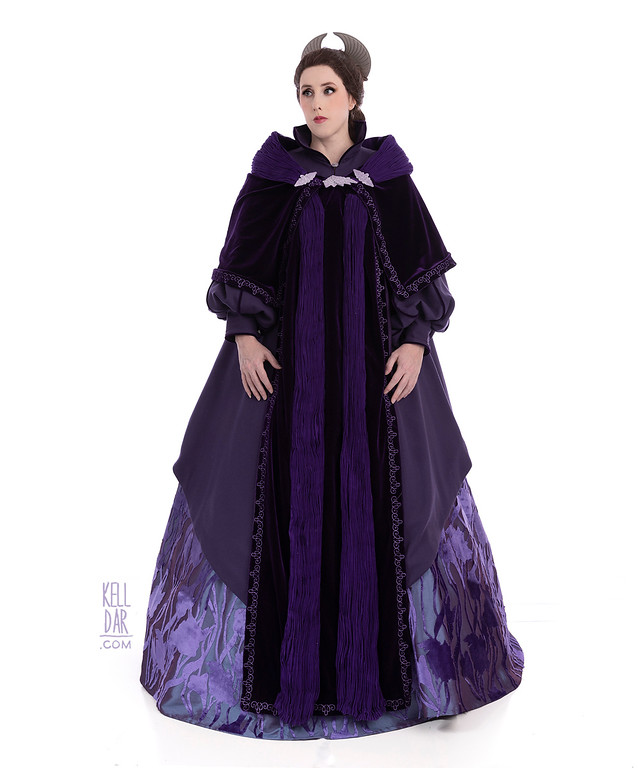
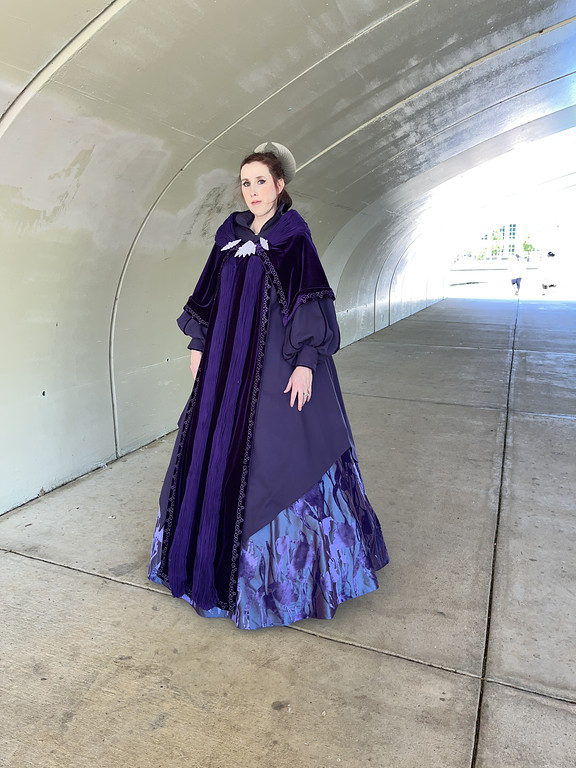
Velvet Robe:
I feel like on the original, the swirl design on the edges of the velvet robe are painted or printed. But I just got a new toy in 2020 I hadn’t really gotten to play with yet (a janome memorycraft 350e) so I decided I wanted to embroider it. I drew up the design based on the best costume exhibit photos I could find and then set about digitizing it for the machine. I ended up using Hatch Embroidery software and I really loved it – saving up to buy the program in the future! It took some trial and error but I finally was able to get it going. I think they ended up a LITTLE small but ah well. I started with the long rectangular piece first. The hardest part was getting the next grouping of swirls lined up to the last one – I got better at it as I went. And if something messed up and I had to undo it… that would take hours to unpick so I quickly learned if it’s not lined up, stop it as soon as I can tell so there’s less to unpick. (I actually kind liked unpicking the messed up ones, though. I had a magnifying glass and tweezers and it was just… kinda satisfying when I got it done LOL)
Once I had the big rectangular piece done, I lined it in my purple lining material. Did a small gather at the top and that part was done. The “shawl” piece was a lot harder was to do, since it wasn’t just a straight edge, and joining them up at the center back ended up being really tricky. I had length variations (main one was 4 loops. I also had a 3 loop, 2 loop, and 1 loop for filling in gaps), but none of them fit at the end, so… I took up the back seam to make one fit LOL.

Anyway, once all the embroidery was done, I lined the shawl piece and got it finished up. Then it was time to move onto the gathered pieces.
I had picked out a fabric for the gathered pieces back in 2020, and thankfully was able to track down my swatch again. Originally I was going to buy it white and dye it, but when I went to order the actual fabric, they had a purple option. I got a swatch of it, and it was pretty darn close to what I wanted. It arrived and I kinda thought about dyeing it slightly darker but decided to leave it as-is, because by this point time was starting to run short.
The original piece looks to be one long piece that goes through an opening in the shawl of the velvet robe. I decided for the ease of it, I would make it 3 pieces – the shoulder piece and the 2 hanging pieces. I got the lengths for each cut, and then sat and gathered them and ran a thread through the gathers to hold them in place. Once I had the entire length done, I pressed it vertically. Then I lined the long hanging pieces in the leftover fabric just so they’d look a bit cleaner, and I lined the shoulder piece as well as adding some interfacing to stiffen it.
I got those pieces sewn into place on the velvet robe, and then set about getting everything attached to the surcoat. I ended up with a series of
snaps that hold everything in place.

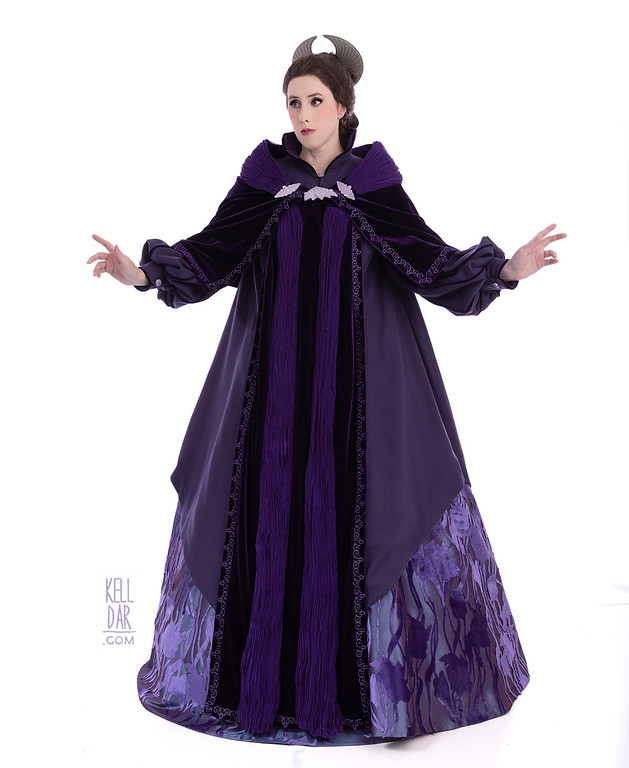
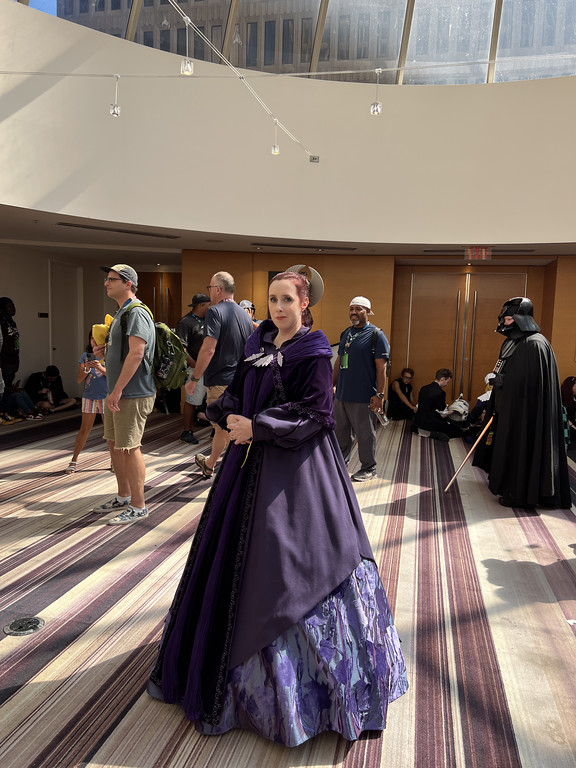
Floral Underskirt:
The Floral Underskirt yall. THIS EFFING SKIRT.
So first up I guess I should say, I made a basic skirt out of my blue/purple shift taffeta, elastic waist. Then came the floral pattern.
I’ve actually avoided talking about it on my blog, on IG, everywhere, because I’d come up with a way to do it… and then it would fail. And then I’d come up with another plan… and it would fail. I didn’t want to share my plans and failures and get a bunch of suggestions, which sounds weird — but I wanted to figure it out for myself. And everytime the next thing we’d try would fail, I’d have to go back to the drawing board and think (AKA procrastinate) for a few weeks. This whole process took basically the entire year. I first started messing with this in late 2020.
My initial plan was to design each individual element of the burnout design of the original (as best I could decipher them from exhibit photos), cut out each element on my silhouette machine and them assemble them onto the skirt.
After a first attempt failed, I realized the floral drawings I’d done were too complicated and I had to simplify them. Another test run in the silhouette, still had issues, so I simplified them further. Still had issues.
Ok so my husband and I brainstormed. Maybe it’s the blade? So we tried different blades. No luck, the fabric would just get dragged and messed up everytime. Tried different pressures. No luck. Then i thought maybe it’s the stabilizer I’m using? So I tried various stabilizers, starches, everything. Nothing we did would let the silhouette cut the shapes without dragging and pulling the fabric. We even thought about dropping money on the newer version of the silhouette but decided against it.

So next plan of attack. What if I draw up the complete design as a repeat, have it printed on velvet (because I was deadset on it being velvet), and then cut away the background? Took forever to get a swatch and when it arrived… no good. Cutting the background away left white fuzz.
So what else? Of course I dug through pages and pages and pages of purple-floral-velvet-burnout-lace-mesh-every-keyword-I-could-think-of-fabric with no luck. I did end up buying one purple lace option… which I think would work nicely for her ROTS dressing gown LOL. But I reallllly didn’t want to use it.
So finally with about 3 weeks left, every silhouette cutting plan out the window, printing it out the window, we came down to brass tacks… doing it by hand. So here’s what I did.
I took my repeat pattern I’d drawn for the print version, simplified it – because I just did not have time to do all the little interior petal details I’d originally drawn. Then we got a pen attachment for the silhouette, and used that to draw my repeat design onto the paper-y side of embroidery stabilizer. That worked great!
I cut my velvet into 12×12 squares, sprayed them down with Terial Magic to stiffen them up a bit, then applied the embroidery stabilizer to the back. (it was a peel and stick stabilizer, no ironing). For the actual cutting, Chase got me a new soldering iron with an xacto blade attachment. Let it heat up and I used my drawing on the stabilizer as my guide to just cut the background away. At first I was not good at this and was feeling like there was no way it was going to get done. But by the end I was doing a panel in about 20 minutes. Not bad!! I ended up cutting about 30 panels total.

Once they were all cut, I carefully peeled the rest of the stabilizer off, and then starched them just so they’d not fall into a jumble as soon as I picked them up. I also put a piece of duct tape across the top to sort of use as a “handle” to carry and place them. I took each panel outside, sprayed it with super77 glue, then brought it back to my sewing room and carefully got it placed onto the skirt. I’d weight it down with a block of wood I had in my sewing room, let it sit for about 15 minutes, and then do the next one. The Super77 held well enough to keep everything on the skirt til I could sew it.
The biggest hurdle here was joining the panels vertically. Towards the end I realized I could have just cut my squares 24in long and 12 inch wide and just join the stabilizer pieces on the back – then I wouldn’t have had to sew the 2 vertical panels together. But I realized that FAR too late LOL. I was so stuck on 12×12 squares for the silhouette it never crossed my mind.
But I got them all linked up vertically, hand-sewed them together. Once I had the lower level covered (everything that would show under the surcoat), I sat for about 4 days straight with a thimble and needle sewing everything in place. “I’m tired of this grandpa” indeed.
Once I got everything sewn on and pressed… it actually looked pretty good. For slamming this together in about 3 weeks… I’m pretty proud of myself. Talk about a marathon.

Accessories:
I bought the wig on amazon – I was looking for a lacefront with a little bit more of a natural hairline/baby hairs. It came in and the very next day I saw someone post in the Leia or padme group, can’t remember which, the exact wig I’d bought saying “warning, this wig DOES NOT work for up-dos”. Well crap.
But I was like, I spent my money we’re going to make this thing work. I ended up putting it into 2 ponytails, because yes, it absolutely did not want to pull nicely into 1 without showing a bunch of wefts. One higher one, one lower one. I cut the length off both ponytails and stubbed them with hot glue. For the hairpiece, I got a drawstring ponytail. I attached it to the stub at the top of the wig, pulled some of the hair through the tiara, then made the lower “bun” shape out of some scrap fabric and batting, wrapped the the excess hair around it, and sewed it in place. Not perfect and I need to revisit some things after wearing it but I was actually pretty happy with the finished look.
The tiara/headpiece is 3d printed, a file we found on thingiverse. Chase painted it for me, and also made/attached some little loops so I could sew and pin it into place on my hairpiece. The brooches Chase 3d modeled himself – we originally bought versions on shapeways but I felt like they were too small. So he modeled new ones, and also the buttons. I painted the brooches and buttons and attached them to the dress.
Finally I just wore some black boots with it. Plan to switch to flats next time.
Final Thoughts:
Overall got a few things to fix – I want to shorten the skirt so I can wear flats. I need to add a closure closer to the bottom of the surcoat to keep it from wanting to flare open a bit too wide. I need to slightly move the gathered shoulder section on the velvet robe out a bit – it’s a bit too snug on me. And I need to figure out a way to make the tiara/headpiece sit at a better angle. All just little things I can do in a day, I think.
![]()


![]()


Please note that none of these costumes are for sale! This is my personal portfolio.