Marasiah Fel – Star Wars: Legacy
Made for: Dragoncon 2007
Background: I fell in love with this costume when I saw it on the cover of Star Wars Legacy 3. I really ended up rushing this costume, though. I got it done to the point where I could wear it at Dragoncon, but the whole thing still could use a little more work.
Journal Entries: Read more at my Marasiah Fel tag.
Related Costumes: Mara Jade, Mara Jade Green Tunic

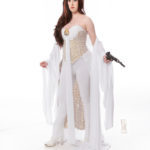
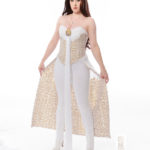
- White Backdrop 2020
- White Backdrop 2020
- White Backdrop 2020
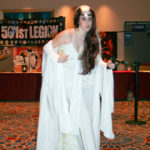
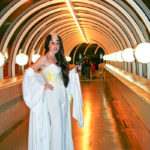
- Dragoncon 2007
- Dragoncon 2007
- Dragoncon 2007

 Patterns Used: Simplicity 9887
Background: This costume is a little funny – I have it listed under both 2007 and 2020 costumes, because I finally did some major updates to it in 2020. I’m going to split the construction info between 2007 and 2020.
Original 2007 Construction Notes:
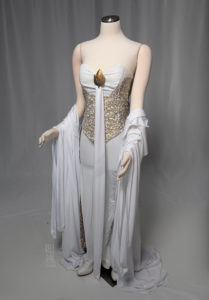
Bodysuit: I bought a white bodysuit to use as a base. I cut off and altered the top, and added clear straps. I ended up building the boots into the suit, which I need to go back and tweak. The “tie” piece I made similar to the one from Amidala’s parade dress. The brooch was a found piece I painted gold. The most time-consuming part of this project was the waist pieces and back “cape/skirt” piece, which are both part of the bodysuit. I made each piece for the waist, then came up with the design and heat-transferred most of it onto the fabric. For the parts I didn’t get, I hand-painted on. Same went for the back cape – which is hard to see in photos.
Robe: The robe I made using a pattern, using some lightweight jersey knit.
Accessories: The wig was one I already had – I cut apart a white wig and sewed wefts from it into the front of this one for the white stripe. The tiara was leftover gold leather.
The most frustrating thing of the whole process? My hard copy issue of the comic had different designs/colour on her outfit than the jpg I had downloaded online! No wonder I was confused at the beginning! I ended up leaning more towards the hard copy issue look. I really need to do some repairs and at least do a photoshoot with this one day….
2020 Construction:

So after Dragoncon 2007 I knew this thing needed some major work. I had wanted to do it right away, but kinda lost interest in the project and never did anything. And as a result, I never wore it again – I only wore for about 2 hours Friday night at Dragoncon 2007. No white backdrop shoot, nothing.
In early 2020 I was pulling out old costumes to put on my display form and photograph. I got this one out and as I was looking at it on the form, I realized… doing these updates now would NOT be hard. This would be minimal effort to update and make wearable again. So… new quarantine project.
I kept the original tiara and robe as they were – the wig I’d already updated a few years ago when I reused it for a Rogue costume. The bodysuit is where the bulk of the updates needed to be made.
First up, I decided to nix the whole “built in boots” concept. I took in the legs of the bodysuit to be more form fitting, and changed the shape at the bottom to essentially become stirrup pants that fit around the shape of the existing boot. This looked much better.
Next – I decided to build a new bodice. When I made this in 2007, I’d tried to make a soft faux bodice that was sewn onto the stretchy bodysuit (in non-stretchy material) with a velcro closure in the back to allow enough stretching for me to get into it. I mean, technically it worked but it didn’t look good. So I ripped off the old faux-bodice piece (not hard, it was only hand-sewn in place in a few spots). To replace, I decided to make a stand-alone bodice that could be worn over the bodysuit. The top of the bodysuit would still be visible, but the new bodice would sit on top of it, with a front lace-up closure that would be hidden under the “tie” piece. As you can see in the progress photos, this got quite far – in fact, I totally finished this bodice except for the swirl patterns.

Then I rethought it. I thought, why am I still relying on a very unreliable spandex bodysuit top? I scraped the first bodice and instead built a full coverage bodice, so I didn’t have to worry about the top of the bodysuit anymore – no more hoping it didn’t slip down/clear straps/what bra do I wear with it? I used my trusty Simplicity 5006 for the bodice, just edited to bring the bottom edge up higher along the hips. In order to give bodice #2 the same “look” as bodice #1, I would just place the swirl patterns on to mimic the placement of the smaller bodice #1. I hope that makes sense!
Speaking of the swirls, I drew them up in photoshop – inspired by Klimt’s Tree of Life – and printed them out on gold heat transfer vinyl on my silhouette. It took about 3 rolls to get enough for the bodice and skirt panel. I was worried about all the weeding I’d have to do but… it was fun!! I loved weeding these things! And the heat-transfer vinyl worked SO MUCH BETTER than the old heat-transfer printer paper I’d used on the 2007 version – firstly, it had a nice metallic sheen which was impossible to get with the printer paper. Secondly, I could go back over the vinyl I’d already laid down as long as I had the plastic protector sheet over it. I could NOT do that with the printer paper – I had a lot of gaps in the 2007 version where I just couldn’t get a design put right next to another or the iron would rip up what I’d already ironed on. And I ended up cutting up my last sheet of swirls into pieces and using them as filler in some areas to soften the hard edges. I was overall really happy with how this came out – and really glad I invested in the silhouette last year.
The skirt panel is just one large rectangle of white fabric – I pleated it along the top and originally I was going to try to sew it onto the back of the corset like I’d had it on the 2007 version and then realized, why am I stuck on this idea? Instead of trying to figure out how that would work, I just sewed a ribbon along the top of the skirt panel and tie it on around my waist before putting the bodice on. Works much better than trying to figure out to make that work with the lace-up back of the bodice.
Finally, I made a new “tie” piece for the front, out of some leftover jetset knit. I was going to keep my original brooch I’d used for the 2007 version, because I always liked it- but it’s not very Star Wars. My husband offered to 3D model something for me, and what he came up with I LOVE! He printed it, painted it up, and unfortunately for the photoshoot it’s only taped on because I didn’t have time for the backing I put on it to set. So I’ll get that finished up and sewn on permanently later.
History: Overall I’m super happy with the updates and really like how it turned out! It’s so nice to have this done and wearable finally!

(First row is photos of the 2007 progress/costume. Everything else is 2020.)


Please note that none of these costumes are for sale! This is my personal portfolio.
