Cinderella- 2015 Live Action Cinderella
Made for: Church Christmas Play, 2018
Background: This was an “inspired-by” version for our church’s Christmas play, December 2018.
Journal Entries: Read more at my Cinderella Peasant Dress
Related Costumes: Briar Rose, Village Belle 2012, Giselle

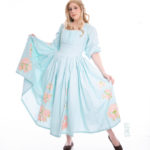
- White Backdrop
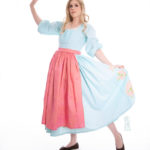
- White Backdrop
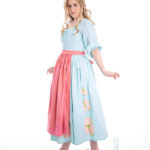
- White Backdrop


Patterns Used:
Simplicity 5041
Planning:
For the past few years my mom has directed our church’s Christmas play. I’ve only peripherally been involved previously, but this year she was directing a fairytale version of A Christmas Carol – ie, the Big Bad Wolf is Scrooge, Prince Charming & Cinderella are Mr and Mrs Cratchit, the Matchstick Girl is Tiny Tim, etc. As soon as my mom told me I’d be Cinderella, I decided to make a quick, inspired-by version of the live action “peasant” dress from the 2015 movie.
I finished it pretty quickly, and did a test run of it at the Ren Faire in October… and hated it! It looked awful. So I did some revisions before the actual play and it looked a bit better. I’ll get into all that shortly – I just wanted to note that a good chunk of time has passed since I made this and I’m just now writing these notes… I may miss some details! (My tag for this may have more info than I have here since I was writing those posts as I was making it!)
Dress:
I wasn’t going for a direct copy of the movie dress – that would have taken a bit more time and money than I had at the time! I ran by the fabric store right after auditions and picked up 8 yards of a light blue cotton with very small white polka dots. I really liked it! I got it prewashed and then dug through my patterns to find something that would work.

I ended up using Simplicity 5041 — which looked simple enough, only problem was the copy I had was the wrong sizes – too large. I figured I could work it down, no problem. I got my fabric cut and made a few changes – I eliminated 2 of the darts on the bodice, I cut all of the skirt pieces out using just the front panel piece (the side/back piece was way too wide for my fabric, I didn’t feel like refolding it, and they’re just big squares anyway. I cut 4 of front skirt panel for all of the panels.), took some of the width out of the sleeves, and skipped the facing and fully lined the bodice.
I added boning at the two front seams and side seams to keep things sturdy. The front panel is where I waffled. Initially I was just going to split it in half and do the upper part as a gathered panel – creating a sort-of a dirndl look. But the original has a that front panel as a fully smocked/pleated piece. My fabric was MUCH thicker than the original’s which would make doing that difficult, but I decided to give a try. So I made one panel of each look, posted pics on my instagram and had people vote. The vote was 100% for the half-gathered, and not for the more accurate fully-gathered.
So what did I do? I ignored instagram and went with the accurate fully-gathered, LOL. After I got the bodice assembled I realized it was still way too big despite working it down a bit before assembling, so I had to go back in and do some more darts, take it in where I could. Got the sleeves made and sewn in – just inserted elastic at the hem. Got the skirt gathered and attached to the bodice, trimmed and hemmed, and put a zipper in the back.

At that point it was basically done and wearable, but I wanted the roses from the original – so I got some fabric paint and painted rows of vertical roses on the skirt panels. They weren’t exact copies of the original but close enough to give you the idea.
So like I said above, I did a test run of the dress at our Ren Faire in October. I just wore my Dolores wig, since I didn’t have my wig for this yet, and had a lot of fun. I thought it was looking pretty good of it overall until I saw photos of it after the fact. It looked AWFUL on me, totally frumpy, and that big gathered panel in the front just added way too much bulk at my waist. And it was still too big overall.
So back to the drawing board. I took the skirt off the bodice, removed the gathered front panel. I cut the front panel in half, so I had the upper section to still use — made a new, flat, lower portion. I took it in at the waist some more, added another pair of darts to help force it in, and took the zipper out of the back and replaced it with eyelets (which also meant adding some boning back there to support them – I just made ribbon casing for those.)
The updated version looked MUCH better – it no longer “tented” in the front. It still has some problems, namely I think the waistline ended up being about an inch too high on me, but there was nothing left on the inside for me to be able to drop it down.

Accessories:
For the apron, I bought a yard of a brick-red cotton. Then I realized it wasn’t the right colour LOL. So I threw it in some bleach which turned it orange, then redyed it with some pink dye. Overall I was pretty happy with how the colour came out! I cut the yard into two pieces – one big rectangle for the main piece, leaving one long piece for the waistband. I cartridge pleated the top edge, and attached to the waistband.
The shoes were ones I had. The wig I bought online – I was originally going to style it back into a sort-of french twist, but it was so pretty I decided to leave it down. The shawl is just a yard of fabric I bought at Joann, pinned in the front.
History:
Overall, it’s not the most flattering thing I’ve ever made. But it was really fun to wear! (Lesson learned. Don’t start with a pattern 4 sizes too big. And also, apparently, listen to instagram polls.)
Despite wearing this a TON the past 2 weeks for practices and performances, I don’t have a lot of photos of it. Just a handful of iphone photos. Hoping that soon we can take some good photos of it, but I wanted to get this page up before I TOTALLY forgot how I made this LOL.


Please note that none of these costumes are for sale! This is my personal portfolio.


