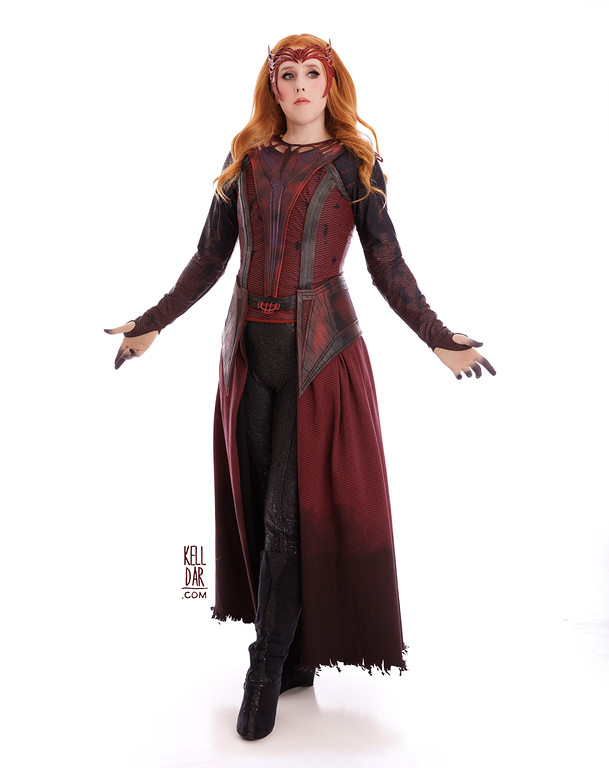
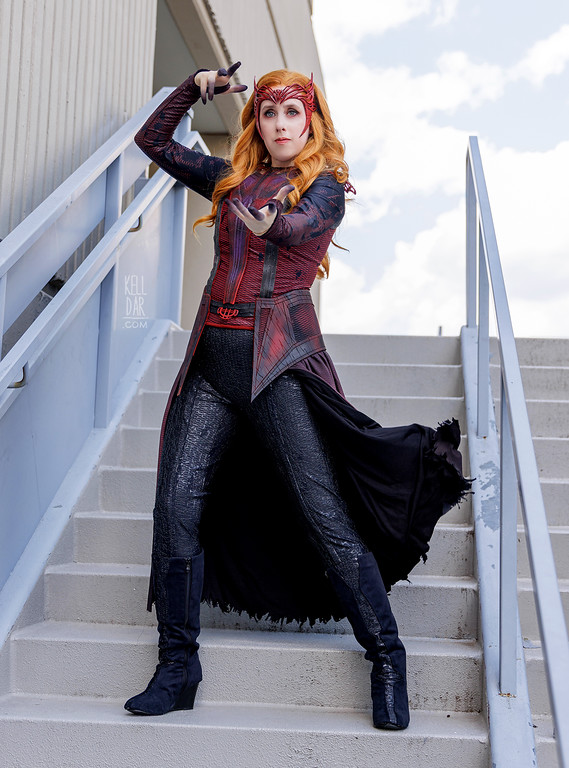
Scarlet Witch – (Multiverse of Madness)
Source: Doctor Strange & the Multiverse of Madness
Made for: Dragoncon 2025
Background: I wanted to make this as soon as I saw her new look!
Journal Entries: Read more at my MoM Scarlet Witch tag
Related Costumes: Scarlet Witch Wandavision, Scarlet Witch Comic Version, Scarlet Witch Disneybound
![]()
![]()
 Patterns Used: Kwiksew 2722 (pants – modified), Kwiksew 3502 (top – modified)
I love my Wandavision Scarlet Witch so much – one of my fav costumes I’ve done in the last few years, so of course when her new look for Multiverse of Madness dropped, I wanted to make it ASAP.
Chase got me some of the custom printed fabric for Christmas in 2022! And I did nothing with it for a few years. In late 2024 I decided it was time, with a goal of Dragoncon 2025 in mind – and I decided I needed more fabric, so I ordered more in prep. The fabric is from Parallel Life Studios – but let me go ahead and warn you get all you need at once! There was a colour difference between my 2022 and 2024 fabrics, which is not a Parallel Life Studios issue – you can’t expect dye lots to stay the same over 2 years. I skated by with 2 panels of the black for the boots/pants, and 3 for the bodice/shirt.
As luck would have it, in early 2025, I came across a fellow Wanda on facebook selling some MoM costume pieces. She sold me her front panel piece (we call it the “tuning fork”), hips panels, shoulder pieces, and a wig! It was a great deal and cut back on the workload for this costume significantly. Unfortunately I don’t know the provenance of these pieces. If you’re reading this and recognize them, let me know so I can credit them.
The Top:
 I built my bodice/top the same way I built my Wandavision version – I started with a duct tape dummy, cut it up to make a pattern, and constructed it out of black taffeta and cotton for the interior, with spiral steel boning. The outer layer is the Parallel Life Studios fabric of course. It was so great to have the front “tuning fork” already in hand so I get the top shaped right to fit under it – when I did my Wandavision version in 2021, I had to go back and edit the neckline at the last minute.
One thing to note about the PLS fabric is that it can’t be ironed. So I used a roller on all of the seams of the outer layer to make sure they laid flat, and snuck a few tacking stitches in there too. It all zips up the back.
I was so glad to be making a shirt for this version instead of gloves again! I modified a basic leotard pattern for this. To preserve my PLS fabric, I cut just enough to cover my chest, and then created an extension out of basic black spandex so that it wouldn’t ride up. I did the sleeves as normal sleeves, then patterned and added the thumb loop portion at the seam.
Pants:
I made the pants the same way I made my Wandavision pants – altering a bodysuit pattern that does not have a crotch seam! I cut the bodysuit pattern off around the lower bust, then just fold it over and add elastic. I used the PLS fabric for this, and added stirrups to the bottom to keep them in place when I put the boots on. I thought I was done with these pants and was pretty proud of myself for finishing them in one night. Then I was looking at my references and realized I’d missed the stripe up the front. Ugh! I made the stripes, and popped the seams of the pants open so they’d be easier to sew on, then sewed the pants closed again.
Skirt:
 I really brainstormed this skirt. I did not want to do HTV again, that was a nightmare with the Wandavision version. I decided the best course of action would be to create a repeat pattern and have it custom printed on a cotton knit – something that would be relatively heavy and drapey, but that I could dye the black gradients into. Went through a couple of swatch rounds to get the sizing right, and ordered a yard from 2 places, to see which I liked better. As of this writing, I’ve only received the spoonflower one, so that’s the one I went with for dragoncon. If I like the alternate one better, I may remake it after Dragoncon – because the skirt did not go together easily and I’d love to remake it.
So what went wrong? Well number 1, even though I got swatches, my brain did not register the fact that the wrong side would still be white. Which doesn’t work here. Of course I’d be doing the black gradient dyeing, but that would only be at the top and bottom. I tested out some fabric paint but it soaked through too much.
I decided what I’d do is make a lining layer of plain black knit, and I’d use some lightweight heat bond at the bottom to adhere the 2 layers together to do the tattering. I tested out the heatbond on a swatch and a scrap and adhered well without stiffening the fabric up too much.

Well, doing it in a larger scale did not work so well. I sewed the black lining layer to the spoonflower layer at the sides (right side to right side) and flipped it, then basted the top edge. I first ironed the heatbond onto the wrong side of the spoonflower layer, removed the backing, then carefully laid out the black lining layer over it to avoid any wrinkles, and ironed it down. It stuck great to the spoonflower layer. It pulled right off the black lining layer. Plus it stiffened up the fabric way more than I thought it would after testing it. So I googled ways to remove heatbond so I could get it off the spoonflower fabric and just leave them as 2 separate layers at the bottom. Someone suggested using brown paper bags, ironing them onto the glue and then pulling them away. This worked ok — in some cases the brown paper just became adhered to the heatbond and I had to wash and scrub it to get it off. But overall most of it came off. The inside is a MESS but at least they’re not stuck together and stiff anymore.
I dip dyed the top and bottom into some Rit Back to Black dye – worked great. Then I pleated it down to fit along the top, sewed it into a bias tape waistband and added a hook and eye. I put it on my dressform and cut up the bottom – though due to the nature of the fabric, couldn’t really get it to fray.
So when the other panel comes in, I may remake this, minus the heat bond travesty. Now that I know what to do. I also expect the other panel to be higher quality than this one, so I’ll update later.

The boots:
Oh, the boots.
I thought I could make these boot covers in a day. This was incorrect and I think this may have been the one thing over the dragoncon prep season that really broke me LOL
So I wanted the same boots I used for Wandavision Wanda, but they were no longer available. So I found something close. Once they arrived I did a plastic wrap/duct tape form of my leg in the boots to make a pattern. I cut that up to use as a pattern. So these boots have an inset of the PLS black fabric. Seems simple enough right? I used black faux suede for the rest of the boot cover, just like I did my Wandavision ones.
My first stab at putting the first one together, and I wasn’t happy with how the shapes weren’t lining up. The sides should be mirrored and they weren’t. So I started over. Then they didn’t fit the boot right. Had to make a new pattern piece for the back panel because it was too short. Then had to take up the back panel because now it was too big. Had to edit the front seams around the inset spandex piece because it wasn’t curving right. Then I couldn’t get the boot cover to adhere to the boot in anyway – sewing, double stick tape, e6000, none of it worked. Finally resorted to hot glue only to get towards the end and realized the damn thing still didn’t fit – it didn’t curve right. And I couldn’t fix it again because now the interior was covered in hot glue.
I worked on ONE BOOT COVER from 9AM to 8PM one Sunday. And at the end of all that? I had to just throw it away and start over.
Finally got something workable that fit right and finished them over the next 2 days. But so much drama. So much work. My permanent double stick tape DID work the second time around – now that it fit the curve of the shoe correctly.

The “hard parts”:
As I said at the top, I don’t know the provenance of the front panel, the hip panels or shoulder pieces. The front panel was very stiff and needed to be heat formed. I don’t love it. We got it as formed as possible but it just doesn’t conform like my softer Wandavision version. We plan to take it off and cast it in something flexibile in the future.
The hip panels are more rubbery – they had some velcro on them which I removed because it wants to snag on the PLS fabric. The other stripes on the bodice were 3d modeled, printed and cast by my husband.
I wanted to avoid gluing all of these pieces directly onto the bodice. I did that with the Wandavision one and firstly, the front panel has fallen off twice now. Secondly, the glue I used stained the fabric underneath, so everytime I have to reglue it, it doesn’t line up exactly and there are now imperfections around it on the fabric. So this time I decided we would glue fabric tubes to the edges of all of the pieces, and I would hand-sew them on. It was a pain in the ass but worth it, all of the panels are sturdy but removable if needed.
The shoulder pieces were heatformed, and my belt buckle and tiara were 3d printed from thingiverse files. Chase painted them.
Accessories:
The wig also came from my fellow Wanda! It’s so pretty and I was so glad to not have to shop for one. After wearing it at Dragoncon, I kinda think I want to thin it out a bit – as pretty as it is, it seems a little too thick. The darkened finger gloves came from amazon. I think that’s it for accessories?
History:
I’ve made a lot of costumes over the years. Obviously. This is the first time ever that I finally got to see the finished product on me in the hotel room mirror… and it made me a little verklempt. Like I legit teared up over it. Good feeling. I loved wearing this at Dragoncon and felt so cool. Little things you learn while wearing it and after seeing pics though – need to make sure I hold my chin up while wearing it, since that hard-formed front panel doesn’t completely conform to my chest correctly and makes me look like I have no neck. Hopefully won’t be a problem once we recast it.
![]()


![]()


Please note that none of these costumes are for sale! This is my personal portfolio.