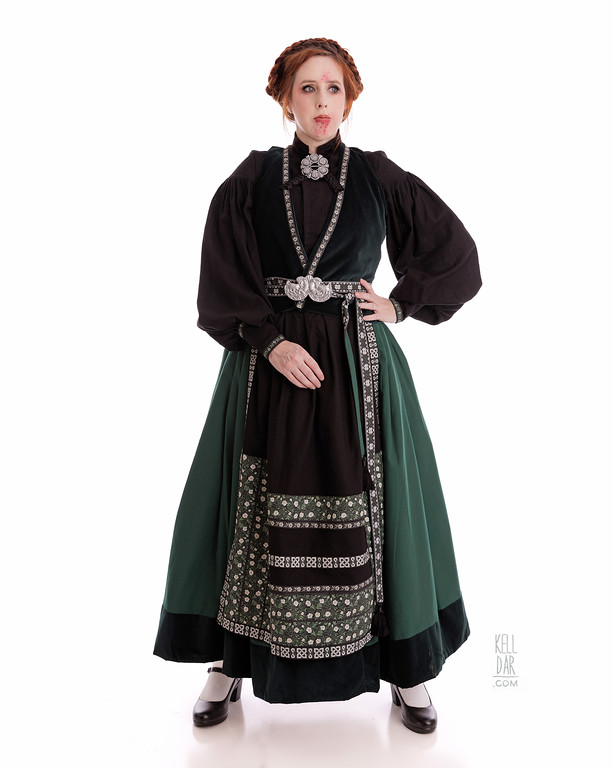
Lorne – Ceremonial Dress
Source: Severance
Made for: Dragoncon 2025
Background: I’m obsessed with this show and was looking for a costume to make from it. Nothing was really “costume-y” enough for me until I saw Lorne’s dress in the season 2 finale episode.
Journal Entries: Read more at my Lorne tag
![]()

![]()
 Patterns Used: Butterick B4954 (top), Simplicity 4443 (sleeve)
So Chase watched season 1 of Severance on his own and loved it. He kept telling me to watch it too, that he thinks I’d really like it, and he’d rewatch it with me if I would. I gave in and… he was right, I was obsessed. Season 2 came along and we watched it together. Of course the whole time I’m thinking “what costume could I do?” but nothing was really “costume-y” enough for me. Until the season 2 finale when Lorne (Gwendoline Christie’s character) shows up in that very traditional-looking dress for the sacrifice. And then beats the shit out of Mr Drummond and saves Emile! I was obsessed and started gathering references the very next day.
This was a hard one to research because there’s really not a very good “all together” shot in the show, close-ups were blurry, and the colour grading made it hard to tell what was what. Thankfully I found some behind the scenes shots that showed what colours things actually were.
For fabrics I used a black linen for the top (with black cotton as the lining – trying to keep things as breathable as possible!), a green velveteen for the vest and lower half of the skirt (leftover from my 18th century Belle library dress), green poly lining for the vest lining layer, green cotton for the upper part of the skirt, and I flat-lined the skirt panels with some basic white cotton culled from some sheets. And then a yard of custom spoonflower fabric for the trim.
Patterning:
 For the top, I used the Butterick pattern noted above. This is the same pattern I modified for Jane, but I think it was overall more useful here. Just a simple, fitted open-front bodice with a collar. I cut it off just below the waistline to shorten it (originally I had planned to attach the skirt to the top to make it one piece, but didn’t – I’ll get to that later). I also added an overlapping panel in the front for the closure.
When I went to get the collar part of this pattern out – it was missing. This is something that happens regularly with collar pieces for me… I have a hard time wrapping my brain around the actual size of my neck, so if I try to pattern a collar piece on my own, it’s inevitably way wrong and I have to go through multiple pattern and mockup pieces to get it right. So it’s easier to just grab a collar panel from an existing pattern and start there. Problem is, I find one I like, take it out of the pattern bag, and never put it back. So I had to dig around and find another similar collar pattern to use here. Did I put it back when I was done? Probably not.
Anyway, I copied the basic torso pieces over to some craft paper, along with the collar. For the sleeves, I used the Padme look-a-like Simplicity pattern – I used these sleeves for my Liberty Dies dress and they worked great, and this looked similar. I made up my own sleeve cap pattern piece, widened the sleeve as much as possible, and changed the shape of the cuff a bit.
For the skirt I didn’t use a pattern; it’s just big rectangles pleated down to fit. For the vest, I used an 80s pattern that I apparently don’t have a photo of in my pattern archive – it was just a basic women’s fitted vest pattern. I did do a mockup here, even though this was super simple – I just didn’t have a lot of that green velveteen left, so I needed to make sure it was right. I did some adjustments to the mockup then copied that over to craft paper to use as a pattern.
 The Top:
I got the basic top pieces cut out of black cotton and did some fit adjustments here. Once I’d done that, I cut my outer linen pieces out to match. I used the black cotton layer as lining, sewing it together at the front panels. The little front panel/overlap is interfaced, and I stitched it down to the lining at the seam to keep it steady.
The collar is constructed the same way, outer layer of linen, interfacing and cotton lining. The collar pattern piece didn’t work right out of the box. It was too long. So I trimmed it down and tried again – and now it was too short. So i made a new one. This one worked ok. Got that sewn into place on the top, then closed up the inside edge by hand.
For the sleeve caps, they are lightly interfaced and also lined in cotton. I had to adjust them a bit from my pattern – my pattern was a little too big/long. The actual sleeve piece is just one large rectangle of the linen – I pleated it down to fit onto the sleeve cap, then sewed up the inside seam.
Cuffs are made the same way as collar, linen layer, interfacing, cotton lining. Pleated the sleeve down to fit. I did try to do actual button holes here – I found some nice vintage buttons in my stash I thought would like nice. My machine wouldn’t do the button hole correctly in my tests, so after about five minutes I gave up and sewed on snaps. I don’t have the patience for that.
For the shirt closure, I sewed on some black snap tape from my stash. It’s not perfect but it mostly won’t be seen thanks the vest and other accessories. It’s functional. I got that pinned on and put it on pause while I did the skirt, because as I mentioned above, I had wanted to just sew the skirt onto the top and make it all one dress.
 Well I experimented with that. Got the skirt pleated down and pinned onto the top – and did not like it. The weight of the skirt pulling on the top just made it look weird. And even though you wouldn’t really see any of that because of the vest, I decided to scrap the idea and make them two pieces. This wasn’t ideal, because if I’d planned to do this from the beginning, I would’ve made the top longer. But oh well. I closed up the bottom of the shirt, and then tested out the snap closures. It was a little too big on the sides, so I opened it up again and took it up, closed it up again. Fit better now. Got the snap tape sewed on and the top was finished.
Skirt:
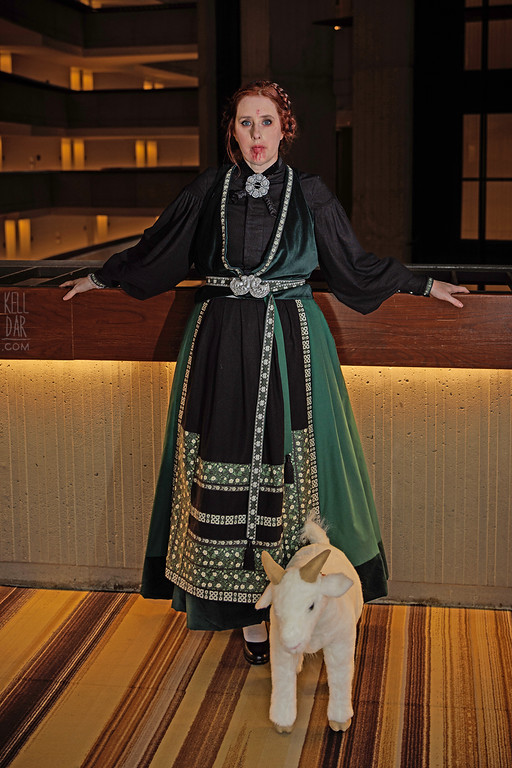
Originally I had thought the skirt was also black. (And the vest too. I thought the whole thing was black until I noticed in some close-ups the vest looked more green.) Thankfully I found those behind the scenes shots that confirmed the skirt and vest are both GREEN!
The cotton I ordered for the skirt came in and was just a little thinner than I expected. It just didn’t hang the way I wanted, and it especially wasn’t going to look right over my small petticoat. I had a few cotton sheets I’d gotten from the secondhand store to use for mockups, so I decided to use one of those for a lining layer.
But first, I needed to add the stripe to each skirt panel. I cut each skirt panel to where it would be around mid-shin length. Then I cut what was left of my green velveteen into strips, and sewed that onto the bottom of each skirt panel. Thankfully I had JUST enough of this velveteen to do those strips and the vest! I had nothing left!
Once each panel was complete, I flatlined each panel using the cotton sheets. That gave this fabric the weight and thickness it needed to sit right. I sewed all of the panels together (french seams so no fraying fabric visible), and then got all pleated down to fit my waist.
 As I mentioned in the top section, originally I was going to sew the skirt directly to the top to make it into a one-piece dress. But that didn’t work, so that changed the way I needed to finish the top of the skirt and closures. I went back and opened up the back seam to add a zipper (dyed to match), and I made a basic waistband out of scrap black cotton, with a hook and eye closure. I made the waistband a little taller than I normally would, just to create a little extra coverage since my top was shorter than I planned.
Once all that was done, I hemmed the skirt by hand.
I’ll include the apron in this section – it’s just a square of the black linen from my top, hemmed on the sides, pleated at the top, and I sewed it onto a ribbon that just ties on at the top under the vest.
Vest:
I had scraps of about a yard of this green velveteen leftover from my 18th century Library Belle. As I said in my pattern section above, I did a mockup for the vest to MAKE SURE it was right before cutting my fabric, because I did not have enough to recut if I messed up.
So I did a mockup out of scrap fabric, made fit adjustments there, and then made pattern pieces from that. Got my velveteen panels cut, and used some green lining fabric for the interior. Tried the outer piece on, and felt like it did need a few more adjustments – took it in a little at the waist, lowered the back neck, cut the sleeve opening in closer to the neck. Did those same adjustments to the lining layer, then sewed the outer layer and lining layer together at the interior front/neck and lower hem, leaving a pocket at the lower center back for flipping it. Closed that part and the sleeve openings by hand. Added a snap at the front for a closure – might need another, will figure that out when I’m able to try it on with the belt.
I did realize a few weeks after finishing the vest that the back of my neck opening is not shaped correctly, but I’m not fixing it. It’s fine as it is. It’s in the back! Who cares. LOL
 Trim:
Trim:
By my count, there’s 5 (5!) different green/black/white trims (or floral fabrics used as trims) on this costume. I knew there was no way I could find 5 similar trims in the same colours and it all look cohesive. So I decided to just make them myself.
I took the best references I could find, and drew them up in photoshop. There’s a lot of guesswork here so they aren’t 100%, but close enough to get the vibes right. Once I had them basically drawn, I used the parametric filters in Photoshop Beta to give them an embroidered/stitched look – there’s a whole embroidery filter where you can adjust stitch length and everything! So cool!
Once all 5 were drawn I put them all together on one big file and uploaded that to spoonflower. Got a swatch on their cotton twill. First swatch the sizing wasn’t right, so I adjusted and did a second swatch. Second swatch was good! Got a yard ordered.
Once my yard arrived, I cut each “trim” section out. I gave myself a gutter on either side, enough room to fold it over and press it to give it a clean edge. I do wish I’d given myself a bigger “gutter” because in some cases I didn’t have a lot to work with! But it was do-able.
 For the small trim on the cuffs, I cut that trim out, pressed the edges down, then hand-sewed it onto the cuffs at the top and bottom of the cuff. I did this by hand and it was probably the most annoying part of this, just because the opening was small and it was a fiddly area to work with.
I did the same with the vest trim, pressed the excess down, and then hand-sewed it onto the vest. I probably could have machine sewed this but I was worried about it messing up the velveteen nap if I messed up and needed to move it.
Obviously the biggest chunk of the trim went on the apron. I cut out all of my pieces and layered them on. For these, I machine-basted the edges down and then machine-sewed them onto the apron. It’s so busy I felt like the machine-sewn stitches being visible was fine here. I did end up with the designs coming up higher than they should have – I should have put the apron on me and marked where they went to, but I eyeballed it and it ended up being wrong. Oh well, it still gives the same effect.
Lastly was the long waist tie piece – I linked 3 cuts of that trim together, so it was 3 yards long, and then sewed an equal length of leftover green cotton from the skirt to it to make a tube. I tried to use my tube turner but it was too long! I ended up punching a hole through the end of it trying to get it to work! Oops. So I had to turn it by hand and that was a pain. But thankfully it did end up too long so I was able to cut that segment with the hole off. I finished the edges by hand, and added a little bead at the end to make the tassel.
 Accessories:
The brooches were from etsy seller Woodenstihl! I thought we were going to have to make these ourselves and I did not have the best references, especially for the one at the neck. Thank god for Woodenstihl, I was able to just buy these. We bought the unpainted versions and Chase painted them silver for me.
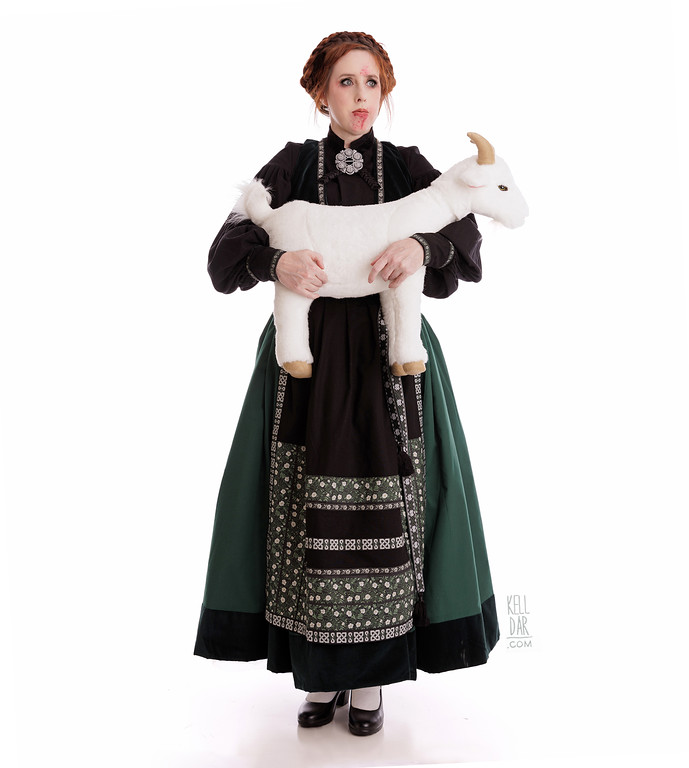
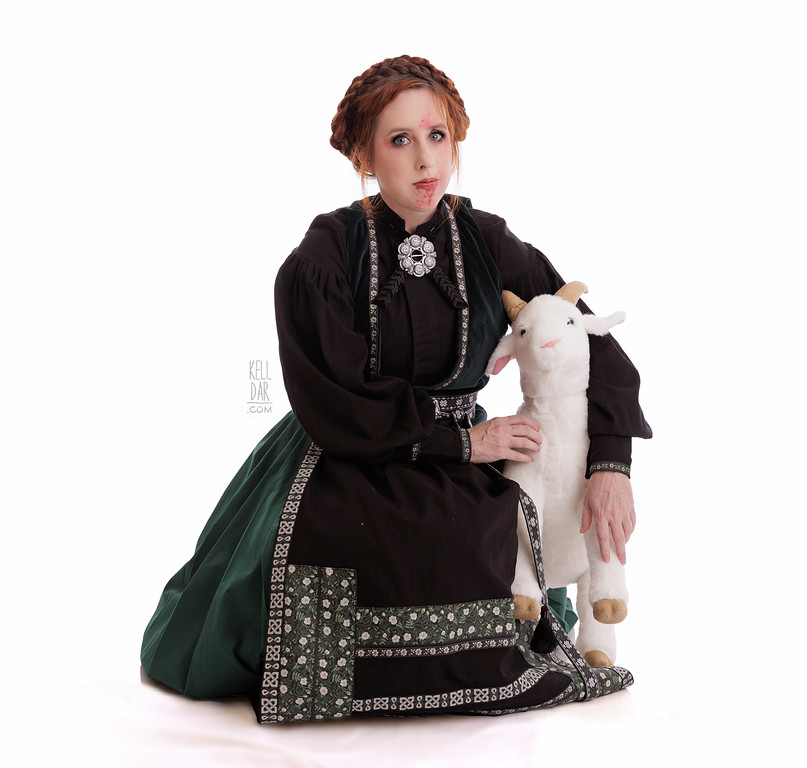
I have 2 Emiles. “Baby” Emile was just a little stuffed goat I bought online, I ripped the back seam open and sewed in a pocket and some snap closures, and used the excess ribbon from my belt to make a strap – now he’s my little purse! Unfortunately he was too small for me to fit my phone in, but I can carry my glasses and badge ribbons in there, and have the strap to attach my badge to. “Big” Emile was from amazon and thankfully I got him for half off his normal price, otherwise I wouldn’t have pulled the trigger because I couldn’t justify the full price for a stuffed goat LOL
For the bow at the neck, I got some black velvet ribbon and some black leaf trim. I’m just hand-sewing the leaf trim on. I could’ve embroidered this but didn’t feel like it, hand-tacking the trim on is easier. I still need to add a closure on this, for my preview photos it was just pinned on. (I also used the same black ribbon through my braids to tie them up onto my head.)
For shoes, I got a pair at the thrift store that looked great. And they were Clarks so I knew they’d be comfy! However they didn’t have a size marked on them. The area on the inside where it would be printed was worn off. I held it up to my foot and it looked similar so I got them. Came home and tried them on and they must be like a size 10 and I wear a size 7 LOL So not even close! They were fine for a photoshoot where I was standing still, but for Dragoncon I bought a new pair.
History:
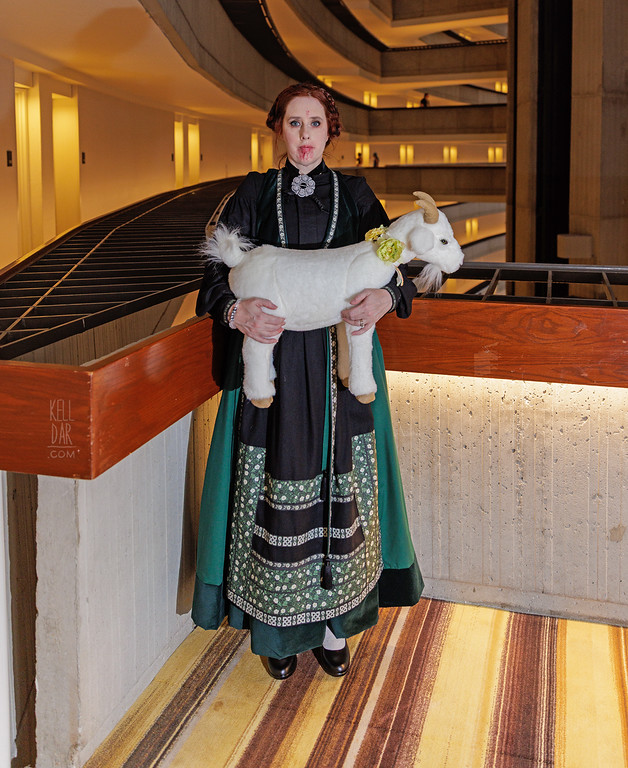
This was so much fun to wear at Dragoncon! The Severance photoshoot was especially fun. Overall I was happy with how the costume wore — I only did the blood and heeled shoes for the shoot. When I rewore it later it in the weekend, I skipped the blood and wore flats. One other change I made — when I did my test photos earlier in the summer, I thought my own hair worked fine. And then I struggled with it at Dragoncon, even though I brought an extra braid bump to help! It just looked too small and flat. Probably because by Friday afternoon my hair had already been in wigs for hours LOL. So when I rewore it Saturday, I got out one of my regular Leia extensions, braided it, and used that (with my own braids tucked underneath). It wasn’t 100% but the size and silhouette was much better. I’ll have to figure out something for photoshoot in the future. I may just keep going with the Leia braid – most comfortable and cheapest option.
![]()


![]()


Please note that none of these costumes are for sale! This is my personal portfolio.