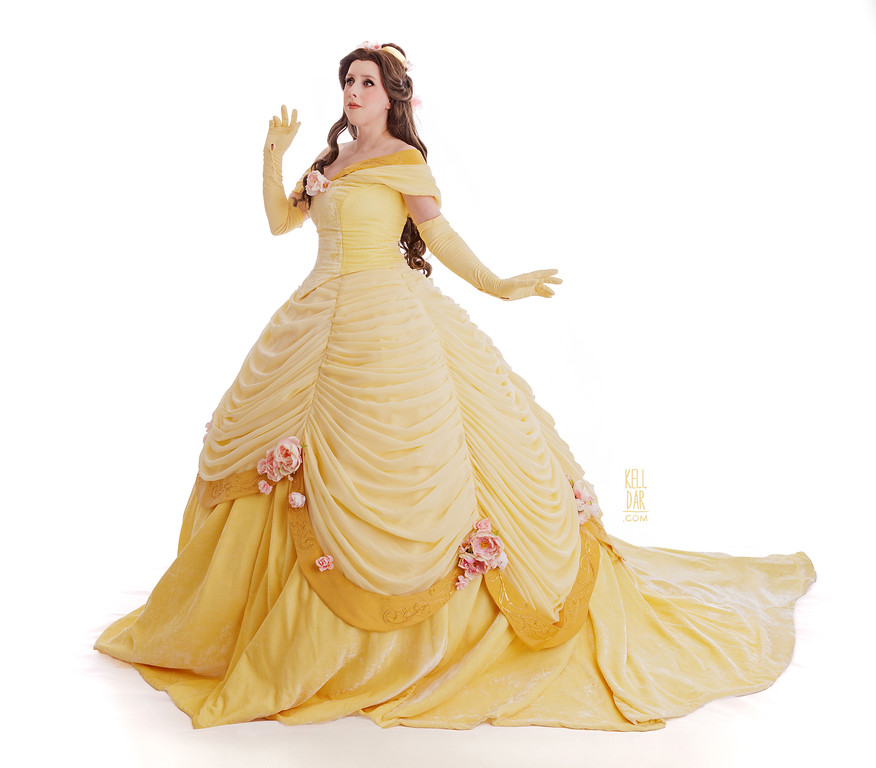
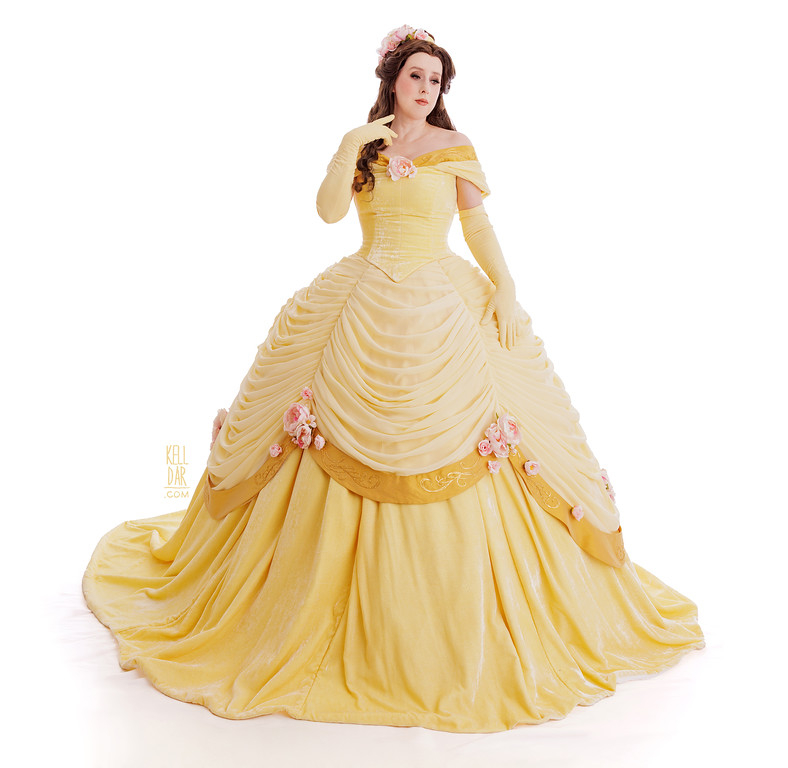
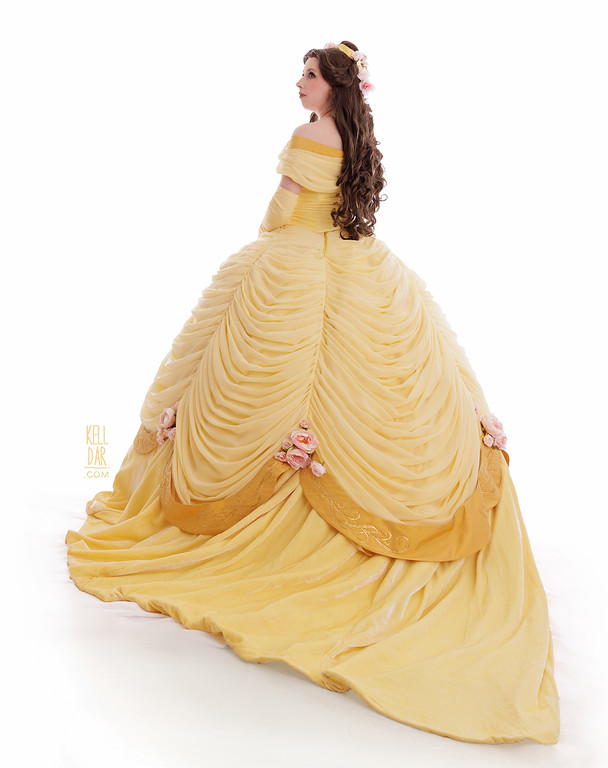
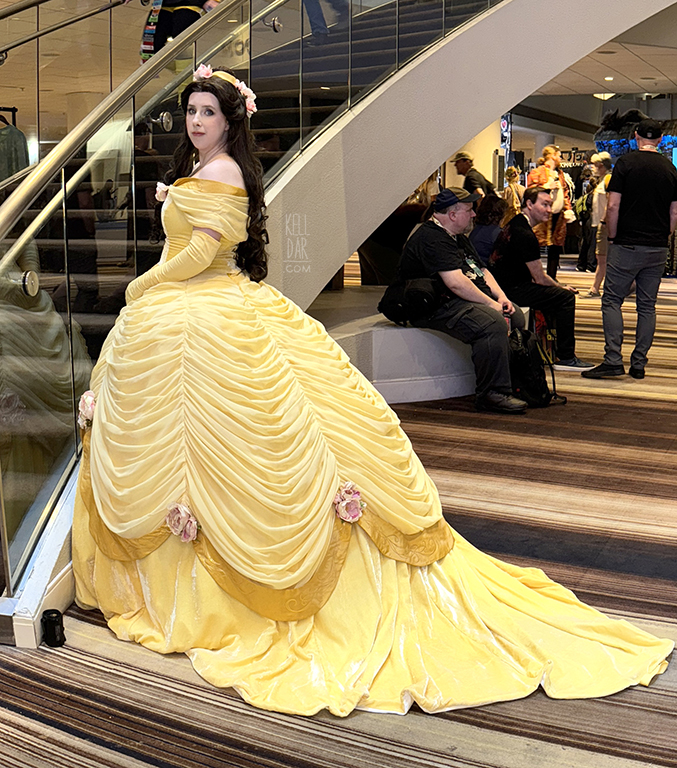
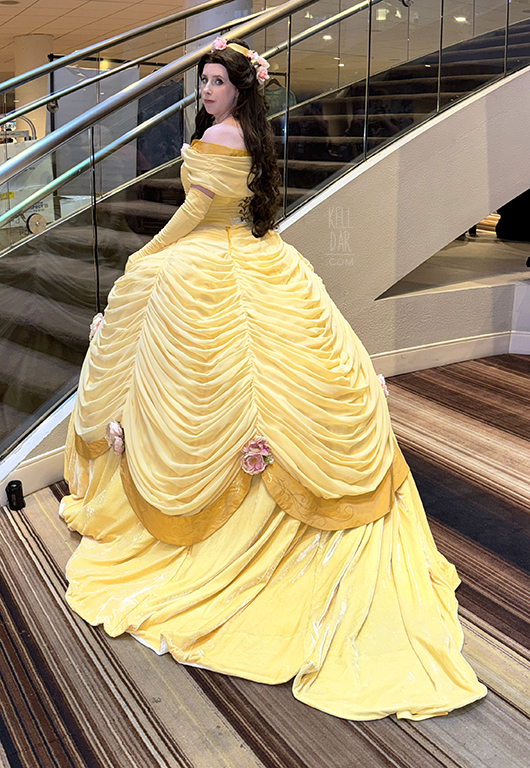
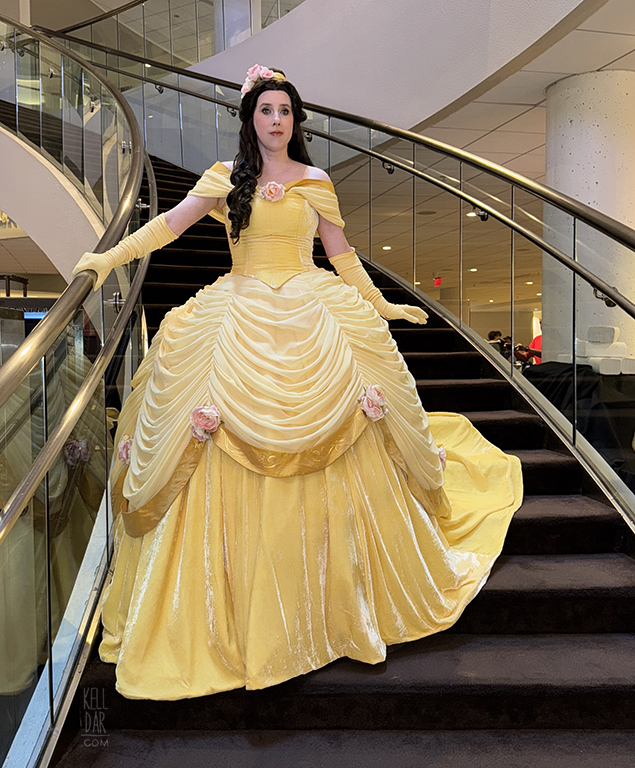
Belle’s Ballgown – 2025 Version
Source: Beauty and the Beast
Made for: Dragoncon 2025
Background: I’ve been saying for over a decade that I’m going to do a 3rd Belle ballgown – finally got around to it.
Journal Entries: Read more at my Belle version 3 tag
Related Costumes: Belle Ballgown 2005, Belle’s Ballgown 2012
![]()

![]()
 Patterns Used: Butterick 6195 (top), Truly Victorian’s Elliptical Hoopskirt
I made my first version of Belle’s ballgown in 2005, and I felt like it was a pretty straight-forward, true-to-the-movie interpretation. In 2012 I made a second one, where I let myself have a little more fun with the design elements and do my own interpretation. Since 2012 I’ve had so many ideas floating around my head for a version 3, but could never nail down exactly what I wanted to do. A straight historical interpretation? Pure fantasy? Go overboard with embellishments? I couldn’t decide. Finally for Dragoncon 2025 I decided it was time to do it, whether I had my ideas solidified or not, because it was the 20th anniversary of my first one!
Fabric/Dyeing:
In January it became apparent that between the upcoming death of Joann and tariffs, I was going to have to make a decision on my direction soon in terms of fabric.
After a lot of thought I decided that I wanted my inspiration to be sort of 1860s inspired for the silhouette, and to be very floral – not in terms of a floral print fabric, but of looking like a flower, and I wanted the “opulence” of the costume to show through in the fabrics and not the embellishments. So with that in mind, I decided I wanted a silk velvet for the base of the bodice and skirt, and silk chiffon for the swags. Yall know I’m a sucker for those fabrics anyway so not really any big surprise!
 Finding a already dyed silk velvet proved way too far outside of my budget, so I got white from Dharma Trading (along with the silk chiffon) to dye myself. I got 12 yards of chiffon and 10 of velvet and I used EVERY BIT. It sat in my office for a couple of months before I finally worked up the courage to dye it all.
I really had not wanted to dye something so substantial this year, but to save a ton of money, I’ll drag the kiddie pool out LOL. I did a mix of RIT yellows with a touch of pink for some warmth. The pink ended up being a pain in the butt — I think my bottle of it was really old and it did not dissolve correctly, because I ended up with some pink spots in places. I worked around them as best I could.
At first I wasn’t completely sold on the colour, I felt like it was a touch too saturated than what I had in mind, but after living with it in my sewing room draped over a dressform, I did eventually decide it was perfectly in line with my “floral” goal – the yellow silk velvet looks like a soft yellow rose. Ah I’m obsessed.
For my ancillary fabrics, I got a TON of old cotton king size bedsheets for $2 a pop at a secondhand store for lining things. This saved me a LOT of money vs buying new yardage. I did also buy some matching yellow cotton locally for lining the bodice, swags and making the waistband.
One of the last major things I bought at Joann – 60 yards of a “copper” tulle for petticoats. I was going to buy all 100 yards they had but their “going out of business sale” wasn’t much of a sale LOL
Last major fabric purchase was a some silk taffeta from Silk Baron in shade “renewal.” This was for the swags – I wanted something a little “harder” to contrast the softness of the chiffon and velvet. I’ll get more into this later, because I did end up dyeing it.

Under-things (Part 1):
All of my old “round” hoopskirts have bit the dust. The newer one I made for Liberty Dies Padme in 2021 wasn’t quite the right shape, but a couple of years ago I bought a big round 5 hoop skirt on amazon just to have for shooting some of my older costumes on the dressform. I had planned to use that for this project – it was essentially the big, round shape I wanted, though I also wanted a little bit more “poof” in the back – I figured I could achieve this with petticoats, especially since I had so much tulle.
So with that amazon hoopskirt on the dressform I started making petticoats. First I made a basic cotton petticoat out of the bedsheets I bought, pleating it at the waist and adding a bias tape waistband. Once I had it hemmed, I started adding tulle. I cut long strips in half, then folded that in half again and started pleating it around the cotton petticoat along the bottom. Once I had it pinned on the way I wanted, I hand-sewed it into place. Then I did 2 more tiers moving up the skirt.
After I had the lower half fully covered in pleated tulle, I started working up the back portion to get the longer back silhouette I wanted. I added more tiers up the pleated tulle up the back building out the shape. I also made a second petticoat that is 2 layers of all tulle, gathered at the top to fit my waist and closes with a snap.
I got out my old Snow White skirt to try on over the petticoats to check the shape. I was happy with the tulle petticoats overall, but I wasn’t getting the extension in the back I wanted. I dug out a piece of quilted cotton leftover from Tightrope Walker, and tried to see if I needed to make a separate bustle piece. When I pinned this onto the petticoat, it caused the whole hoopskirt to shift forward awkwardly.
At that point, I decided to put a pause on the petticoats and move onto the skirt. I felt like I needed to see what the heavy velvet skirt was going to do on this hoopskirt.

Skirt:
Since I only had 10 yards of this dyed silk velvet I wanted to be realllly careful and make sure I knew what I was doing before cutting into it. I used the bedsheets I bought to do a mock-up of the skirt. There are 8 panels – center front and center back, 2 side fronts, 2 sides, and 2 side backs. Each panel gets longer as it moves back – I wanted as much train as I could manage. It always seems like when I want a really long train it ends up shorter than I wanted, so I went all out.
Once I had a cotton version of the skirt panels cut and pinned onto the dressform, I cleaned up the panel shapes a little bit, labeled them, and then moved them over to the velvet to use as patterns for cutting.
Cutting out the velvet was a work out! I cut each panel individually and it was a lot of crawling around on the floor. I was sore by the time I was done! Once I had them all cut, I laid out each velvet panel with its corresponding cotton layer, getting them laid out as perfectly as I could, and laid on the floor for several nights hand-basting the velvet layer to its cotton layer to flatline each piece. I felt like the silk velvet needed this to have the body to lay the way I wanted over the hoops/petticoats.
Once each skirt panel was flat-lined, it was time to sew it all together. I did each seam as a french seam so the inside would be clean, and as I added more panels, I had to have Chase come help me hold up the weight of it while I worked each seam through the machine – it was getting heavy!!
I left the side back seam partially open for an eventual zipper, and got it all pleated down at the top to fit my waist. At this point it was time to try it on with the hoopskirt and petticoats. Aaaaand the weight of the skirt completely collapsed the cheap little amazon hoopskirt LOL I was trying to walk around in it and the hoopskirt was just moving like an amoeba.

Under-Things, Part 2:
So, back to the drawing board. I was going to need an entirely new base to build everything off of! To be honest I was panicking at this point a bit, because I was already getting behind schedule for Dragoncon projects, and having to dedicate time and budget to building a new hoopskirt was NOT in my plans.
But I had no other choice, if it was going to look the way I wanted, I had to buckle down and do it. I decided to use Truly Victorian’s elliptical hoopskirt pattern, since that would give me that back silhouette I wanted from the start. I ordered hooping and other supplies and thankfully it all came quickly.
Couple of deviations I had to make – I bought a thinner hoop than the pattern called for because it was cheaper. And I originally bought hoop casing on amazon, but when it arrived, my hooping would not fit into it. It would go in about an inch and no further. Ugh! I didn’t have time to search for and order something else, so I said forget it, I’ll make the hoop casing out of bias tape. At this point, Joann was gone, so I headed to Michael’s, only to discover Michael’s doesn’t carry bias tape in store. I had a crash out in the car, and in desperation went to Super Walmart… who thankfully DID have bias tape. I had to get 2 different colours, but I was able to get it home and get the hoopskirt finished that day. It’s not all that pretty, but it’s functional. I used a scrap piece of leather belting from Honeymoon Leia for the belt at the top (I tried to use a ribbon at first but quickly realized why the pattern calls for a belt – the ribbon dug into my waist uncomfortably, the leather belting was much better.)
So now with the new hoopskirt finished, I put my skirt on it and… cue another crash out. The silhouette was still not what I wanted. It was far too small from the front.
 So I sulked for a few minutes, then got up and put my 18th century panniers (with the interior ribbons untied) over the top of the elliptical hoopskirt. Is wearing 2 hoopskirts on top of each other ideal? No. Does it work? Sure does.
With that settled, I had to rehem the cotton petticoat to fit the new shape, but beyond that it all worked fine with the new set-up.
Skirt, Part Two:
So back to the skirt – I got the skirt set-up on the dressform with both hoops and petticoats. Now it was time to figure out the chiffon swags.
I started out by doing a mockup of a basic shape of the center front swag out of my cotton bedsheets. Once I had that close enough in terms of width, I used that as a pattern to cut my chiffon – I cut the chiffon piece a little longer. I used that cotton pattern as a basic guide for the rest as well – I cut the side front panels about 15 inches longer than the front one, then the side back panels about 15 inches longer than that, and the center back probably about 20 inches longer than that. Each panel also got a little wider as it went down just by virtue of being longer.
Once I had each panel cut, I pleated the edges to the length I wanted, pinning them into place. Once I had them pinned, I basted the pleats into place, then moved onto the next panel and pleated it to fit onto the previous panel. Did that all the way around, then sewed all the panels together with a french seam. (I did one backwards too. Pain in the butt to undo and fix!)
 I used some yellow ribbons at each seam just to give it a little more structure and stability – hand-sewed it into each seam and the ribbon is anchored into the waistband. Finished the edges of the swags by hand.
Once the swags were all done, I sewed it along the top, and got an interfaced cotton waistband added, and the zipper sewn in.
For hemming the whole thing, I trimmed a little off the length in the front, then folded it up twice and hemmed it all by hand. I did it on the dressform, with the hem propped up on a pillow and just moved my way around it!
For the final silk taffeta swags at the bottom of the chiffon, I started by making cotton versions to fit the shape of the bottom of the chiffon pieces, then used that to cut my taffeta and a cotton lining layer.
I got the first couple made and pinned on… and did not like the colour anymore. Even though I’d agonized over multiple swatches and felt I picked the one that went best with my other colours. As pretty as this taffeta was, it just read as BROWN against my other yellows, not gold. At this point it was only about 3 weeks out from Dragoncon and I did not have time to go swatch hunting again. So I took a scrap of the taffeta and threw it in some yellow dye… and thankfully that worked. That gave it a more saturated golden yellow tone. So I dyed the rest of the fabric and got back to work.
Got each swag made, pressed and embellished (which I’ll get to in a later segment), and hand-sewn onto the ribbon “spines” of the swags. I also made 3 hand-loops on the skirt out of the yellow ribbon so I can pick it all up for easier movement.
 Bodice:
There’s not a lot to say about the bodice, because I used the exact same pattern I’ve used for my other 2 Belles and not a lot of deviations here! I’ve always liked the shape of my other 2 bodices which is why I wanted to carry it over here.
It has a canvas interior, cotton lining, and the outer layer of silk velvet. I did not flat-line the velvet bodice pieces like I did the skirt, but I wish I had – it would’ve been a lot easier to deal with. But I got the interior strength layers sewn together and boning added, and only then discovered that my machine was having tension issues and all of the seams on the cotton lining layer were loose. I did not want to take it all apart and fix it, so I re-inforced them by hand and called it a day!
The velvet layer I basted together first, then machine sewed. I got the velvet layer sewn onto the strength layer, flipped right side out, and added grommets to the back and a basic yellow satin modesty panel.
I did think about adding some kind of embellishment to the front of the bodice, but decided to leave it plain and focus on the shoulder drape/swags. I had saved sooo many 18th century bertha inspiration pics for this and had narrowed down what I wanted to do. I wanted to do a little puff sleeve of the velvet with some pleated chiffon trim and a base “bertha” out of the taffeta with velvet and chiffon trim embellishments. Like this is where I wanted to put the bulk of the “fanciness” of the costume.
But I was running up close to Dragoncon. I got the base of the “bertha” made – started with scrap cotton again to get the shape right, cut it out of my taffeta with a cotton lining layer. Got that pinned on and just kinda vibed with the simplicity of it. I did want to tie the chiffon swags in here too, so I made another drapey piece (out of my LAST decent size piece of the chiffon) that fit just under the taffeta piece.
And I decided that’s how I would leave it. I do have one decent size square of the velvet left, and some long thin strips of the chiffon if I do ever want to make the little puff sleeves as a removable element. Dunno that I ever will, but I think I have enough materials if I do.
 Embellishments:
So my plan was to embroider all of the taffeta swags. I wanted to design an art nouveau vine motif, and do the embroidery in couched goldwork. I ordered the supplies, and once I had the swags made, I laid them out, traced the basic shape onto paper, and started sketching up ideas. Once I settled on something I liked, I took a photo of it, brought it into photoshop and refined it.
But, I was running out of time. My Padme costume was taking longer than expected, and I was still helping Chase and my mom with their projects. I realized I was not going to have time to do this embroidery.
So I tested out a piece of gold HTV on a scrap of the taffeta – and I actually liked how it looked. It was really similar to the colour of my taffeta, so it wasn’t super obvious – but it glowed when hit with light.
I laid out each swag on the floor with a measuring tape pinned on so I could get the sizing right, took a photo of each one as flat as possible, and brought them into photoshop. I got the photo sized to match the measuring tape, then brought my vine design in and edited it to fit the shape of each individual swag.
Got the HTV cut and ironed on. I only had one mishap – the design I did for the shoulder piece was slightly too big. So I had to recut it a tad smaller – but those 2 pieces that were too big ended up working on Chase’s Beast vest perfectly!
So yeah all of my designs on the swags are just HTV — but I figure, now I’ve got my vine design on each swag and I can use that as a guide for when I have time to do the embroidery later! And I do plan to – I didn’t buy all that gold thread for nothing. (And I did – continue reading below!)
 Accessories:
I did not want to buy another pair of cheap costume opera gloves. I wanted something that looked a little nicer, and then I remembered my grandma gave me a pair of vintage opera gloves yeaaars ago. They had some stains on them (looked like some lipstick stains?), but they are beautiful, non-stretch white gloves with little tiny buttons at the wrist. Perfect! I dug them out, and soaked them in some oxi-clean to get as much of the stains out as possible, then dyed them to match my fabric. They turned out great.
I planned to just wear my 2012 shoes with this, but when I got them out they were soooo stiff. At the last minute I wore my pink Lucy character shoes with it instead. I decided character shoes would be much more comfortable, and having straps would be easier to deal with. I knew the skirt was going to be a LOT so I needed to make the shoes easier.
For the hair, as is usual with all 3 of my Belle costumes, I wanted a softer more natural looking version of her hair style, not the park look. The wig is an Arda – I recurled it, built up the front “bangs” and made the bun out of a little sock of fabric stuffed with batting and covered in matching extensions. Sewed the bun in place, and added some of my yellow ribbon around it. Also it is their lacefront that has the widows’ peak – but I feel like in photos you can barely see the widows’ peak? I really don’t want to have to go in and remove more hair to make it bigger and have to restyle it.
 All of the roses I bought at the craft store. For the roses in my hair, I glued them to barrettes so I can rearrange and move them around as I want. For the roses on the skirt, I cut the bottom “peg” off, glued them together and sewed them onto a felt base, then sewed that onto the ribbon spine of the skirt swags.
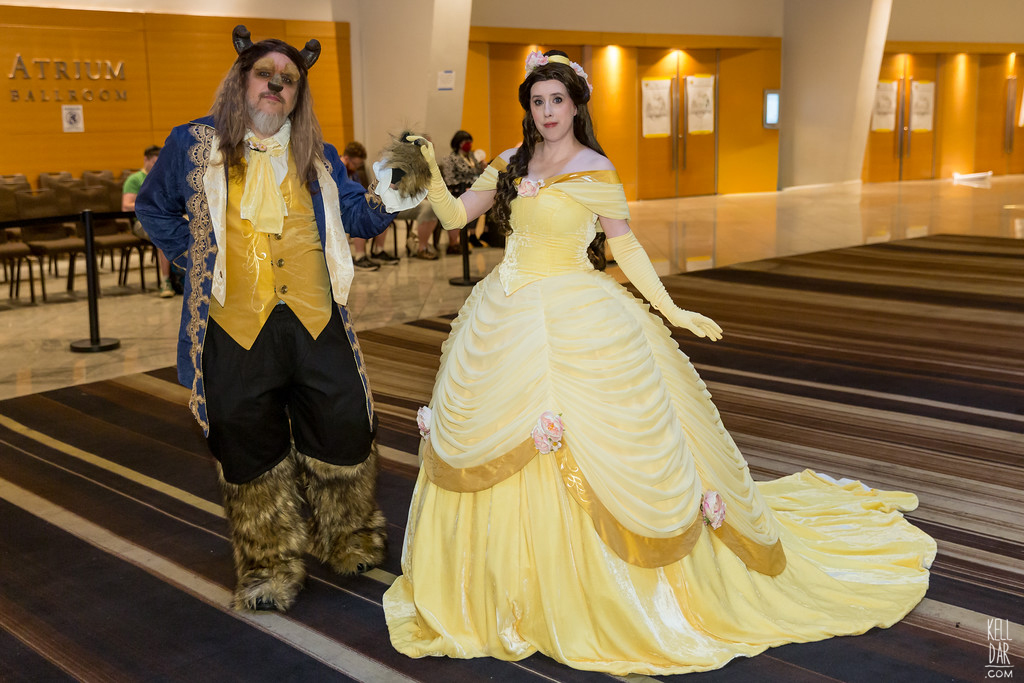
Beast:
Chase did a Beast costume to match me – we decided to do a more theatrical take on it rather than a version with a big mask or something like we were attempting in 2012.
I bought fabric to make his jacket. However Dragoncon was fast approaching, and I still had a TON to do, so I told Chase, see if you can find a jacket that looks decent. He searched and found a really nice one that wasn’t all that expensive?? Thank goodness! So we bought the jacket. Didn’t do anything to it.
The shirt shirt is his Laszlo shirt. The vest I made out of my leftover silk taffeta, added the rose buttons and the HTV design. I made the cravat out of a scrap of my velvet. The pants he bought and I modified to fit. He made the legs and curved them in fur, and he also covered some shoes and gloves in fur. He made the facial appliances and horns. Originally he was going to make a tail too, but at the last minute we left it off because it was literally like the last thing we still needed to do the weekend before dragoncon and we were just tired LOL
 Embroidery:
I DID get around to doing the swag embroidery after dragoncon. I removed the swags (and roses) from the skirt, and then sat and outlined the vine motifs with my gold couching floss. I used a plain yellow thread to do the couching. I definitely got better at it as I went!
It took a few weeks but once I got them finished, I sewed them all back onto the skirt spines, and then got the roses re-attached – I decided I needed more roses, so I went and bought a few more and got them sewn on also. Overall really happy with the effect and it looks much more how I wanted it in my head than just the htv.
History:
Overall I feel like I achieved my inspiration goals here. Some of the details weren’t quite what I envisioned but I am very happy with what it grew into as I worked on.
Wearing it was interesting. All of the weight of the (very heavy) skirts and hoops is directly on my lower back, so after an hour I was getting uncomfortable. Getting close to hour 2 I was done. BUT seeing it in photos after I was SO happy with how it looked I can forgive the pain LOL
One nitpick I have is the bodice fit. I’ve noticed some of my other bodice doing this before but they develop a weird bump at the side back – but only one side. I’d really love to dig in and figure out why that is. I think I have a fix to keep it from happening (hook and eye on interior bodice to skirt waistband) but I’d also just like to know why?? LOL. Also need to get new shoes so I’m not wearing shoes that say “Lucy Ricardo” on the bottom!
![]()


![]()

![]()

Please note that none of these costumes are for sale! This is my personal portfolio.