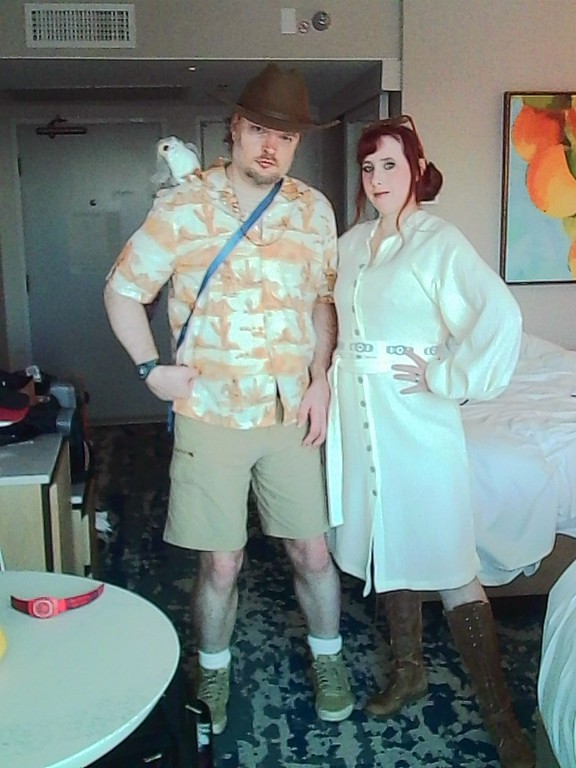
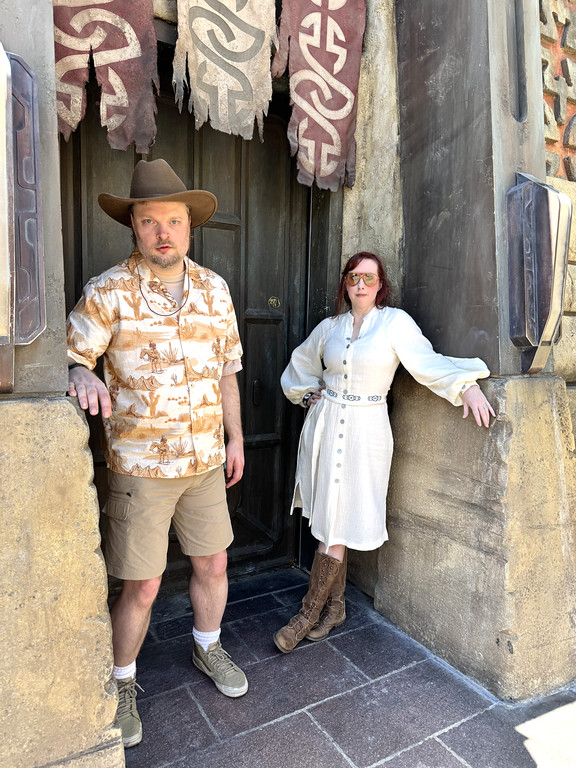
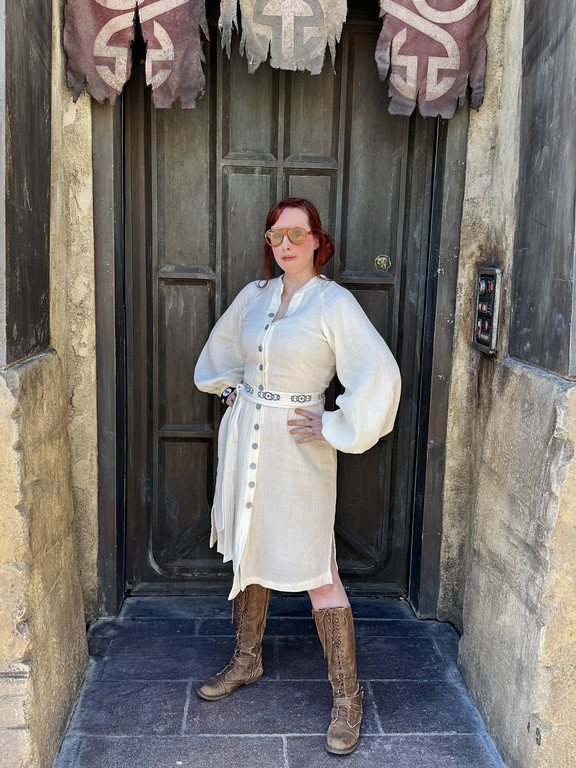
Princess Leia – my 3rd Disneybound version
Source: Star Wars
Made for: Disney Trip 2026
Journal Entries: Read more at my leia disneybound tag
Related Costumes: Disneybound Princess Leia 2, Disneybound Princess Leia 1


![]()
 Patterns Used: Mood Fabrics’ “Tundra” Dress Pattern
Pattern/Fabric:
So Mood puts out these free downloadable patterns pretty regularly, and I have a stash of them saved on my computer. Never used one until I saw the “Tundra” pattern and thought – that would make a great “inspired by” Leia dress. They link the fabric they used in the sample project for the pattern, and they had the same fabric in white (a double cotton gauze) so I ordered that and decided this would be a great project for our next disney trip. I wanted to do a Leia disneybound project that wasn’t so “on the nose” and costume-y as my second version was – I wanted something I could wear as a regular dress elsewhere and not have it be clocked as Leia.
Plus, it had a great desert or western vibe to it – which fit perfectly with the khaki western button up I’d bought for Kevin to wear on our next disney trip. The two put together as a Luke and Leia bound gave a great “space western” theme – or as Ash called it, “Yeehaw Skywalkers”!
I did read some comments from people saying that the free Mood patterns aren’t great, so I went into working on this dress with that mindset – but after printing it, taping it together and holding it up, it seemed fine? Maybe a little long? Spoiler alert: it was not fine.
Dress:
 I had expected this to be a weekend project, because it seemed super simple. I got the fabric cut and the sleeves assembled first. I changed the cuffs – I split them down the side so I could put a snap on to make them tighter, and encased the raw edge of the sleeve inside the lining layer of the cuff.
I also did french seams everywhere I could since this fabric was so sheer. It would all be for naught, though, as I had to do major alterations towards the end and it was quicker to just nix the french seams.
I moved onto the dress panels, folding over the front edge for the button placket. I got the sleeves pinned on, and then I kinda vaguely pinned pleats into the collar area to get an idea of how it was fitting and tried it on… omg it was huge!!
Like I don’t mean it was a LITTLE big big, it was enormous. I cut it out to a medium, but this must have been a medium intended for a 6.5ft tall woman! It was so long it was dragging on the floor behind me! The pockets were nearly to my knees, the the bottom of the armscye was below my waist.
I decided easiest thing to do would be to shorten it from the top, that way it would pull the armscye and pockets back into place. I removed about 2.5 – 3in from the top and then tried it on again. Better. So I got the sleeves sewn in, then gathered the top edge.
 I tried it on again, and it looked… like a nightgown. But I figure once I get the belt made it would look better. Got the collar pieces interfaced and attached and sewed snaps down the front so I could put it on. (I hate buttons, so my buttons will be fake with snaps underneath)
Belt:
So finally around to the belt! I wanted to embroider designs onto it, so I used the belt pattern piece but cut it extra wide so it would fit onto my embroidery machine hoop. I picked out a sort of art deco, southwestern-y design on etsy I liked and bought it… only to realise it was just SLIGHTLY too big for my hoop, so I couldn’t use it. Back to the drawing board. Found another I liked ok, it was a little more swirly-celtic-y than I wanted but it was pretty and it fit my hoop, so I went with that.
Got a new roll of stabilizer and got started. Been a while since I used the machine so it took some practice at getting them placed right. Started at center back and then moved right, and then left. Each one took about 21 minutes, so I spent a Saturday babysitting the machine. Some of them got slightly misaligned but nothing egregious. I wanted to do 8 total. I got 7 done, and started the 8th…. and the bobbin thread got caught and wadded up the fabric and tore a big hole into fabric before I could catch it. Like literally I saw it going bad but couldn’t move fast enough to stop it before it was ruined.
 So I just cut that off and decided I’d live with 7 motifs instead of 8. I cut a new piece for the end of the belt and joined at the end, got interfacing ironed on and the belt finished up.
And… I hated it. I just felt like it was too big? The belt was too tall on me and the motifs were too big – it was just out of proportion. And when I put it all on, I just felt like I was wearing a bathrobe.
Back to the drawing board. I decided I needed to make a new belt that was smaller and had a smaller motif. I went looking on etsy for another option, and thankfully I kept digging long enough to find this perfect file from GreenGirlEmbroidery – the size was perfect, it had the southwestern-y art-deco-y vibe I wanted, and I feel like it looks way more like Leia’s conchos than any of the other ones I had.
Best part is this one was only a 7 minute job on the machine so it didn’t take nearly as long. Worst part is I didn’t have a big enough piece of fabric left to do it all on one, so each motif is on its on scrap of fabric and then I joined them all together. I didn’t love the joins but it did make it easier to make sure they’re all spaced correctly. I used the rest of the scraps to make the long ends – I made the belt longer this time than the first, I thought that might help it seem like less of a bathrobe tie.
Got the embroidery done, belt assembled, interfaced and turned, I liked this much better.
 Accessories/Alterations:
My shoes came in – I wanted something kinda espadrille-like but not a heel, and I found these white stacked Toms that I thought would be perfect. Chase 3d modeled and printed buttons with rebel symbols on them for me – I got those painted and started sewing them on.
I did a try on of everything including the bun style I wanted to do… and I hated it.
The dress was FRUMPY. The shoes were giving nurse shoes. I was ready to scrap the whole project and just take my 2nd Disneybound Leia instead. First thing I did was to take it up through the side seams – which meant I lost almost of all of the width that would’ve allowed this to look loose and flowy, but it did help it not look so dowdy on me. I lost my french seams in doing this because I wasn’t about to redo that, oh well! (Oh, and I should mention – I removed the pockets really early on. They just bulged out funny and were not cute. I figured I wouldn’t use them much anyway because the fabric is so light – if I put my phone in them it as gonna make the whole thing sag)
I tried it on with different shoes. Different ways of tying the belt. I could not put my finger on what was making me hate it so much – why it made me look so frumpy dumpy. I posted a video of it and me talking through it all on my IG to get some feedback, and that’s what helped me realize a big issue.
 Basically, at that point, I’d taken it up everywhere, through the side seams, shortening it at the top and the bottom (it was originally ankle length but I decided to shorten it a little more). But that sleeve connection and upper part of the dress was still the original width of the pattern, which meant it was huge.
Reluctantly, I unpicked the front seam connecting the sleeve to the dress and took the collar off (because unpicking anything on this fabric was a NIGHTMARE) and then pinned it removing all of the excess fabric that was previously gathered through the front panel and front of the sleeve. I ended taking about 4 inches out of the very top and tapering it down through the sleeve seam. Once again losing my loose flowy-ness, but it looked SO much better on me with that fabric removed. So I did that on the other side as well.
I had to cut a new collar piece after that because the collar was shot – like I said, unpicking anything on this fabric was a nightmare, and the collar was a mess. I angled my scissors towards the collar when unpicking, because if I was going to cut a hole anywhere by accident, I’d rather it be on the smaller collar piece I could replace, than the dress panels! Glad I did because yep, collar was shot after that. I had just enough to cut a new one, so I did and got that attached. It all looked SO much better.
Next problem? All that manipulation through there had stretched out the fabric along the front edge. At least, that’s my assumption, because after it was all finished and the collar back on, the fabric was “slumping” right under the collar like it was suddenly too long. I took the collar off again, only at the front, and angled it down to eat up as much of that as I could. It helped – it still slumps, but not as bad as before.
 Finished getting my buttons sewn on and reinforced my snaps. Dress was officially done and I was ok with it. Didn’t LOVE it, but it was miles better than it was before.
Now for shoes? I decided an old pair of brown pleather boots I had looked cute with them, and I also ordered a pair of brown sandals that give ewok village vibes. I just decided white shoes looked weird and brown worked better. I packed both the sandals and the boots, and ended up wearing the boots all day. I did have the sandals in our park bag in a locker in case I needed to change, but the boots were surprisingly comfortable all day!
History:
I wanted to use this section as a word of warning on the Mood Fabrics free patterns – go in prepared for it to fit like crap and do a mockup before cutting your real fabric, save yourself the headache LOL I don’t know that I’ll ever use another one!
But, this was fun to wear at Disney. I don’t LOVE it, I think my 2nd disneybound looks cuter on me and is more fun to wear at the parks. I’m not sure how many people “got” the concept that we were Luke and Leia bounding, but we had fun so that’s all that matters.
![]()


Please note that none of these costumes are for sale! This is my personal portfolio.